
In solar photovoltaic (PV) projects, the quality of solar panels directly determines system performance, reliability, and lifespan. Even minor defects in PV modules can significantly impact solar electricity generation, increase maintenance needs, and raise overall solar installation charges.
For EPC (Engineering, Procurement, and Construction) professionals, conducting thorough damage inspection and quality checks of PV modules is a critical step before installation. Identifying defects early helps avoid costly replacements and ensures optimal system efficiency.
Proper inspection and quality assurance are essential for successful renewable solar installations.
This blog provides a complete guide to PV module damage inspection and quality checks, helping installers maintain high standards and optimize solar panel system cost.
Why PV Module Inspection is Important
Solar panels are sensitive components that can be damaged during:
- Transportation
- Unpacking
- Storage
- Handling
Undetected damage can lead to:
- Reduced solar electricity generation
- Hotspots and overheating
- System failure
- Increased solar energy installation cost
Proper inspection ensures long-term performance and reliability.
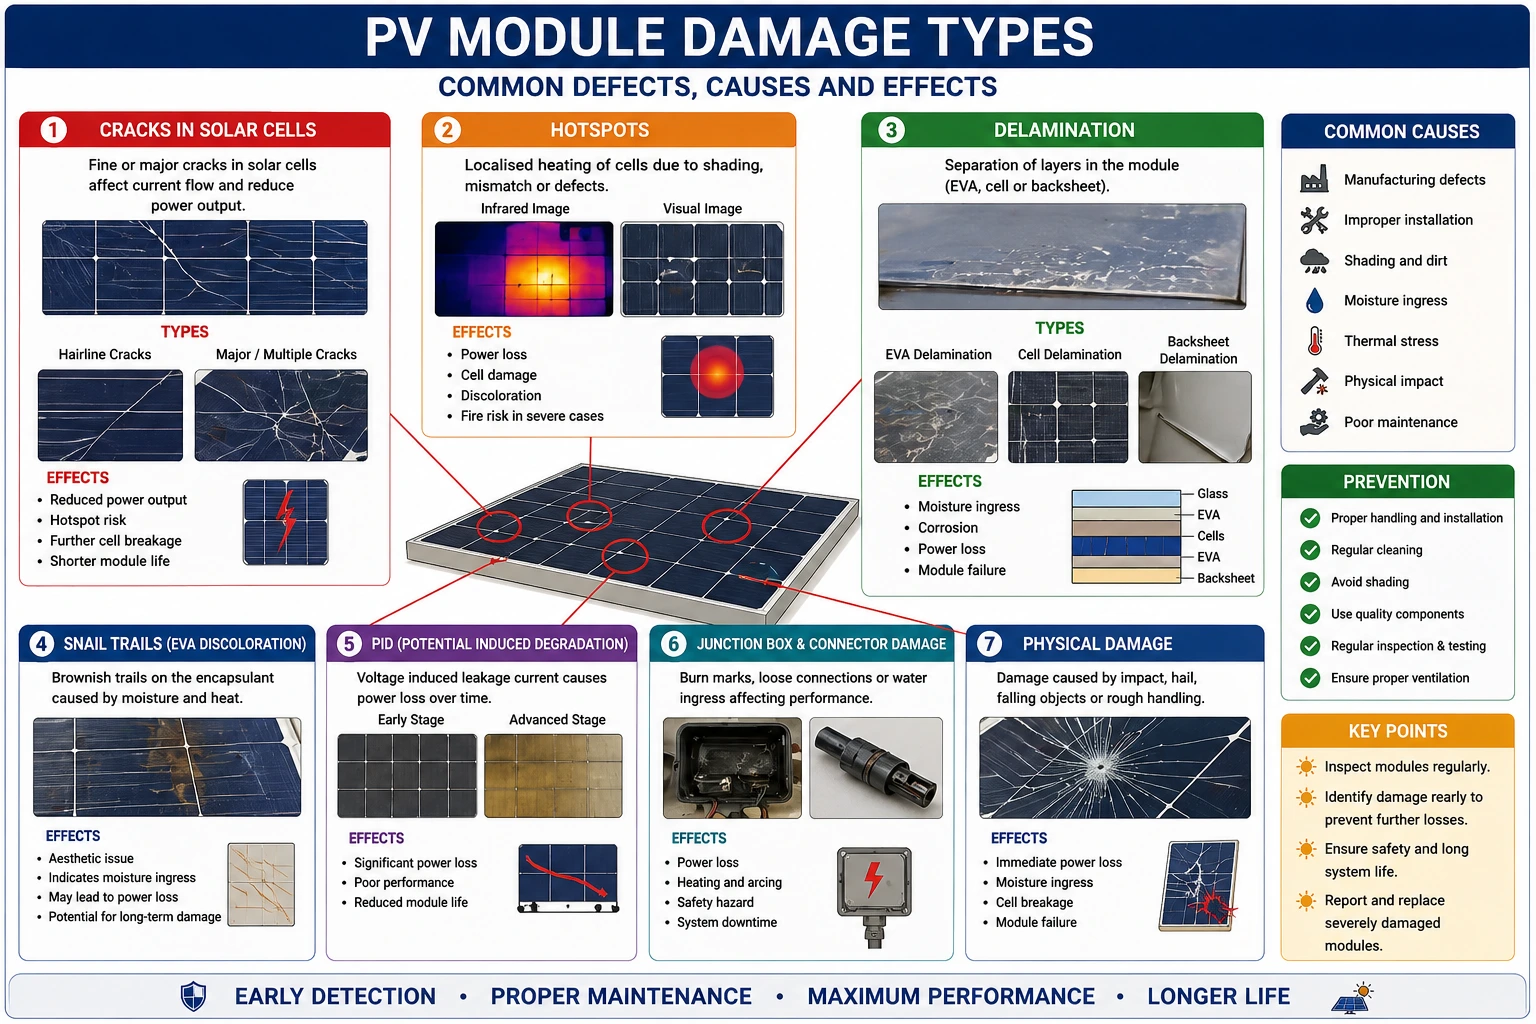
Types of PV Module Damage
1. Micro-Cracks
- Invisible cracks in solar cells
- Reduce efficiency over time
2. Glass Breakage
- Visible cracks on the panel surface
- Compromises durability
3. Frame Damage
- Bent or damaged aluminum frame
- Affects mounting and alignment
4. Delamination
- Separation of layers within the module
- Reduces performance
5. Hotspots
- Localized overheating areas
- Can cause permanent damage
6. Junction Box Issues
- Loose connections
- Damaged wiring
Stages of Inspection
1. Pre-Delivery Inspection
- Verify manufacturer quality
- Check certifications
2. Delivery Inspection
- Inspect packaging
- Check for transport damage
3. Site Inspection
- Inspect panels after unpacking
- Perform visual and technical checks
Step-by-Step Inspection Process
Step 1 – Visual Inspection
Check for:
- Cracks on glass
- Scratches
- Frame damage
- Discoloration
Step 2 – Check Label and Specifications
Verify:
- Module rating
- Serial number
- Manufacturer details
Step 3 – Electrical Testing
- Measure open-circuit voltage (Voc)
- Check short-circuit current (Isc)
Step 4 – Check Junction Box
- Inspect connectors and cables
- Ensure proper sealing
Step 5 – Infrared (IR) Testing
- Detect hotspots
- Identify hidden defects
Step 6 – Electroluminescence (EL) Testing (if available)
- Detect micro-cracks
- Identify internal defects
Step 7 – Documentation
- Record inspection results
- Report damaged modules
Tools and Equipment Required
- Multimeter
- IR camera
- EL testing equipment
- Visual inspection checklist
Quality Check Parameters
1. Electrical Performance
Ensure output matches specifications.
2. Physical Condition
No visible damage or defects.
3. Structural Integrity
Frame and glass must be intact.
4. Connector Quality
Ensure proper electrical connections.
5. Compliance with Standards
Modules should meet quality certifications.
Conclusion
PV module inspection and quality checks are critical steps in solar PV projects that ensure system reliability, efficiency, and durability. By conducting thorough inspections and following best practices, EPC professionals can prevent damage-related losses and improve overall system performance.
Quality assurance is a key aspect of successful renewable solar installations. Additionally, compliance with standards set by the Ministry of New and Renewable Energy ensures safety and reliability.
With proper inspection practices, solar professionals can optimize solar panel system cost, enhance solar electricity generation, and contribute to sustainable solar energy for home use and large-scale renewable solar solutions.
FAQs
Q1. Why is PV module inspection important?
Ans: It ensures modules are free from defects and perform efficiently.
Q2. What are common types of PV module damage?
Ans: Micro-cracks, glass breakage, frame damage, and hotspots.
Q3. What tools are used for inspection?
Ans: Multimeter, IR camera, and EL testing equipment.
Q4. How does inspection affect solar panel system cost?
Ans: It reduces replacement and maintenance costs.
Q5. Can damaged modules be used?
Ans: No, damaged modules should be replaced to ensure system performance.

Solar Savings Made Simple: Know Your Cost Cuts in 2025
Maximize your solar savings in 2025. Learn how solar energy reduces electricity costs for homes and businesses.
Solar Energy Myths vs. Facts: What You Should Know
Solar power myths often mislead homeowners. Learn the facts about cost, efficiency, and reliability of solar energy.
Should You Switch to Solar in India? Complete Guide
India has become a hot-selling solar market and people are interested in installing solar systems in their homes as well as in industries and factories.
How to Choose Solar Panel Mounting Structures for Home, Industry & Commercial Installations
Choosing the right mounting structure is crucial for solar panel efficiency and durability. This blog explains various types of mounting structures for residential, industrial, and commercial solar installations, including rooftop, ground-mounted, and hybrid systems, to help you make an informed decision.

Sun Path Diagram for a Specific Location and Time: Solar Installer Guide
Earthing and lightning protection are critical safety components in solar PV installations. This guide explains their importance, types, components, and best practices for solar installers.
How to Check Equipment Location for Solar PV Systems
A complete guide to battery bank enclosure and rack installation, including site verification, setup procedures, and safety practices for solar PV systems.
Fall Protection for Solar PV Systems
A complete guide to inspecting and installing fall protection systems for solar PV projects, helping protect workers during rooftop installation, maintenance, and other work at height.
1 MW Solar Plant Cost in Haryana | A Complete Guide
Planning a 1 MW solar power plant in Haryana? This guide covers complete 2025 cost details, subsidy schemes, ROI, and savings potential for industrial users.