
Roof hook installation is a critical step in sloped rooftop solar systems, especially for tile roofs commonly used in residential buildings. These hooks act as the primary anchoring interface between the roof structure and the solar mounting rails, ensuring stability, safety, and long-term performance.
Improper installation of roof hooks can lead to structural damage, water leakage, reduced solar electricity generation, and increased solar installation charges. Precision in mounting and anchoring is essential for reliable renewable solar systems.
This blog provides a complete step-by-step guide to installing roof hooks for solar panels, aligned with best practices and training standards.
What are Roof Hooks in Solar PV Systems?
Roof hooks are metal brackets fixed to the roof’s structural members (rafters), used to support mounting rails and solar panels.
They are commonly used in:
- Tile roof installations
- Sloped residential rooftops
Importance of Proper Roof Hook Installation
Correct installation ensures:
- Strong structural support
- Resistance to wind uplift
- Leak-proof roofing
- Long system lifespan
- Efficient solar electricity generation
Improper installation increases solar energy installation cost and maintenance issues.
Types of Roof Hooks
1. Standard Roof Hooks
- Used for basic tile roofs
- Fixed directly to rafters
2. Adjustable Roof Hooks
- Adjustable height for uneven roofs
3. Heavy-Duty Roof Hooks
- Used in high wind load areas
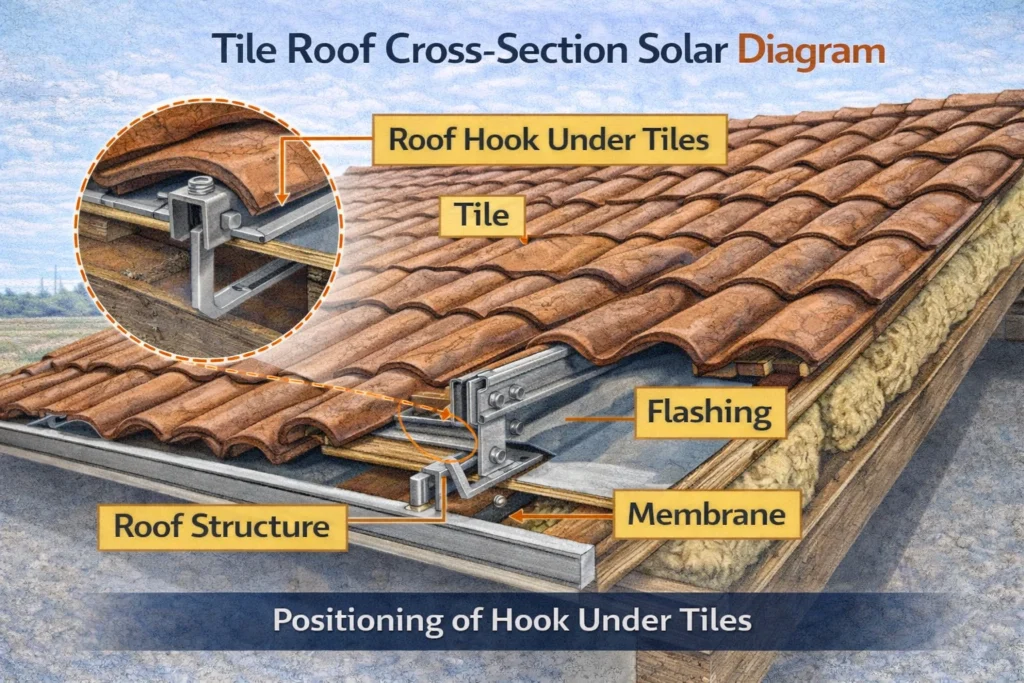
Step-by-Step Installation Process
Step 1 – Site Assessment
Evaluate:
- Roof type and condition
- Structural strength
- Rafter positions
Step 2 – Mark Rafter Locations
- Identify rafters under tiles
- Mark positions for hook installation
Step 3 – Remove Roof Tiles
- Carefully lift tiles
- Avoid breaking or damaging them
Step 4 – Position Roof Hooks
- Place hooks over rafters
- Ensure proper alignment
Step 5 – Fix Hooks to Rafters
- Drill pilot holes
- Secure hooks using screws or bolts
Step 6 – Adjust Hook Height
- Ensure proper clearance for tiles
- Maintain uniform height
Step 7 – Reinstall Roof Tiles
- Place tiles back carefully
- Ensure proper fit around hooks
Step 8 – Apply Waterproofing
- Use sealants and flashing
- Prevent water leakage
Step 9 – Install Mounting Rails
- Attach rails to roof hooks
- Ensure alignment and spacing
Step 10 – Final Inspection
- Check alignment and stability
- Verify waterproofing
Waterproofing Techniques
1. Flashing Installation
Prevents water ingress around hooks.
2. Sealants
Seal drilled holes and joints.
3. Proper Tile Placement
Ensures natural water flow.
Quality Checks
1. Alignment Check
- Ensure hooks are aligned in a straight line.
2. Tightness of Fasteners
- Verify proper torque application.
3. Waterproofing Inspection
- Check for gaps or leaks.
4. Structural Stability
- Ensure hooks are firmly fixed.
Common Mistakes to Avoid
- Incorrect rafter identification
- Over-tightening or under-tightening bolts
- Poor waterproofing
- Damaging roof tiles
- Misalignment of hooks
Best Practices for Installers and EPCs
- Identify rafters accurately
- Use high-quality hooks and fasteners
- Ensure proper waterproofing
- Follow design specifications
- Conduct final inspection
Conclusion
Installing roof hooks correctly is essential for the success of sloped roof solar PV systems. By following proper procedures, ensuring accurate alignment, and applying effective waterproofing techniques, installers can achieve durable and efficient solar installations.
Precision in mounting and anchoring is key to reliable solar systems. Additionally, compliance with guidelines from the Ministry of New and Renewable Energy ensures safety and quality.
With the right installation practices, solar professionals can optimize solar panel system cost, enhance solar electricity generation, and contribute to sustainable solar energy for home use and large-scale renewable solar solutions.
FAQs
Q1. What are roof hooks used for in solar installations?
Ans: They support mounting rails by anchoring them to roof rafters.
Q2. Why is waterproofing important during installation?
Ans: It prevents water leakage and protects the roof.
Q3. Can roof tiles be damaged during installation?
Ans: Yes, improper handling can damage tiles, so care is required.
Q4. How does roof hook installation affect solar panel system cost?
Ans: Proper installation reduces maintenance and long-term costs.
Q5. Are safety measures necessary during installation?
Ans: Yes, they ensure safe working conditions and prevent accidents.

Complete Guide to Solar Panel Subsidy Scheme in Haryana
Solar power is not only less expensive, but it is also the most abundant source of clean energy.
UPNEDA Solar Subsidy 2025: How to Maximize Savings on Rooftop Solar
Discover how the UPNEDA Solar Subsidy 2025 can help you cut electricity costs and make rooftop solar more affordable. Learn about eligibility, subsidy rates, and the step-by-step application process.
How to Check Equipment Location for Solar PV Systems
A complete guide to battery bank enclosure and rack installation, including site verification, setup procedures, and safety practices for solar PV systems.
End of Rooftop Solar Subsidy for Industrial & Commercial Consumers: What You Need to Know
The rooftop solar subsidy for industrial and commercial consumers is coming to an end. This guide explains the implications for businesses, updated policies, and strategies to adopt solar power without relying on subsidies.
How to Choose Solar Panel Mounting Structures for Home, Industry & Commercial Installations
Choosing the right mounting structure is crucial for solar panel efficiency and durability. This blog explains various types of mounting structures for residential, industrial, and commercial solar installations, including rooftop, ground-mounted, and hybrid systems, to help you make an informed decision.

What is MPPT in a Solar System? Meaning, Working & Benefits
Solar radiation on a tilted surface directly affects how much energy a solar panel produces. Learn why tilt angle matters and how it impacts solar output.

Solar Installation Cost in Haryana: Pricing, Savings & Subsidy Guide
Solar installation cost in Haryana varies by system size, components, and subsidy eligibility. This guide explains per-kW pricing, government incentives, and how much owners can save with rooftop solar in 2025, helping you choose the right system at the right budget.
Case Study: Successful Design, Installation, and Commissioning of a 50 kWp Rooftop Solar PV Plant
This case study details our experience in designing, installing, and commissioning a 50 kWp solar PV rooftop power plant. Learn how we overcame technical challenges, optimized system performance, and delivered clean, reliable energy. Discover insights on panel selection, inverter sizing, monitoring, and commissioning processes that ensured maximum efficiency and long-term performance for the rooftop solar installation.