
Roof hook installation is a critical step in sloped rooftop solar systems, especially for tile roofs commonly used in residential buildings. These hooks act as the primary anchoring interface between the roof structure and the solar mounting rails, ensuring stability, safety, and long-term performance.
Improper installation of roof hooks can lead to structural damage, water leakage, reduced solar electricity generation, and increased solar installation charges. Precision in mounting and anchoring is essential for reliable renewable solar systems.
This blog provides a complete step-by-step guide to installing roof hooks for solar panels, aligned with best practices and training standards.
What are Roof Hooks in Solar PV Systems?
Roof hooks are metal brackets fixed to the roof’s structural members (rafters), used to support mounting rails and solar panels.
They are commonly used in:
- Tile roof installations
- Sloped residential rooftops
Importance of Proper Roof Hook Installation
Correct installation ensures:
- Strong structural support
- Resistance to wind uplift
- Leak-proof roofing
- Long system lifespan
- Efficient solar electricity generation
Improper installation increases solar energy installation cost and maintenance issues.
Types of Roof Hooks
1. Standard Roof Hooks
- Used for basic tile roofs
- Fixed directly to rafters
2. Adjustable Roof Hooks
- Adjustable height for uneven roofs
3. Heavy-Duty Roof Hooks
- Used in high wind load areas
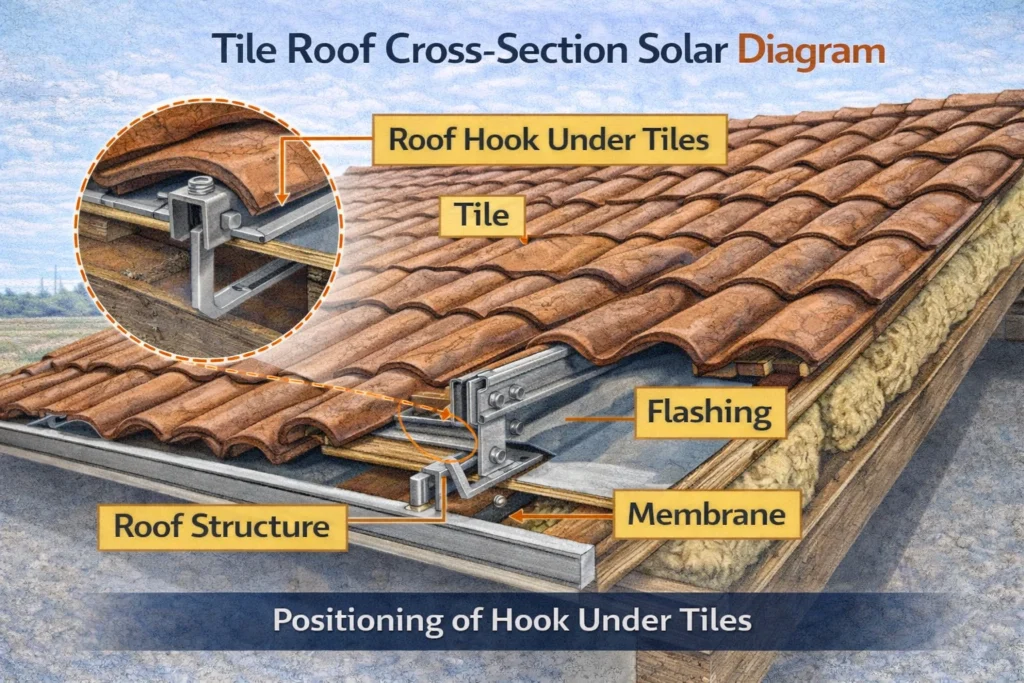
Step-by-Step Installation Process
Step 1 – Site Assessment
Evaluate:
- Roof type and condition
- Structural strength
- Rafter positions
Step 2 – Mark Rafter Locations
- Identify rafters under tiles
- Mark positions for hook installation
Step 3 – Remove Roof Tiles
- Carefully lift tiles
- Avoid breaking or damaging them
Step 4 – Position Roof Hooks
- Place hooks over rafters
- Ensure proper alignment
Step 5 – Fix Hooks to Rafters
- Drill pilot holes
- Secure hooks using screws or bolts
Step 6 – Adjust Hook Height
- Ensure proper clearance for tiles
- Maintain uniform height
Step 7 – Reinstall Roof Tiles
- Place tiles back carefully
- Ensure proper fit around hooks
Step 8 – Apply Waterproofing
- Use sealants and flashing
- Prevent water leakage
Step 9 – Install Mounting Rails
- Attach rails to roof hooks
- Ensure alignment and spacing
Step 10 – Final Inspection
- Check alignment and stability
- Verify waterproofing
Waterproofing Techniques
1. Flashing Installation
Prevents water ingress around hooks.
2. Sealants
Seal drilled holes and joints.
3. Proper Tile Placement
Ensures natural water flow.
Quality Checks
1. Alignment Check
- Ensure hooks are aligned in a straight line.
2. Tightness of Fasteners
- Verify proper torque application.
3. Waterproofing Inspection
- Check for gaps or leaks.
4. Structural Stability
- Ensure hooks are firmly fixed.
Common Mistakes to Avoid
- Incorrect rafter identification
- Over-tightening or under-tightening bolts
- Poor waterproofing
- Damaging roof tiles
- Misalignment of hooks
Best Practices for Installers and EPCs
- Identify rafters accurately
- Use high-quality hooks and fasteners
- Ensure proper waterproofing
- Follow design specifications
- Conduct final inspection
Conclusion
Installing roof hooks correctly is essential for the success of sloped roof solar PV systems. By following proper procedures, ensuring accurate alignment, and applying effective waterproofing techniques, installers can achieve durable and efficient solar installations.
Precision in mounting and anchoring is key to reliable solar systems. Additionally, compliance with guidelines from the Ministry of New and Renewable Energy ensures safety and quality.
With the right installation practices, solar professionals can optimize solar panel system cost, enhance solar electricity generation, and contribute to sustainable solar energy for home use and large-scale renewable solar solutions.
FAQs
Q1. What are roof hooks used for in solar installations?
Ans: They support mounting rails by anchoring them to roof rafters.
Q2. Why is waterproofing important during installation?
Ans: It prevents water leakage and protects the roof.
Q3. Can roof tiles be damaged during installation?
Ans: Yes, improper handling can damage tiles, so care is required.
Q4. How does roof hook installation affect solar panel system cost?
Ans: Proper installation reduces maintenance and long-term costs.
Q5. Are safety measures necessary during installation?
Ans: Yes, they ensure safe working conditions and prevent accidents.
Delhi Jal Board Solar Project: A Step Towards Sustainable Energy
Delhi Jal Board has embraced solar power, becoming a leader in renewable energy adoption. This initiative highlights the benefits of solar energy, including cost savings, sustainability, and promoting clean energy practices in institutional operations.
Solar Power Output Checks: Dust, Shade & Performance Guide
A complete guide to identifying and preventing factors such as dust, shade, dirt, and debris that interrupt solar power output and reduce PV system efficiency.
Agrovoltaics Innovation: Boosting Solar Energy While Supporting Farming
Explore agrovoltaics innovation: how combining solar energy with farming boosts efficiency, supports agriculture, and maximizes land use.
Monitoring Services for Solar Plants by Smart Roof Solar to Maximize Performance and Efficiency
Smart Roof Solar provides advanced monitoring services for solar plants to ensure maximum performance and efficiency. With real-time data tracking and intelligent analytics, our monitoring solutions help detect issues early, reduce downtime, and enhance the overall energy yield of your solar system.
How to Calculate Battery Capacity for Solar Off-Grid Applications
Sizing a solar battery correctly is vital for off-grid performance and energy independence. This guide explains how to calculate battery capacity, choose the right type, and design a balanced off-grid system for uninterrupted power supply.
India and IMT-GT JBC Sign MoU to Boost Energy Efficiency in Southeast Asia
The first meeting of the G20 Energy Transitions Working Group was held in Bengaluru, India, and was a success, with participants sharing a consensus on the priority areas of energy security and diversified supply chains.
How to Check Equipment Location for Solar PV Systems
A complete guide to battery bank enclosure and rack installation, including site verification, setup procedures, and safety practices for solar PV systems.
Solar Industry Faces Growing Losses from Underperforming Equipment
According to the Raptor Maps’ Global Solar Report, the amount of power loss due to equipment anomalies has nearly doubled from 1.61% in 2019 to 3.13% in 2022. This trend is expected to continue, with anomaly-driven power loss potentially growing to almost 6% by 2025.