
Roof hook installation is a critical step in sloped rooftop solar systems, especially for tile roofs commonly used in residential buildings. These hooks act as the primary anchoring interface between the roof structure and the solar mounting rails, ensuring stability, safety, and long-term performance.
Improper installation of roof hooks can lead to structural damage, water leakage, reduced solar electricity generation, and increased solar installation charges. Precision in mounting and anchoring is essential for reliable renewable solar systems.
This blog provides a complete step-by-step guide to installing roof hooks for solar panels, aligned with best practices and training standards.
What are Roof Hooks in Solar PV Systems?
Roof hooks are metal brackets fixed to the roof’s structural members (rafters), used to support mounting rails and solar panels.
They are commonly used in:
- Tile roof installations
- Sloped residential rooftops
Importance of Proper Roof Hook Installation
Correct installation ensures:
- Strong structural support
- Resistance to wind uplift
- Leak-proof roofing
- Long system lifespan
- Efficient solar electricity generation
Improper installation increases solar energy installation cost and maintenance issues.
Types of Roof Hooks
1. Standard Roof Hooks
- Used for basic tile roofs
- Fixed directly to rafters
2. Adjustable Roof Hooks
- Adjustable height for uneven roofs
3. Heavy-Duty Roof Hooks
- Used in high wind load areas
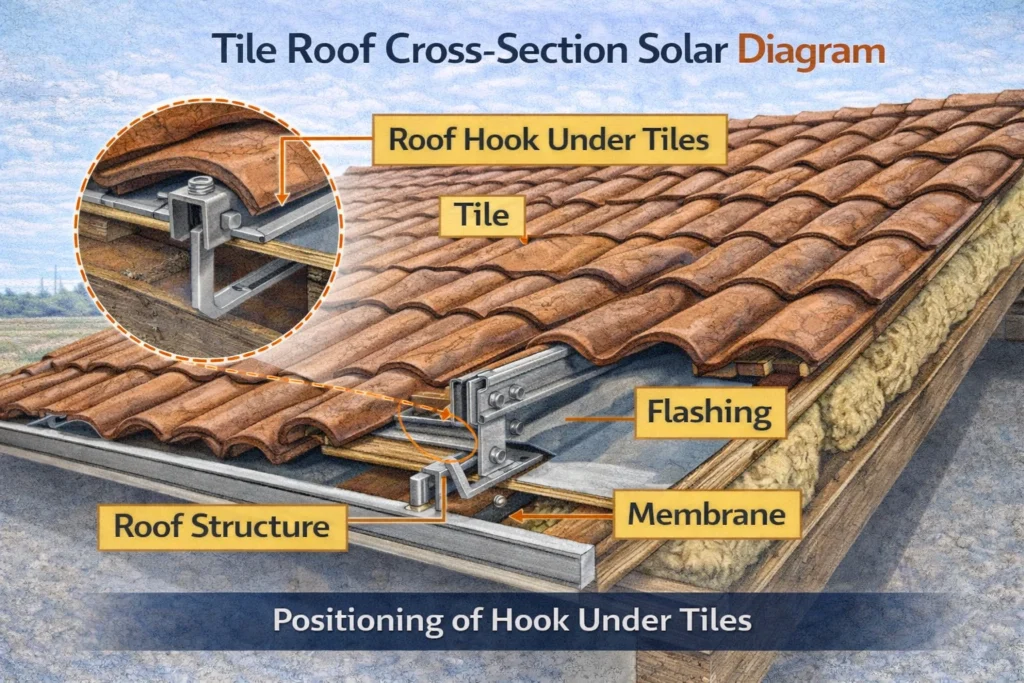
Step-by-Step Installation Process
Step 1 – Site Assessment
Evaluate:
- Roof type and condition
- Structural strength
- Rafter positions
Step 2 – Mark Rafter Locations
- Identify rafters under tiles
- Mark positions for hook installation
Step 3 – Remove Roof Tiles
- Carefully lift tiles
- Avoid breaking or damaging them
Step 4 – Position Roof Hooks
- Place hooks over rafters
- Ensure proper alignment
Step 5 – Fix Hooks to Rafters
- Drill pilot holes
- Secure hooks using screws or bolts
Step 6 – Adjust Hook Height
- Ensure proper clearance for tiles
- Maintain uniform height
Step 7 – Reinstall Roof Tiles
- Place tiles back carefully
- Ensure proper fit around hooks
Step 8 – Apply Waterproofing
- Use sealants and flashing
- Prevent water leakage
Step 9 – Install Mounting Rails
- Attach rails to roof hooks
- Ensure alignment and spacing
Step 10 – Final Inspection
- Check alignment and stability
- Verify waterproofing
Waterproofing Techniques
1. Flashing Installation
Prevents water ingress around hooks.
2. Sealants
Seal drilled holes and joints.
3. Proper Tile Placement
Ensures natural water flow.
Quality Checks
1. Alignment Check
- Ensure hooks are aligned in a straight line.
2. Tightness of Fasteners
- Verify proper torque application.
3. Waterproofing Inspection
- Check for gaps or leaks.
4. Structural Stability
- Ensure hooks are firmly fixed.
Common Mistakes to Avoid
- Incorrect rafter identification
- Over-tightening or under-tightening bolts
- Poor waterproofing
- Damaging roof tiles
- Misalignment of hooks
Best Practices for Installers and EPCs
- Identify rafters accurately
- Use high-quality hooks and fasteners
- Ensure proper waterproofing
- Follow design specifications
- Conduct final inspection
Conclusion
Installing roof hooks correctly is essential for the success of sloped roof solar PV systems. By following proper procedures, ensuring accurate alignment, and applying effective waterproofing techniques, installers can achieve durable and efficient solar installations.
Precision in mounting and anchoring is key to reliable solar systems. Additionally, compliance with guidelines from the Ministry of New and Renewable Energy ensures safety and quality.
With the right installation practices, solar professionals can optimize solar panel system cost, enhance solar electricity generation, and contribute to sustainable solar energy for home use and large-scale renewable solar solutions.
FAQs
Q1. What are roof hooks used for in solar installations?
Ans: They support mounting rails by anchoring them to roof rafters.
Q2. Why is waterproofing important during installation?
Ans: It prevents water leakage and protects the roof.
Q3. Can roof tiles be damaged during installation?
Ans: Yes, improper handling can damage tiles, so care is required.
Q4. How does roof hook installation affect solar panel system cost?
Ans: Proper installation reduces maintenance and long-term costs.
Q5. Are safety measures necessary during installation?
Ans: Yes, they ensure safe working conditions and prevent accidents.
PM Surya Ghar Muft Bijli Yojana 2025: Online Registration Made Simple
PM Surya Ghar Muft Bijli Yojana 2025: Learn how to register online and get free electricity under this government scheme.

Net Metering and Its Advantages Explained: How Solar Users Save More on Energy Bills
Learn what Net Metering and its advantages mean for you—cut electricity costs, earn energy credits, and boost solar efficiency easily.
Sir! Solar Mein Itna Chalta Hai!” When to Reject a Site: The Truth About Shadow Analysis
Discover the importance of solar site assessment and shadow analysis to optimize rooftop solar performance, prevent shading losses, and maximize energy generation.
Cut Factory Electricity Bills with Solar Energy: Smart Power Saving Guide for Industries in India
Discover how solar energy helps factories in India reduce electricity bills, improve ROI, and achieve long-term industrial power savings.
Identify All Major Components of a Solar PV System: Complete Guide for Installers
Understand all major components of a solar PV system, from panels and inverters to mounting structures and BOS. This complete guide helps installers design efficient and reliable solar power systems.

Solar Site Assessment: Shadow Analysis for Maximum Energy Generation
Shadow analysis is a critical step in solar site assessment. It helps solar installers identify shading obstacles and optimize panel placement for maximum energy generation.
PV Cable & Conduit Labeling Guide: Best Practices for Solar Installations
A complete guide to cable termination in solar installations, including tools, step-by-step methods, and best practices for safe connections.
Solar Power Output Checks: Dust, Shade & Performance Guide
A complete guide to identifying and preventing factors such as dust, shade, dirt, and debris that interrupt solar power output and reduce PV system efficiency.