
In solar photovoltaic (PV) systems, safety and compliance with utility regulations are critical for ensuring reliable and secure operation. One of the most important safety components in grid-connected solar installations is the utility-required disconnect switch.
Utility disconnects allow the solar PV system to be safely isolated from the utility grid during maintenance, emergencies, inspections, or fault conditions. Proper installation of these disconnects is essential for preventing electrical hazards, protecting utility workers, and ensuring compliance with electrical standards and grid interconnection requirements.
Incorrect installation can lead to safety risks, system downtime, failed inspections, and increased solar installation charges. Therefore, installers and EPC professionals must understand how to properly install utility-required disconnects in renewable solar projects.
Electrical isolation and disconnect protection are essential for safe solar electricity generation and grid integration.
This blog provides a complete step-by-step guide to installing utility-required disconnects in solar PV systems, including types of disconnects, installation procedures, safety practices, and quality checks.
What is a Utility Disconnect in Solar PV Systems?
A utility disconnect is a switch or isolator that allows the solar PV system to be disconnected from the utility grid.
It is used for:
- Emergency shutdown
- Maintenance work
- Utility inspections
- Fault isolation
Disconnects are commonly required in:
- On-grid solar systems
- Hybrid solar systems
- Commercial solar plants
Importance of Utility Disconnects
1. Safety for Utility Personnel
Prevents back-feeding into the grid during maintenance.
2. Emergency Isolation
Allows quick shutdown during faults or fire incidents.
3. Maintenance Support
Enables safe servicing of solar equipment.
4. Regulatory Compliance
Meets utility and electrical code requirements.
5. System Protection
Protects the inverter and electrical infrastructure.
Types of Utility Disconnects Used in Solar PV Systems
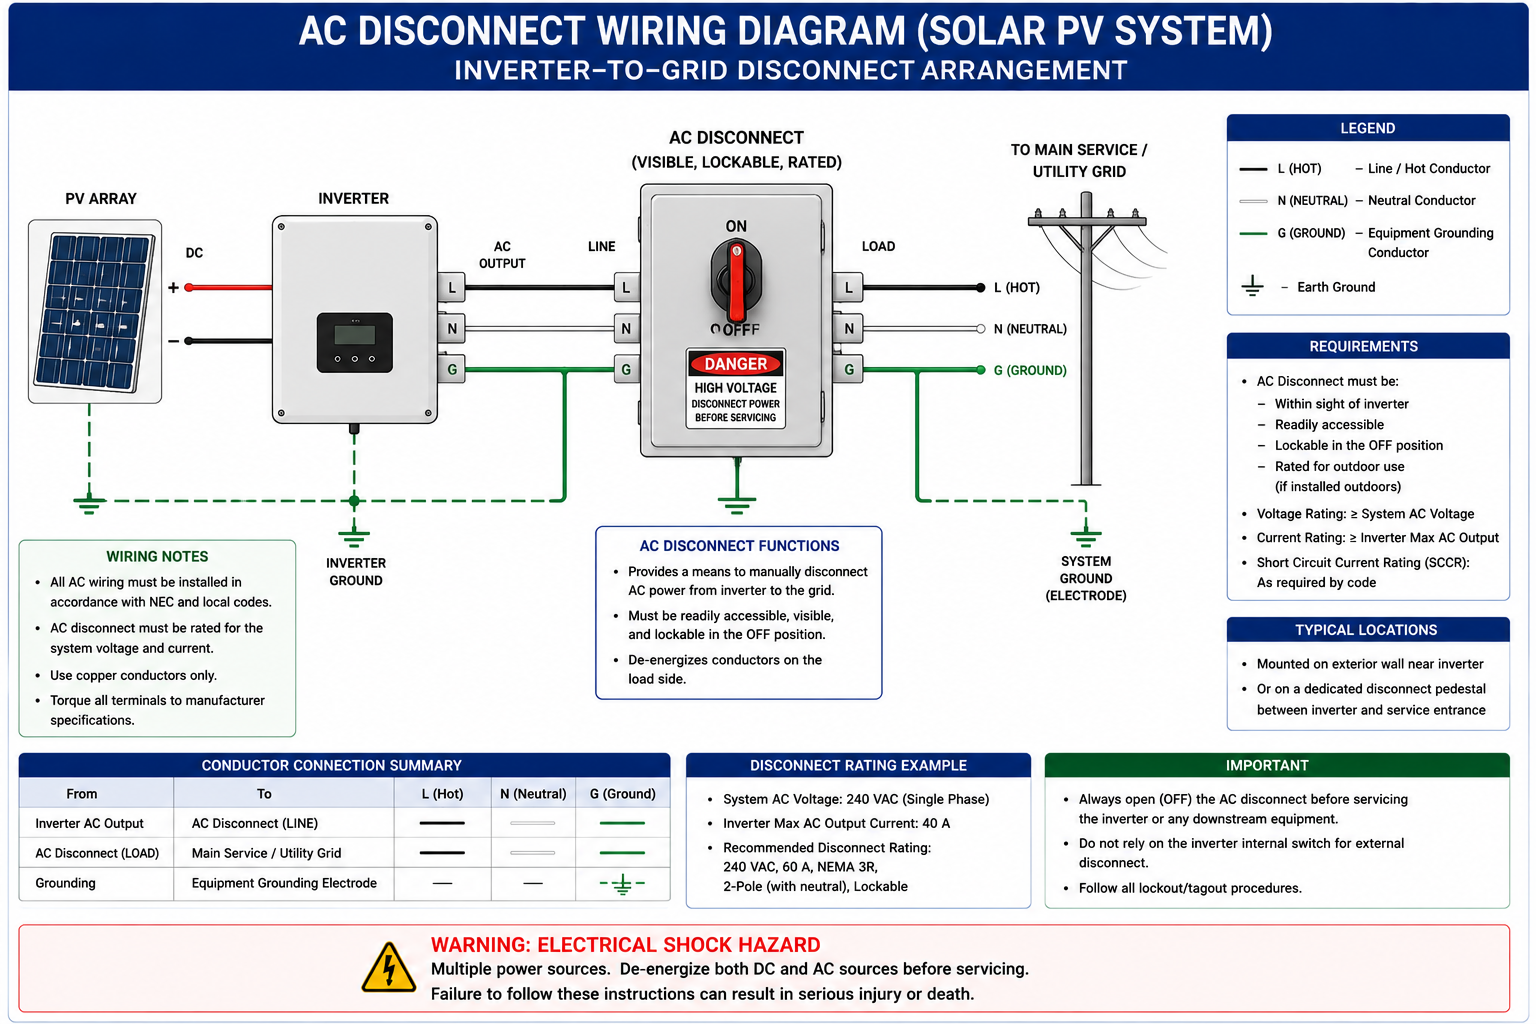
1. AC Disconnect Switch
Installed between the inverter output and the utility connection.
Purpose:
- Isolates the AC side of the system
2. DC Disconnect Switch
Installed between solar panels and the inverter.
Purpose:
- Isolates DC power during maintenance
3. Manual Disconnect Switch
Operated manually during servicing or emergencies.
4. Automatic Disconnect Device
Automatically disconnects during grid faults.
Components Required for Installation
1. Disconnect Switch
Select according to:
- Voltage rating
- Current capacity
- Utility specifications
2. Weatherproof Enclosure
- Required for outdoor installations.
3. Electrical Cables
- Use proper AC/DC cable sizing.
4. Circuit Breakers and Protection Devices
- Provide additional safety.
5. Cable Glands and Conduits
- Protect wiring and improve cable management.
Pre-Installation Preparation
1. Review Utility Requirements
Check:
- Utility interconnection standards
- Disconnect location requirements
- Labeling specifications
2. Verify Electrical Ratings
Ensure disconnect matches:
- System voltage
- Current capacity
- Inverter output rating
3. Inspect Installation Area
Ensure the location is:
- Accessible
- Safe
- Properly ventilated
Step-by-Step Installation Procedure
Step 1 – Select Disconnect Location
The disconnect should be:
- Easily accessible
- Close to the utility meter or inverter
- Visible to utility personnel
Step 2 – Mount the Disconnect Enclosure
- Secure the enclosure properly
- Ensure weatherproof sealing if outdoors
Step 3 – Isolate All Power Sources
Before wiring:
- Turn off the inverter
- Disconnect the PV input
- Isolate the utility supply
Step 4 – Route Electrical Cables
- Use proper conduits and cable management practices.
Step 5 – Connect Input and Output Cables
Ensure:
- Correct polarity and phase connections
- Tight and secure terminations
Step 6 – Install Grounding Connection
- Proper grounding improves safety and protection.
Step 7 – Tighten Electrical Connections
- Use the torque wrench according to manufacturer’s specifications.
Step 8 – Label the Disconnect
Labels should indicate:
- Solar PV disconnect
- ON/OFF positions
- Warning information
Step 9 – Perform Electrical Testing
Verify:
- Voltage levels
- Continuity
- Proper isolation function
Step 10 – Conduct Functional Testing
Operate the disconnect switch to confirm proper isolation.
Conclusion
The installation of utility-required disconnects is a critical part of solar PV system safety and regulatory compliance. By following proper installation procedures, maintaining electrical safety standards, and conducting thorough testing, installers can ensure reliable and safe system operation.
Disconnect protection and electrical isolation are essential for renewable solar systems and solar energy for home use. Additionally, adherence to standards established by the Ministry of New and Renewable Energy ensures safe and standardized installations.
With correct installation practices, solar professionals can optimize solar panel system cost, improve solar electricity generation reliability, and support the growth of sustainable renewable energy technology solutions.
FAQs
Q1. What is the purpose of a utility disconnect in solar PV systems?
Ans: It safely isolates the solar system from the utility grid.
Q2. Where should the disconnect switch be installed?
Ans: In an accessible location near the utility connection or inverter.
Q3. Why is proper grounding important during installation?
Ans: It protects equipment and personnel from electrical faults.
Q4. Does disconnect installation affect solar panel system cost?
Ans: Yes, proper installation reduces maintenance and safety risks.
Q5. What safety precautions should be followed during installation?
Ans: Use PPE, insulated tools, and isolate all power sources before work.
Battery Polarity & Voltage Testing Guide for Safe Installation
A complete guide to battery polarity and voltage testing, ensuring safe battery installation and reliable performance in solar PV systems.
Solar Installation on Sloped Roofs: Design, Mounting Systems & Best Practices
A practical guide to flat roof solar installation covering key design considerations, mounting system types, and best practices for efficient and reliable performance.
Solar Inverter Stand Installation: Step-by-Step Guide
A step-by-step guide to solar inverter stand installation as per drawings and manuals, ensuring proper alignment, stability, and safety.
Workmanship Inspection and Tool Proficiency in Solar PV Projects
A complete guide to solar PV workmanship and tool proficiency, helping installers maintain quality standards and demonstrate technical competency.
Steps Required for Conducting a Site Assessment Prior to Solar Installation
A solar site assessment helps installers evaluate location, shading, structure, and energy requirements before installation. This guide explains the essential steps for accurate solar system planning.
How to Assess Customer Requirements Before Solar Installation
Understanding customer requirements is essential before installing a solar plant. This guide explains key assessment methods such as energy analysis, site survey, and feasibility evaluation.
OPEX Industrial Solar Provider in India: How It Works, Cost & ROI
An OPEX industrial solar provider installs and owns the solar plant while industries pay only for energy used. Learn cost, benefits, and ROI in India.
Financing made easy for the Rooftop Solar Projects
Switching to solar is easier than ever with flexible financing options. This guide explains how to fund your rooftop solar project through loans, subsidies, and government schemes to make clean energy more affordable and sustainable.