
Solar photovoltaic (PV) modules are among the most critical components of any renewable solar system, converting sunlight into electrical energy for residential, commercial, industrial, and utility-scale applications. Designed to withstand harsh environmental conditions for more than 25 years, solar panels are exposed daily to wind, rain, hail, dust, extreme temperatures, ultraviolet (UV) radiation, snow, bird activity, and other external factors. Over time, these conditions may lead to physical damage that can reduce energy production, compromise safety, and shorten the lifespan of the system.
Regular inspection of PV modules for physical damage is an essential preventive maintenance activity. Identifying defects such as cracked glass, broken frames, delamination, discoloration, corrosion, loose connectors, or damaged junction boxes at an early stage allows corrective action before the damage worsens. Routine inspections help maintain system efficiency, improve operational reliability, reduce maintenance costs, and ensure safe solar electricity generation.
Whether performed during commissioning, scheduled maintenance, troubleshooting, or post-storm inspections, physical damage assessments should follow a systematic procedure using appropriate tools, safety precautions, and manufacturer recommendations.
Visual inspection of PV modules for physical damage is a fundamental maintenance practice that supports reliable renewable solar system operation and long-term equipment performance.
This comprehensive guide explains the importance of inspecting PV modules, common types of physical damage, inspection procedures, required tools, documentation methods, safety precautions, and industry best practices.
Why is Physical Inspection of PV Modules Important?
Solar panels operate outdoors under varying environmental conditions. Physical damage may not always stop electricity generation immediately, but even minor defects can worsen over time and affect overall system performance.
Routine inspections help:
- Detect defects early
- Improve renewable solar system efficiency
- Prevent equipment failure
- Maintain electrical safety
- Extend module lifespan
- Reduce repair costs
Early detection is one of the most cost-effective maintenance strategies.
Common Causes of Physical Damage
PV modules can be damaged by several environmental and operational factors.
Common causes include:
- Hailstorms
- Strong winds
- Falling branches
- Bird activity
- Heavy snow loads
- Thermal expansion and contraction
- Improper installation
- Transportation damage
- Mishandling during maintenance
- Impact from tools or equipment
Understanding these causes helps technicians identify likely problem areas.
Types of Physical Damage in PV Modules
Several types of defects may be observed during inspection.
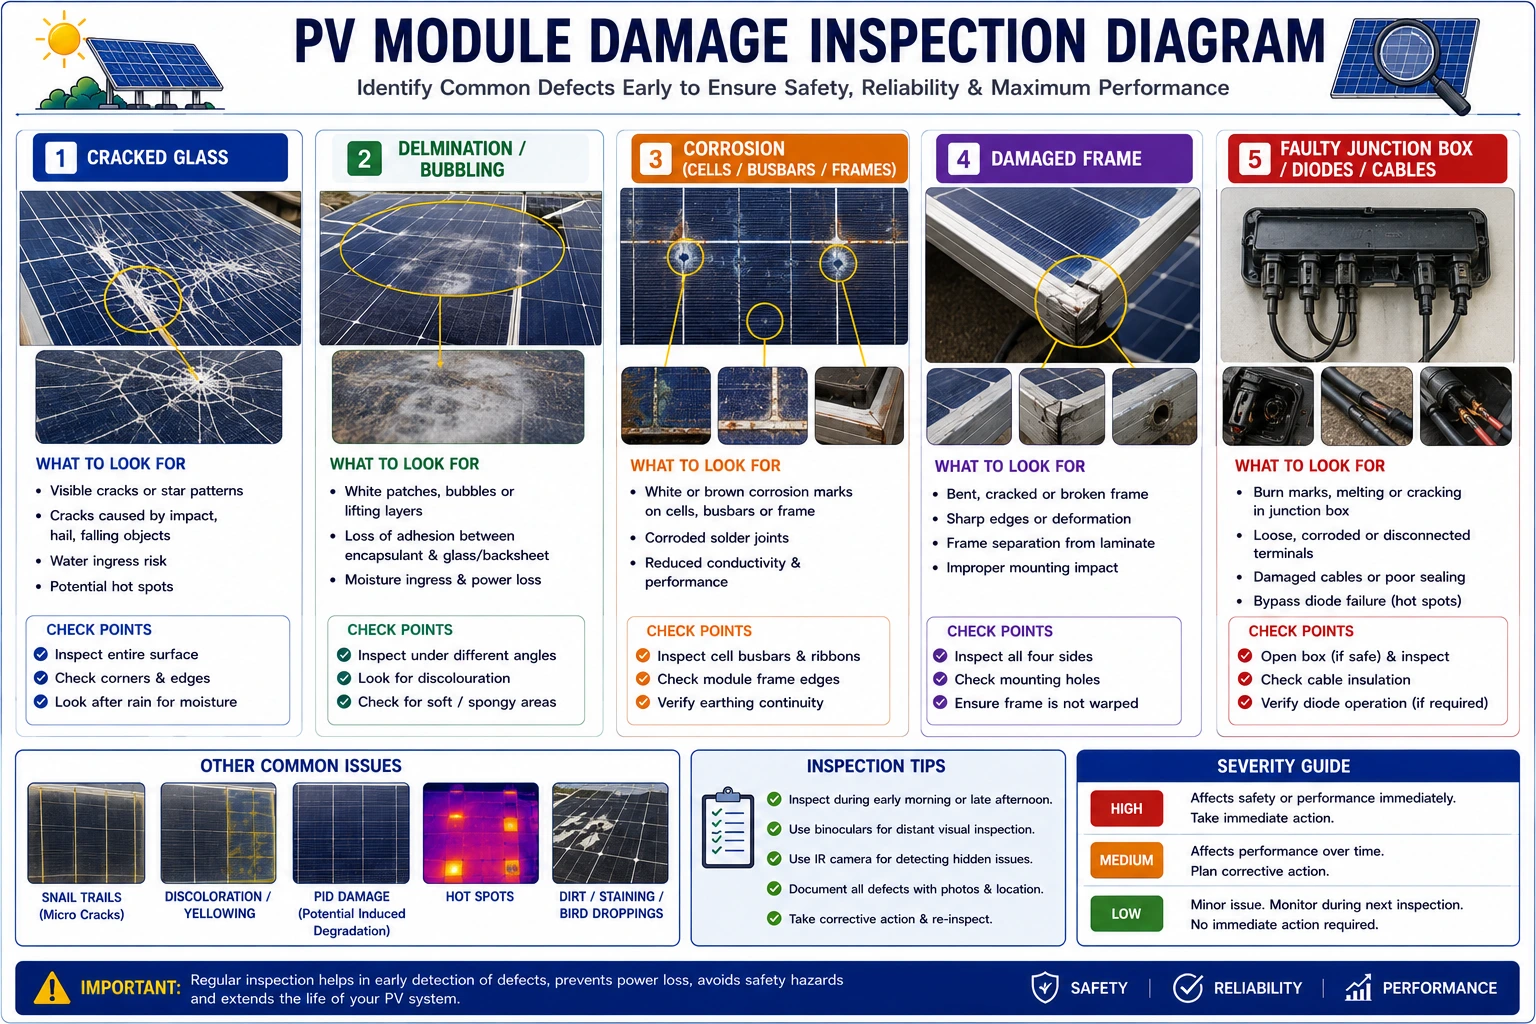
1. Cracked Front Glass
Cracked glass is one of the most visible forms of module damage.
Possible causes include:
- Impact
- Hail
- Improper handling
- Mechanical stress
Cracks may allow moisture to enter the module, leading to long-term degradation.
2. Broken or Bent Frame
The aluminum frame supports the module structurally.
Inspect for:
- Bending
- Cracks
- Corrosion
- Loose fasteners
Damaged frames may affect module alignment and mounting stability.
3. Delamination
Delamination occurs when internal layers of the module separate.
Signs include:
- Air bubbles
- Peeling layers
- Separation around edges
This defect reduces module durability and electrical performance.
4. Discoloration
Yellowing or browning of module materials may indicate:
- UV degradation
- Aging
- Manufacturing defects
Discoloration can reduce light transmission.
5. Hotspot Burn Marks
Localized overheating may leave visible burn marks.
Possible causes include:
- Cell damage
- Shading
- Poor electrical connections
Thermal imaging may help confirm hotspots.
6. Corrosion
Inspect metallic parts for:
- Rust
- Oxidation
- Surface deterioration
Corrosion commonly affects:
- Frames
- Connectors
- Junction boxes
- Mounting hardware
7. Damaged Junction Box
Check the junction box for:
- Cracks
- Loose covers
- Moisture ingress
- Burn marks
A damaged junction box may compromise electrical safety.
8. Damaged Connectors and Cables
Inspect for:
- Broken connectors
- Loose connections
- Cracked insulation
- Rodent damage
- UV deterioration
Electrical faults often originate from damaged cabling.
9. Glass Surface Scratches
Minor scratches may not significantly affect performance, but deep scratches can reduce light transmission and weaken the glass.
10. Water Ingress
Signs include:
- Moisture inside the module
- Fogging
- Condensation
Water ingress accelerates internal deterioration.
Tools Required for Inspection
Proper inspection requires suitable equipment.
Common tools include:
- Flashlight
- Binoculars (for difficult-to-access installations)
- Digital camera
- Inspection checklist
- Infrared thermal camera
- Digital multimeter
- Personal protective equipment (PPE)
Additional testing may be required if physical damage is suspected.
Personal Protective Equipment (PPE)
Before beginning the inspection, technicians should wear:
- Safety helmet
- Electrical insulating gloves
- Safety glasses
- Safety shoes
- Fall protection harness (for rooftop systems)
Safety should always be prioritized.
Step-by-Step Procedure to Check PV Modules for Physical Damage
Step 1 – Review Previous Maintenance Records
Before inspection:
Review:
- Previous inspection reports
- Maintenance logbook
- Known faults
- Replacement history
Historical records help identify recurring issues.
Step 2 – Ensure Safe Working Conditions
Verify:
- Weather conditions
- Safe rooftop access
- Stable ladders
- Fall protection
- Electrical safety
Avoid inspections during storms or high winds.
Step 3 – Perform a General Visual Inspection
Inspect the overall condition of:
- Module surfaces
- Frames
- Mounting structures
- Cables
- Connectors
Look for obvious signs of damage.
Step 4 – Inspect the Glass Surface
Carefully examine each module for:
- Cracks
- Chips
- Scratches
- Broken corners
- Impact damage
Document any abnormalities.
Step 5 – Inspect the Module Frame
Verify:
- Straightness
- Secure mounting
- Corrosion
- Loose bolts
Mechanical stability is essential for long-term operation.
Step 6 – Inspect Junction Boxes
Check:
- Covers
- Cable entries
- Moisture
- Burn marks
Replace damaged junction boxes promptly.
Step 7 – Inspect Cables and Connectors
Verify:
- Proper routing
- Secure connections
- Insulation condition
- Connector locking
Damaged wiring should be repaired immediately.
Step 8 – Check for Delamination and Discoloration
Observe:
- Edge separation
- Bubble formation
- Yellowing
- Browning
These defects may indicate module aging or manufacturing issues.
Step 9 – Use Thermal Inspection (If Required)
An infrared thermal camera can detect:
- Hotspots
- Overheated cells
- Loose electrical connections
Thermal inspections complement visual inspections.
Step 10 – Record Inspection Findings
Document:
- Module identification
- Type of damage
- Severity
- Location
- Photographs
- Recommended corrective action
Update the maintenance logbook.
When Should PV Modules Be Inspected?
Physical inspections should be performed:
- During commissioning
- As part of routine preventive maintenance
- After severe weather events
- Following transportation
- Before warranty claims
- During troubleshooting
- Before the system handover
Regular inspections improve long-term system reliability.
Conclusion
Regular inspection of PV modules for physical damage is a vital component of preventive maintenance that helps ensure safe, efficient, and reliable solar electricity generation throughout the life of a renewable solar system. By systematically identifying defects such as cracked glass, damaged frames, corrosion, delamination, junction box failures, and cable damage, technicians can take timely corrective action, prevent costly failures, and maintain optimal system performance.
Visual inspection and condition assessment of PV modules are essential responsibilities for solar installers, commissioning engineers, and operations and maintenance professionals. Furthermore, following technical recommendations and inspection practices promoted by the Ministry of New and Renewable Energy, together with manufacturer guidelines, helps ensure safe, standards-compliant, and professional maintenance of solar PV installations.
By conducting regular inspections, documenting findings accurately, using appropriate safety equipment, performing timely repairs, maintaining detailed maintenance records, and replacing severely damaged components when necessary, solar professionals can optimize solar panel system cost, maximize renewable solar system reliability, improve energy production, and ensure the long-term success of residential, commercial, industrial, and utility-scale solar energy projects.
FAQs
Q1. Why should PV modules be inspected for physical damage?
Ans: Regular inspections help detect defects early, maintain energy production, improve safety, reduce maintenance costs, and extend the operational life of the solar PV system.
Q2. What are the most common types of physical damage found on solar panels?
Ans: Common defects include cracked glass, damaged frames, delamination, discoloration, corrosion, broken junction boxes, loose connectors, scratched surfaces, and water ingress.
Q3. How often should PV modules be inspected?
Ans: Visual inspections should be performed during routine preventive maintenance, after severe weather events, during commissioning, before system handover, and whenever abnormal system performance is observed.
Q4. Can a cracked solar panel continue generating electricity?
Ans: In some cases, a cracked module may continue producing electricity temporarily. However, cracks can allow moisture ingress, reduce performance, create safety risks, and lead to further deterioration, so damaged modules should be evaluated and repaired or replaced as appropriate.
Q5. What should be documented during a PV module inspection?
Ans: Technicians should record the inspection date, module identification, observed damage, photographs, test results (if applicable), corrective actions, technician details, and recommendations in the maintenance logbook.
Everything You Need to Know About Net Metering
Discover everything about net metering – how it works, benefits, installation process, and how it helps you save on electricity bills.
The Rise of Clean Energy: Solar Energy Trends in 2023
The solar energy industry is on the rise, as the demand for clean and renewable energy sources continues to increase. 2023 is shaping up to be a big year for the solar energy sector, as new technologies and innovations are expected to drive growth and expand the reach of solar energy.
Understanding Solar Battery Specifications: Capacity, Voltage & Efficiency Explained
Solar batteries are essential for energy storage and backup in PV systems. This guide explains key specifications like capacity, voltage, efficiency, and depth of discharge to help you choose the right battery.
Earthing & Lightning Protection Testing for Solar PV Systems
A complete guide to earthing and lightning protection testing for solar PV systems, ensuring safety, regulatory compliance, and long-term system reliability.
Safe Work Procedures for Solar PV Systems Guide
A complete guide to establishing and following safe work procedures in solar PV systems, ensuring worker safety during installation, testing, commissioning, operation, and maintenance.
Solar PV Fault Diagnosis During Power Interruptions
A complete guide to identifying faults in solar PV systems during power generation interruptions, including troubleshooting techniques, root cause analysis, and corrective maintenance.
Fire Hazard in a Solar Setup at Rice Mill, Kaithal – Case Study and Safety Insights
A recent fire incident at a rice mill in Kaithal highlights the critical importance of safety in solar installations. This case study analyzes the root causes, system faults, and preventive actions that can help industries avoid similar hazards in their solar setups.
Difference Between an On-Grid Inverter and a Hybrid Solar Inverter
Confused between an on-grid inverter and a hybrid solar inverter? This blog explains their differences, advantages, and which solar inverter is right for you.