
In any solar photovoltaic (PV) system, the inverter is the heart of the system, converting DC power from solar panels into usable AC electricity. While much attention is given to inverter selection, proper installation of the inverter stand is equally critical for safety, performance, and durability.
An improperly installed inverter stand can lead to vibration issues, overheating, electrical hazards, and increased solar installation charges due to maintenance and repairs. Correct mounting and placement of electrical components is essential for reliable renewable solar installations.
This blog provides a complete step-by-step guide to installing an inverter stand as per drawings and manufacturer manuals, ensuring safety, compliance, and optimal solar electricity generation.
Importance of Proper Inverter Stand Installation
1. Structural Stability
Provides strong support for the inverter.
2. Heat Management
Ensures proper ventilation and cooling.
3. Safety
Prevents electrical hazards and accidents.
4. Ease of Maintenance
Allows easy access for inspection and servicing.
5. Compliance
Ensures adherence to installation standards.
Components of Inverter Stand Setup
- Inverter stand/frame
- Anchor bolts
- Fasteners (nuts, bolts, washers)
- Anti-vibration pads
- Protective coatings
Tools and Materials Required
Tools
- Drilling machine
- Torque wrench
- Spanners and wrenches
- Measuring tape
- Spirit level
Materials
- Inverter stand structure
- Anchor bolts
- Fasteners
- Protective coatings
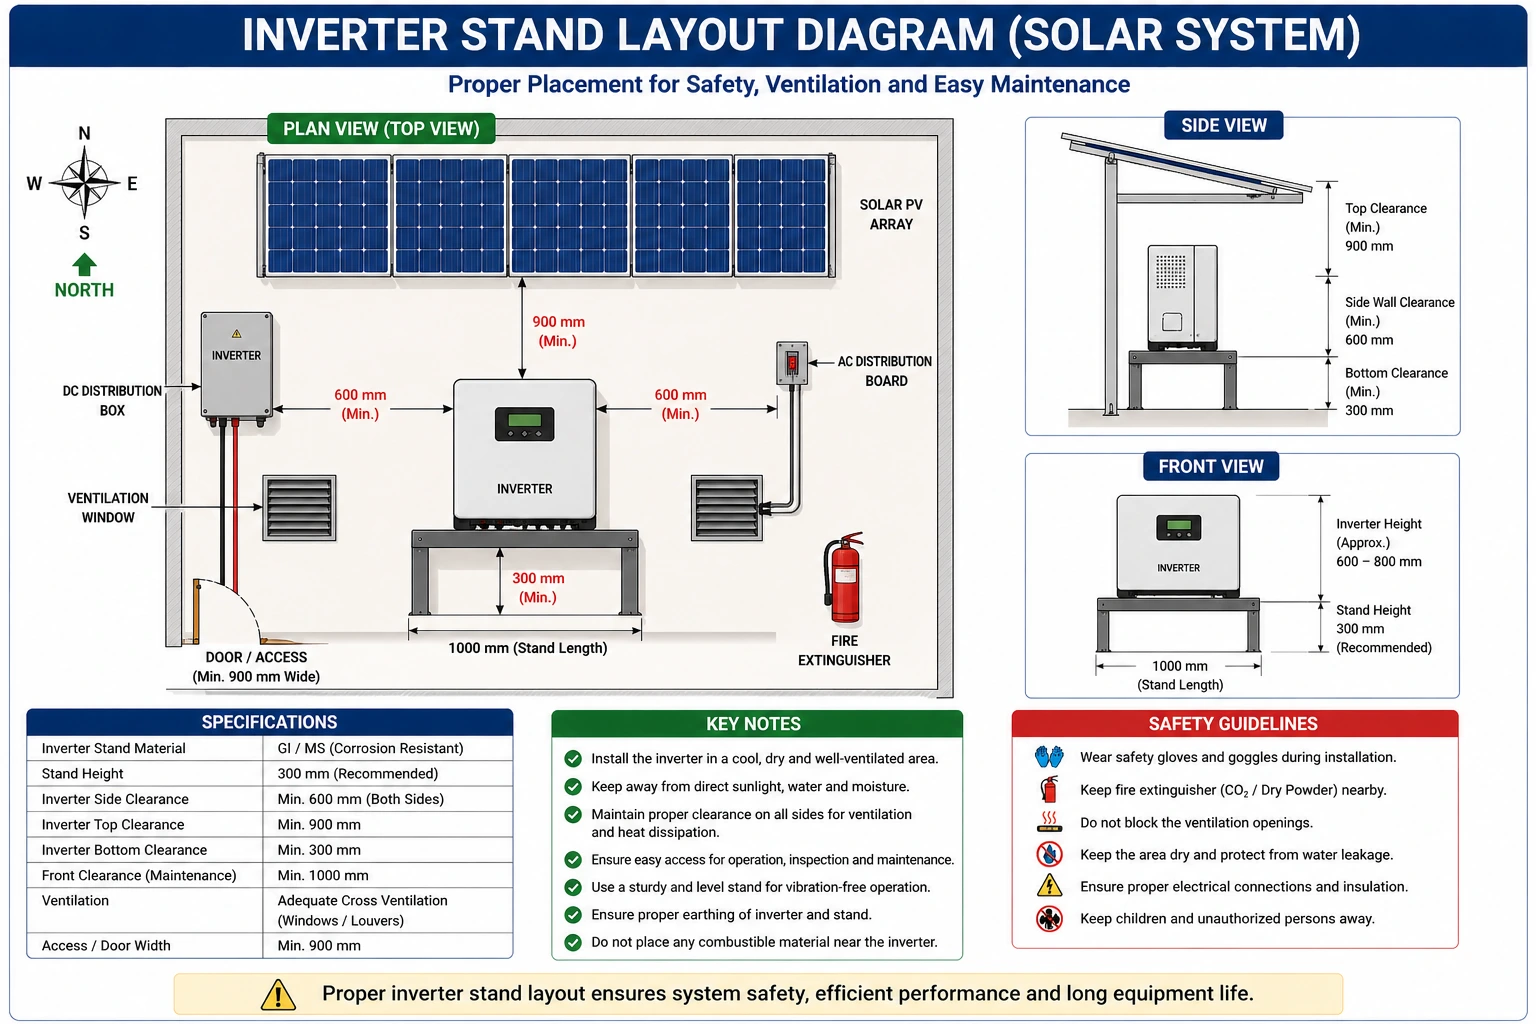
Step-by-Step Installation Process
Step 1 – Mark Installation Area
- Mark positions as per the drawings
- Ensure proper spacing
Step 2 – Prepare Foundation/Base
- Construct a concrete base if required
- Ensure a level surface
Step 3 – Assemble Inverter Stand
- Assemble frame components
- Ensure proper alignment
Step 4 – Fix the Stand to the Floor
- Use anchor bolts
- Ensure firm fixing
Step 5 – Install Anti-Vibration Pads
- Reduce vibrations
- Protect inverter components
Step 6 – Apply Protective Coating
- Prevent corrosion
- Enhance durability
Step 7 – Check Alignment and Leveling
- Use a spirit level
- Ensure proper positioning
Step 8 – Mount the Inverter on the Stand
- Place the inverter securely
- Follow manufacturer instructions
Step 9 – Secure the Inverter
- Tighten bolts properly
- Ensure stability
Step 10 – Final Inspection
- Verify alignment and stability
- Check compliance with drawings
Quality Checks
1. Structural Stability
Ensure the stand can support the inverter’s weight.
2. Leveling
Verify horizontal alignment.
3. Fastener Tightness
Ensure proper torque application.
4. Ventilation Clearance
Ensure adequate airflow around the inverter.
5. Compliance with Manuals
Follow manufacturer guidelines.
Conclusion
Proper installation of an inverter stand as per drawings and manufacturer manuals is essential for ensuring safety, durability, and efficient performance of solar PV systems. By following structured installation steps and maintaining quality standards, installers can prevent risks and improve system reliability.
Correct mounting and placement of components are crucial for successful renewable solar installations. Additionally, adherence to standards set by the Ministry of New and Renewable Energy ensures compliance and operational safety.
With the right installation approach, solar professionals can optimize solar panel system cost, enhance solar electricity generation, and support sustainable solar energy for home use and large-scale renewable solar solutions.
FAQs
Q1. Why is an inverter stand important?
Ans: It provides structural support and ensures safe operation.
Q2. What should be checked before installation?
Ans: Drawings, site conditions, and load-bearing capacity.
Q3. How does proper installation affect solar panel system cost?
Ans: It reduces maintenance and improves efficiency.
Q4. Is ventilation important for inverter installation?
Ans: Yes, it prevents overheating and improves performance.
Q5. Are safety measures necessary during installation?
Ans: Yes, they ensure safe and efficient execution.
Important Factors Deciding the Type of Solar PV System to be Installed
A solar site assessment helps installers evaluate location, shading, structure, and energy requirements before installation. This guide explains the essential steps for accurate solar system planning.

PPA Model Solar for Manufacturing Units: A Complete Guide
The PPA model allows factories to use solar power without any capital investment. Under a Power Purchase Agreement, industries buy clean electricity at a fixed, lower tariff while the solar developer owns, operates, and maintains the plant—making solar adoption simple, risk-free, and cost-effective.
How to Check Battery Location for Solar PV Systems
A complete guide to solar PV battery location assessment, helping installers select safe and efficient locations for battery storage systems.
Earthing & Lightning Protection Testing for Solar PV Systems
A complete guide to earthing and lightning protection testing for solar PV systems, ensuring safety, regulatory compliance, and long-term system reliability.
Safe Work Procedures for Solar PV Systems Guide
A complete guide to establishing and following safe work procedures in solar PV systems, ensuring worker safety during installation, testing, commissioning, operation, and maintenance.

How to Safely Install Solar Panels on Metal and Asbestos Rooftops
Discover how solar systems can be installed on metal sheds and asbestos roofs, making factories more energy-efficient and sustainable

Cut Factory Electricity Bills with Solar Energy: Smart Power Saving Guide for Industries in India
Discover how solar energy helps factories in India reduce electricity bills, improve ROI, and achieve long-term industrial power savings.

Sun Path Diagram for a Specific Location and Time: Solar Installer Guide
Earthing and lightning protection are critical safety components in solar PV installations. This guide explains their importance, types, components, and best practices for solar installers.