
Sloped roof solar installations are one of the most common methods for deploying solar energy for home use, especially in residential and small commercial buildings. A critical aspect of these installations is the secure fixing of roof attachments and anchors, which ensures that the mounting structure remains stable, leak-proof, and durable over time.
Improper anchoring can lead to structural instability, water seepage, reduced solar electricity generation, and increased solar installation charges. Correct installation of roof attachments is essential for safe and efficient solar PV systems.
This blog provides a complete step-by-step guide to installing roof attachments and anchors for sloped roof solar structures, ensuring safety, performance, and optimized solar panel system cost.
What are Sloped Roof Solar Attachments and Anchors?
Roof attachments and anchors are components used to secure solar mounting structures to the roof surface.
They include:
- Roof hooks
- Anchor bolts
- L-feet brackets
- Clamps
These components transfer loads from the solar panels to the building structure.
Importance of Proper Installation
Correct installation ensures:
- Structural stability
- Resistance to wind uplift
- Leak-proof roofing
- Long-term durability
- Efficient solar electricity generation
Improper installation can increase solar energy installation cost due to repairs and maintenance.
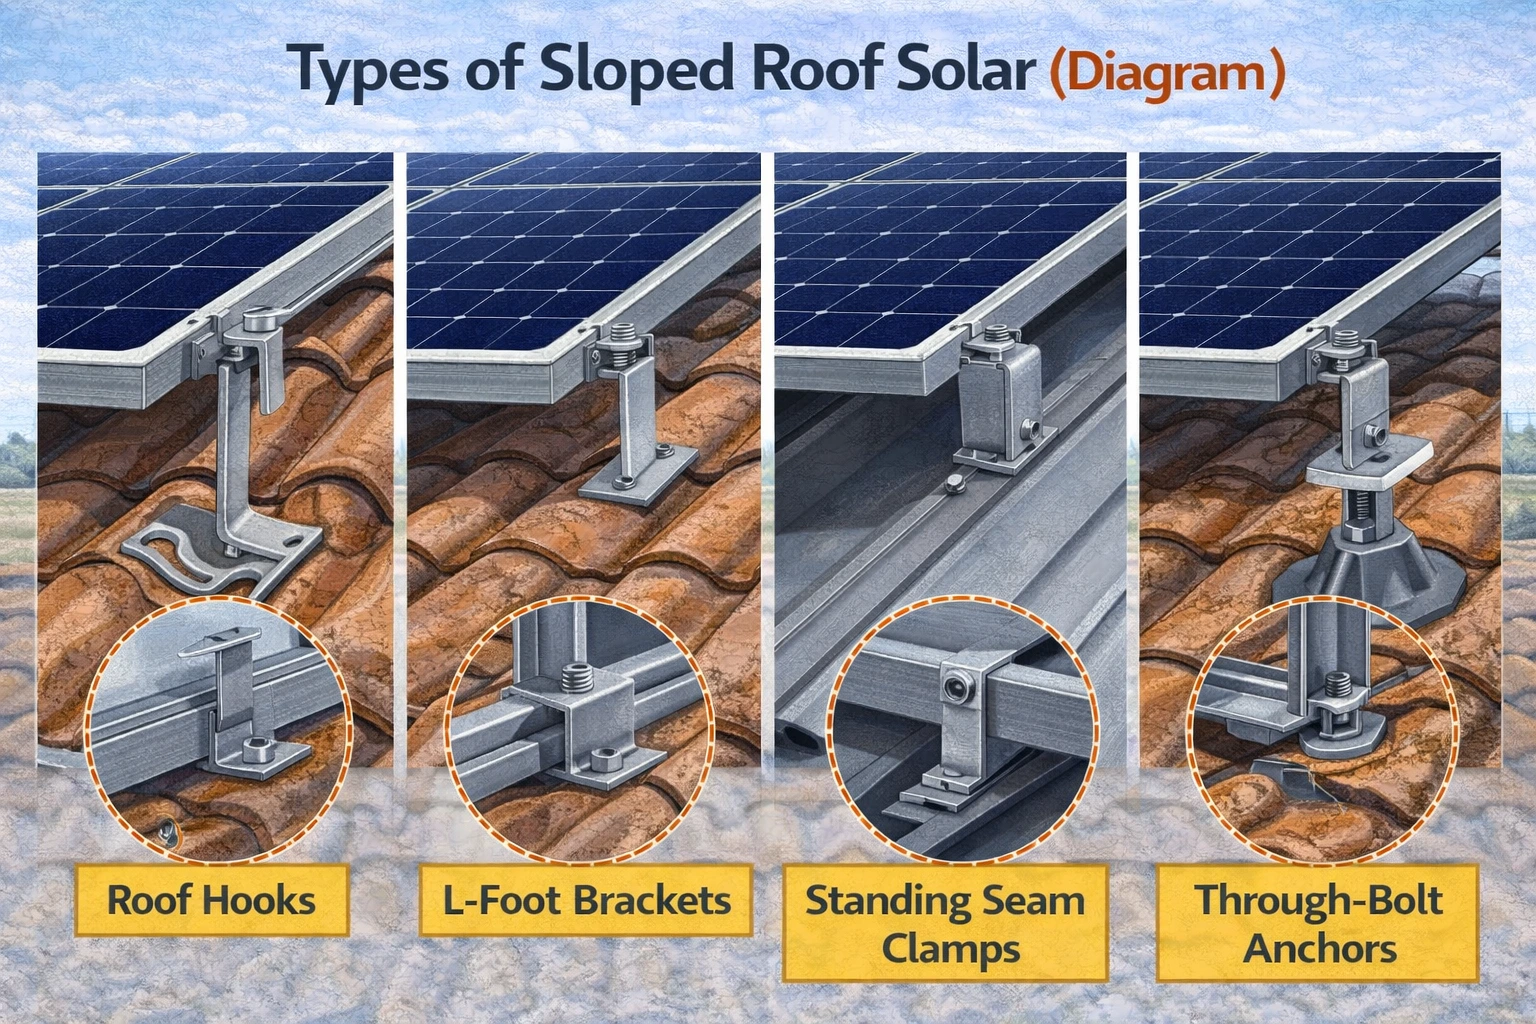
Types of Sloped Roof Solar
1. Roof Hooks
- Used for tile roofs
- Attached to rafters
2. L-Foot Brackets
- Used for metal and RCC roofs
- Fixed using bolts
3. Standing Seam Clamps
- Used for metal roofs
- No drilling required
4. Through-Bolt Anchors
- Fixed directly through roof structure
- Provides strong support
Tools and Materials Required
Tools
- Drilling machine
- Torque wrench
- Spanners
- Measuring tape
- Spirit level
Materials
- Roof attachments (hooks, brackets)
- Anchor bolts
- Fasteners
- Sealants
- Flashing materials
Step-by-Step Installation Process
Step 1 – Site Assessment
Evaluate:
- Roof type (tile, metal, RCC)
- Roof condition
- Structural strength
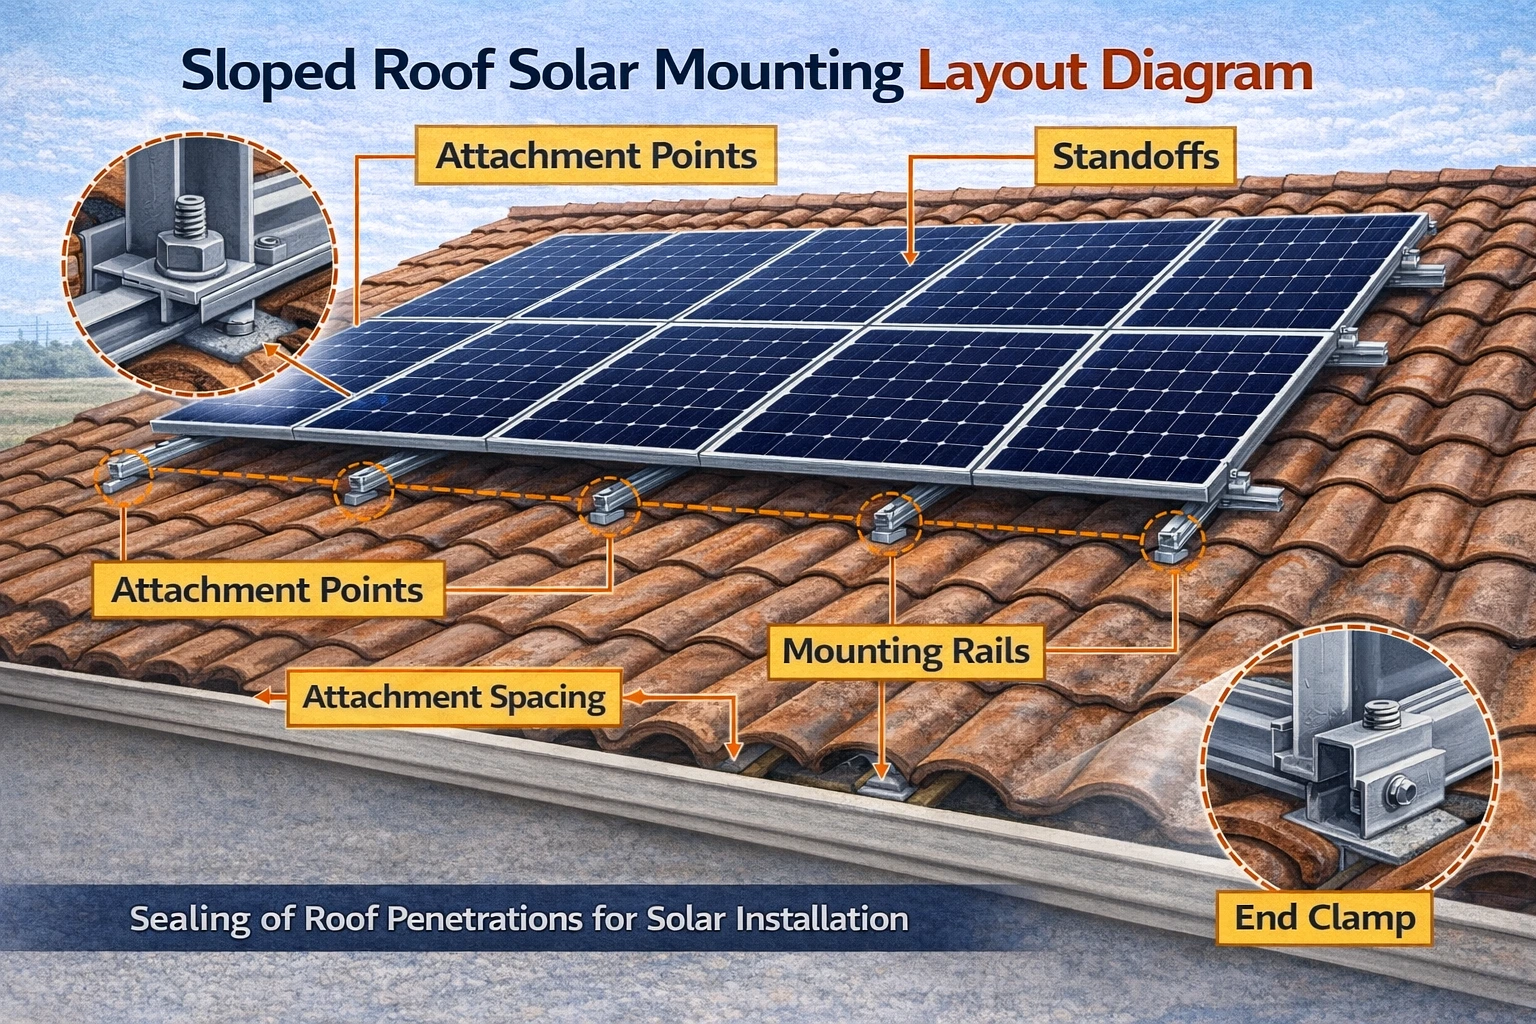
Step 2 – Mark Attachment Points
- Identify rafters or structural supports
- Mark positions as per design
Step 3 – Drill Holes
- Drill at marked locations
- Ensure correct depth and alignment
Step 4 – Install Anchors
- Insert anchor bolts or fasteners
- Fix securely to roof structure
Step 5 – Attach Sloped Roof Solar Mounting Components
- Fix hooks or brackets
- Ensure proper alignment
Step 6 – Apply Waterproofing
- Use sealants and flashing
- Prevent water leakage
Step 7 – Install Mounting Rails
- Attach rails to roof attachments
- Ensure correct spacing and alignment
Step 8 – Tighten and Secure
- Use torque wrench
- Ensure proper fastening
Step 9 – Final Inspection
- Check alignment
- Verify waterproofing
- Ensure stability
Waterproofing Techniques
1. Use of Flashing
Prevents water entry around attachments.
2. Sealants
Seal drilled holes and joints.
3. Proper Installation Technique
Avoid damaging roof materials.
Quality Checks
1. Alignment Check
Ensure all attachments are aligned.
2. Tightness of Fasteners
Verify proper torque application.
3. Leak Testing
Check for water seepage.
4. Structural Stability
Ensure attachments are secure.
Conclusion
The installation of roof attachments and anchors is a crucial step in sloped roof solar PV systems that directly impacts system safety, durability, and performance. By following proper installation procedures, ensuring effective waterproofing, and conducting quality checks, installers can achieve reliable and efficient solar installations.
Correct mounting and anchoring practices are essential for successful solar projects. Additionally, compliance with standards set by the Ministry of New and Renewable Energy ensures safety and quality.
With the right approach, solar professionals can optimize solar panel system cost, enhance solar electricity generation, and contribute to sustainable solar energy for home use and large-scale renewable solar solutions.
FAQs
Q1. What are roof attachments in solar PV systems?
Ans: They are components used to secure mounting structures to the roof.
Q2. Why is waterproofing important in roof attachment installation?
Ans: It prevents water leakage and structural damage.
Q3. Which attachment is used for tile roofs?
Ans: Roof hooks are commonly used for tile roofs.
Q4. How does anchoring affect solar panel system cost?
Ans: Proper anchoring reduces maintenance and long-term costs.
Q5. Are safety measures necessary during installation?
Ans: Yes, they ensure safe working conditions and prevent accidents.
Difference Between Single-Phase and Three-Phase Voltage and Its Use for Solar PV Installer – Complete Guide
Understanding the difference between single-phase and three-phase voltage is essential for solar PV installers. While single-phase supply is common in residential systems, three-phase power is widely used in commercial and industrial solar projects. This complete guide explains electrical phase differences, applications in solar installations, and how choosing the right phase connection impacts system efficiency, safety, and performance.
Difference Between Inverter and Solar Inverter: A Complete Comparison
Confused between an inverter and a solar inverter? This guide explains their key differences, working principles, advantages, and which option is best for your home or business.
Rooftop Solar: Reduce Your Electricity Bill and Increase Savings
Discover how installing a rooftop solar system can help you save on electricity bills, reduce peak demand charges, and take advantage of government incentives.
How Are Solar PV Modules Made? Complete Guide to the Manufacturing Process
Choosing the right solar panels can be confusing with so many options in the market. This guide simplifies solar panel selection by comparing types, efficiency ratings, and cost factors. Whether for your home, business, or industry, learn how to make an informed decision and maximize the return on your solar investment.
Solar System for FMCG Industry: Cost, Benefits, Installation & ROI in India
A complete guide on solar systems for the FMCG industry in India covering installation cost, benefits, ROI, system sizing, and the installation process.

Concrete Formwork for Solar Projects: Design & Execution Guide
A practical guide to concrete formwork in solar projects, covering how to construct forms as per design specifications for accurate and durable foundations.
Agrivoltaics: Merging Solar Power with Farming
Discover how solar batteries store excess energy, maximize your solar system’s efficiency, and provide reliable power during outages. Learn about the types, benefits, lifespan, and maintenance tips to make the most of your solar investment.
How to Calculate PV Power Output? Step-by-Step Guide
Calculating PV power output helps you estimate how much electricity a solar system can generate. This step-by-step guide explains the PV power output formula, examples, and key factors affecting solar energy production.