
In a solar photovoltaic (PV) system, the DC Combiner Box plays a critical role in collecting and managing the DC power generated from multiple solar panel strings. To ensure safety and smooth operation, the combiner box is often equipped with disconnect protection devices such as DC isolators, fuses, and surge protection devices (SPDs).
Proper installation of a DC combiner box with disconnect protection is essential for preventing electrical hazards, simplifying maintenance, and improving overall solar electricity generation efficiency. Incorrect installation can lead to overheating, voltage drops, equipment failure, and increased solar installation charges.
Proper electrical protection and isolation are mandatory in renewable solar installations for safety and system reliability.
This blog provides a complete step-by-step guide for installing a DC combiner box with disconnect protection, aligned with industry best practices and solar training standards.
What is a DC Combiner Box?
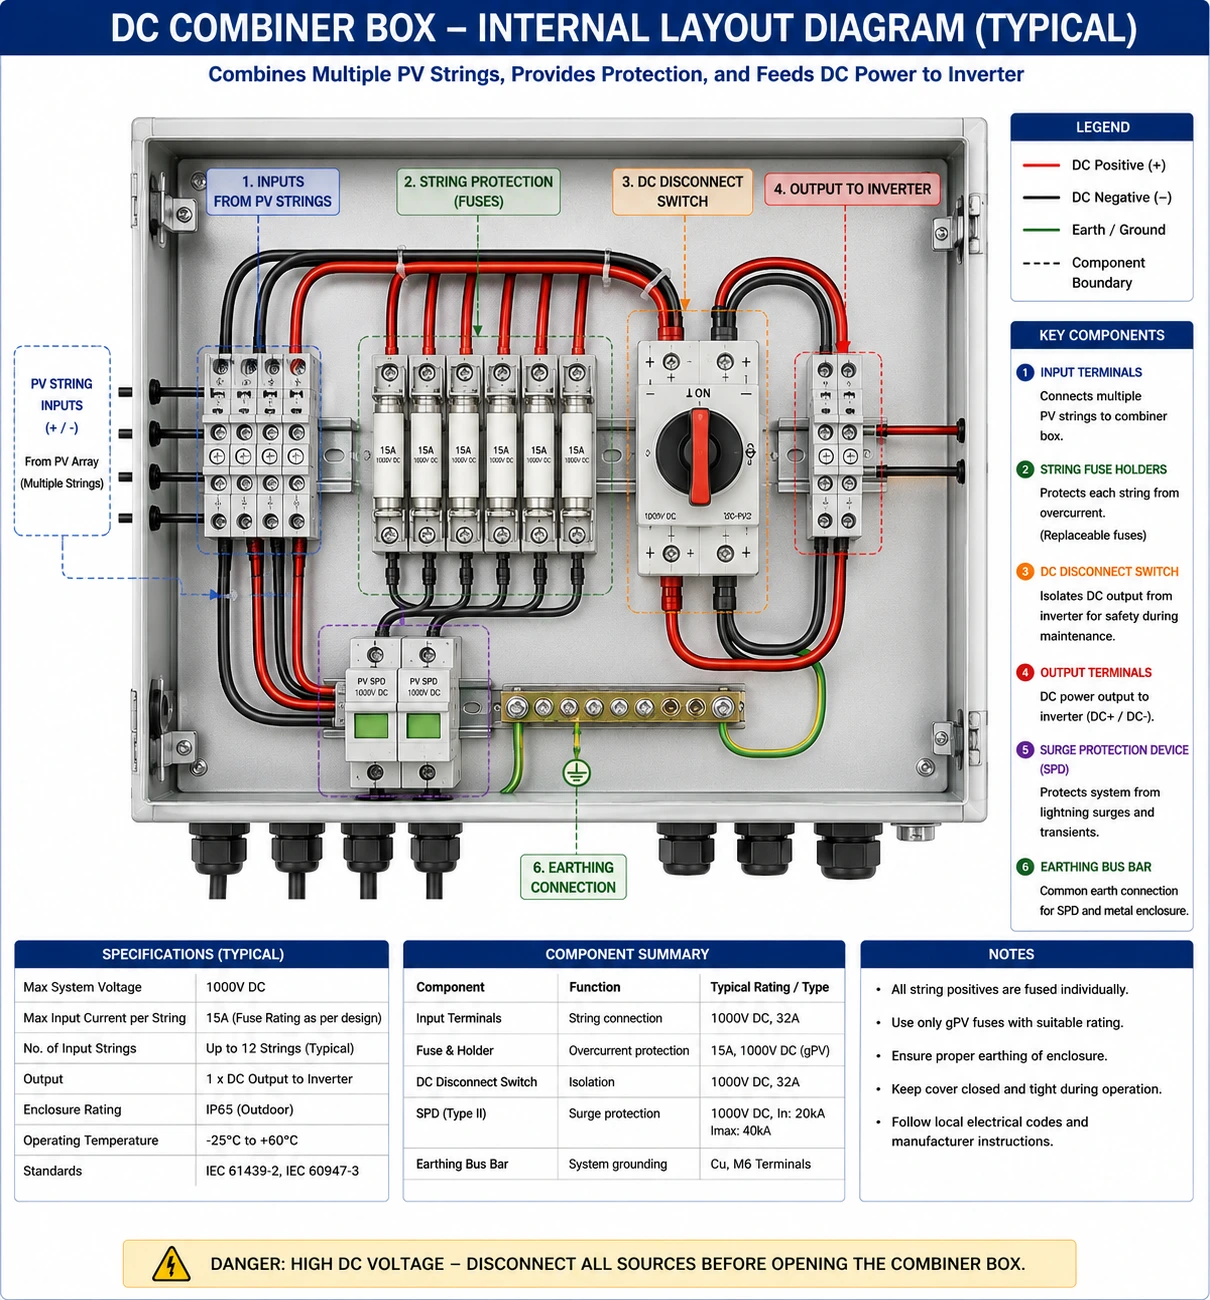
A DC combiner box is an enclosure that combines the output from multiple solar PV strings into a single DC output connected to the inverter.
It typically includes:
- String fuses
- DC isolators/disconnect switches
- Surge Protection Devices (SPDs)
- Terminal blocks
- Monitoring devices
Importance of Disconnect Protection
Disconnect protection ensures that solar PV circuits can be safely isolated during:
- Maintenance
- Emergency shutdown
- Fault conditions
- Inspection and testing
It improves:
- Worker safety
- Equipment protection
- Fire prevention
- System reliability
Components Required for Installation
1. DC Combiner Box Enclosure
Weatherproof enclosure for housing components.
2. DC Disconnect Switch
Allows manual isolation of DC power.
3. String Fuses
Protect individual solar strings from overcurrent.
4. Surge Protection Device (SPD)
Protects against voltage surges and lightning.
5. Terminal Blocks
Provide secure cable connections.
6. Cable Glands and Conduits
Protect and organize cable entry.
Tools Required for Installation
- Insulated screwdrivers
- Wire stripper
- Crimping tool
- Torque wrench
- Multimeter
- Insulation tester
Pre-Installation Preparation
1. Review Design Drawings
Understand:
- String configuration
- Cable routing
- Combiner box location
2. Verify Component Ratings
Ensure compatibility with:
- System voltage
- Current rating
- Environmental conditions
3. Inspect Installation Area
Check for:
- Safe accessibility
- Structural support
- Environmental protection
Step-by-Step Installation Procedure
Step 1 – Select Installation Location
Choose a location that is:
- Close to solar arrays
- Easily accessible
- Protected from water and excessive heat
Step 2 – Mount the DC Combiner Box
- Fix the enclosure securely
- Ensure proper alignment and stability
Step 3 – Install Disconnect Switch
- Mount the DC isolator inside or adjacent to the box
- Ensure clear labeling
Step 4 – Install String Fuses
- Connect fuses for each solar string
- Ensure correct fuse ratings
Step 5 – Install Surge Protection Device
- Connect SPD according to the manufacturer’s instructions
- Ensure proper grounding
Step 6 – Route and Connect Cables
- Use proper cable glands and conduits
- Maintain polarity and cable identification
Step 7 – Tighten Electrical Connections
- Use the torque wrench as per the specifications
- Avoid loose terminals
Step 8 – Ground the Combiner Box
- Connect the grounding cable securely
- Verify earthing continuity
Step 9 – Perform Electrical Testing
Test for:
- Voltage
- Continuity
- Insulation resistance
- Polarity
Step 10 – Label and Document Installation
- Label circuits and disconnect switches
- Update project documentation
Quality Checks After Installation
1. Mechanical Stability
Ensure secure mounting.
2. Proper Cable Management
Check routing and organization.
3. Tightness of Connections
Verify torque values.
4. Functional Testing
Ensure the disconnect switch operates correctly.
5. Weatherproofing
Ensure enclosure sealing.
Conclusion
Installing a DC combiner box with disconnect protection is essential for ensuring the safety, reliability, and efficiency of solar PV systems. By following proper installation procedures, ensuring correct protection device selection, and maintaining quality standards, installers can prevent electrical hazards and improve system performance.
Electrical isolation and protection are fundamental aspects of renewable solar installations. Additionally, compliance with standards set by the Ministry of New and Renewable Energy ensures safe and standardized system operation.
With correct installation practices, solar professionals can optimize solar panel system cost, improve solar electricity generation, and support sustainable solar energy for home use and advanced renewable energy technology solutions.
FAQs
Q1. What is the function of a DC combiner box?
Ans: It combines multiple solar strings into a single DC output.
Q2. Why is disconnect protection important?
Ans: It allows safe isolation during maintenance and emergencies.
Q3. What components are included in a DC combiner box?
Ans: Fuses, SPDs, disconnect switches, and terminal blocks.
Q4. Does proper installation affect solar panel system cost?
Ans: Yes, it reduces maintenance and improves efficiency.
Q5. What safety measures should be followed during installation?
Ans: Use PPE, insulated tools, and isolate circuits before work.
Haryana and UP Face Delays in Solar Net Metering Approvals
Net metering for rooftop solar in Haryana and Uttar Pradesh faces procedural delays, affecting solar adoption and efficiency for residential and commercial consumers
How Quickly Can Solar Panels Pay for Themselves? Payback Period Explained
Learn how the solar panel payback period works, factors that affect ROI, and how soon you can recover your solar investment.
Series & Parallel Wiring in Solar Modules: Installer Guide
A practical guide to solar module interconnection using series and parallel wiring, covering setup, calculations, and best practices for installers.
Improve Your Power Factor After Solar Installation: Complete Guide
Power factor after solar installation often fluctuates due to system design and load patterns. Learn the key causes, challenges, and solutions for better efficiency.
How to Assess Solar PV Array Location for Maximum Energy
A complete guide to battery bank enclosure and rack installation, including site verification, setup procedures, and safety practices for solar PV systems.
How to Check Solar PV Module Performance
A complete guide to testing solar PV module performance, including voltage and current measurements, power output analysis, and performance verification techniques.

New Loan Scheme for solar rooftop projects by IREDA
Solar installation for petrol pumps offers huge savings and energy independence. This 2025 guide explains system cost, subsidy, ROI, and installation process.
How to Read the Electricity Bill Before Deciding Solar Plant Capacity
Load assessment is an essential step before installing a solar PV system. It helps determine electricity consumption and ensures accurate system sizing for optimal solar performance.