
Solar inverters are often referred to as the “heart” of a solar photovoltaic (PV) system because they convert the direct current (DC) electricity generated by solar panels into alternating current (AC) electricity used by homes, businesses, industries, and the electrical grid. In addition to power conversion, modern solar inverters perform critical functions such as Maximum Power Point Tracking (MPPT), system monitoring, fault detection, grid synchronization, anti-islanding protection, energy optimization, and communication with monitoring platforms.
Since the inverter is one of the most sophisticated and expensive components of a renewable solar system, regular inspection and preventive maintenance are essential for ensuring safe operation, maximizing energy generation, and extending equipment lifespan. Environmental conditions such as dust, moisture, heat, humidity, corrosion, insects, rodents, and poor ventilation can significantly affect inverter performance if routine maintenance is neglected.
Periodic inspection helps identify loose electrical connections, damaged cooling fans, clogged air filters, overheating, insulation issues, communication faults, firmware problems, and abnormal operating conditions before they lead to system downtime or equipment failure. Proper maintenance also ensures compliance with manufacturer recommendations, electrical safety standards, and warranty requirements.
Systematic inspection and maintenance of solar inverters are essential for maintaining renewable solar system efficiency, operational safety, and long-term reliability.
This comprehensive guide explains the importance of inverter maintenance, inspection procedures, required tools, testing methods, documentation, safety precautions, and industry best practices.
What is a Solar Inverter?
A solar inverter converts DC electricity produced by PV modules into usable AC electricity.
Modern inverters also perform:
- Maximum Power Point Tracking (MPPT)
- Grid synchronization
- Anti-islanding protection
- System monitoring
- Fault diagnostics
- Communication with monitoring systems
- Battery charging (for hybrid and off-grid systems)
The inverter directly influences the overall efficiency of a solar PV system.
Why is Inverter Inspection Important?
Routine inspections help ensure that the inverter operates efficiently and safely.
Regular maintenance helps:
- Detect faults early
- Improve the renewable solar system efficiency
- Reduce downtime
- Prevent overheating
- Extend the inverter lifespan
- Improve electrical safety
- Maintain warranty compliance
Preventive maintenance reduces unexpected repair costs.
Objectives of Inverter Maintenance
The primary objectives include:
Performance Optimization
Maintain efficient DC-to-AC power conversion.
Equipment Protection
Prevent damage caused by heat, dust, moisture, or electrical faults.
Safety Assurance
Identify hazards before they create unsafe operating conditions.
Cost Reduction
Reduce emergency repairs and replacement costs.
Regulatory Compliance
Ensure compliance with manufacturer recommendations and electrical standards.
Types of Solar Inverters
Different types of solar installations use different inverter technologies.
These include:
String Inverters
Common in residential and commercial solar projects.
Central Inverters
Used in utility-scale solar power plants.
Microinverters
Installed on individual PV modules for module-level optimization.
Hybrid Inverters
Operates with both solar PV systems and battery energy storage systems.
Off-Grid Inverters
Supply AC power independently of the utility grid.
Although maintenance procedures are similar, specific manufacturer recommendations should always be followed.
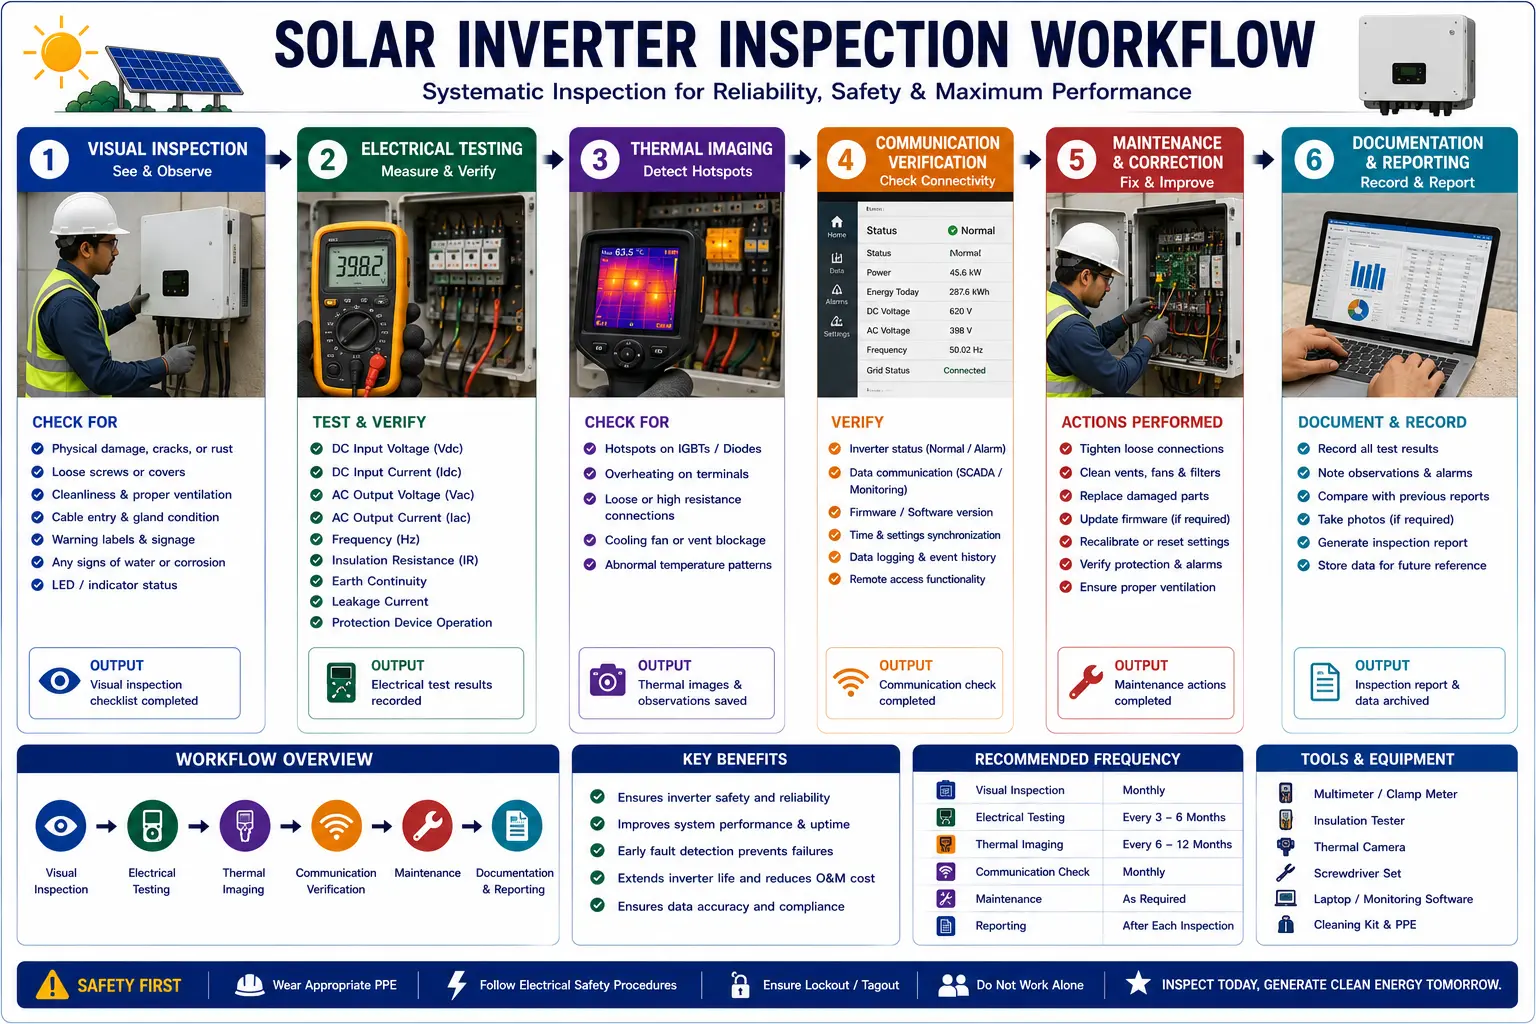
Components to Inspect During Inverter Maintenance
1. Inverter Enclosure
Inspect for:
- Physical damage
- Corrosion
- Dust accumulation
- Water ingress
- Loose covers
The enclosure should remain clean and securely sealed.
2. Cooling System
Check:
- Cooling fans
- Air filters
- Ventilation openings
- Heat sinks
Proper cooling prevents overheating and extends inverter life.
3. DC Input Connections
Inspect:
- Cable condition
- Connector tightness
- Corrosion
- Burn marks
- Loose terminals
Poor DC connections increase electrical losses.
4. AC Output Connections
Verify:
- Cable termination
- Terminal tightness
- Insulation condition
- Signs of overheating
Loose AC connections may create safety hazards.
5. Grounding System
Inspect:
- Ground conductors
- Bonding connections
- Earth continuity
- Corrosion
Proper grounding protects personnel and equipment.
6. Communication System
Verify operation of:
- Wi-Fi
- Ethernet
- RS-485
- SCADA connections
- Monitoring portal communication
Reliable communication supports remote monitoring.
7. Display and Indicators
Check:
- LCD display
- LED indicators
- Alarm messages
- Fault codes
Any abnormal indication should be investigated.
8. Battery Connections (Hybrid/Off-Grid Systems)
Inspect:
- Battery terminals
- Cable condition
- Battery voltage
- Charging operation
Poor battery connections affect system performance.
Common Problems Found During Inverter Inspection
Routine inspections often reveal:
- Overheating
- Dust accumulation
- Cooling fan failure
- Loose terminals
- Corroded connectors
- Moisture ingress
- Firmware errors
- Communication failures
- Ground faults
- Insulation issues
Early detection minimizes downtime.
Tools Required for Inverter Inspection
Common inspection tools include:
- Digital multimeter
- Clamp meter
- Insulation resistance tester
- Infrared thermal camera
- Earth resistance tester
- Torque wrench
- Laptop with the manufacturer’s software
- Cleaning brush
- Vacuum cleaner
- Personal protective equipment (PPE)
Always use calibrated instruments.
Step-by-Step Inverter Inspection Procedure
Step 1 – Review Maintenance Records
Before inspection:
Review:
- Previous maintenance reports
- Fault history
- Manufacturer recommendations
- Firmware updates
Historical records improve fault diagnosis.
Step 2 – Ensure Safe Working Conditions
Verify:
- Safe weather
- Dry working conditions
- Proper PPE
- Electrical isolation where required
Follow lockout/tagout procedures whenever applicable.
Step 3 – Perform Visual Inspection
Inspect the inverter for:
- Physical damage
- Corrosion
- Dust
- Moisture
- Loose components
Record all observations.
Step 4 – Inspect Electrical Connections
Check:
- DC terminals
- AC terminals
- Ground connections
- Cable insulation
Loose or damaged connections should be repaired immediately.
Step 5 – Inspect Cooling System
Verify:
- Cooling fans operate normally.
- Air filters are clean.
- Heat sinks are free of dust.
- Ventilation paths remain unobstructed.
Restricted airflow may cause overheating.
Step 6 – Monitor Operating Parameters
Review inverter readings:
- DC input voltage
- DC current
- AC output voltage
- AC current
- Frequency
- Power output
- Efficiency
- Internal temperature
Compare values with design specifications.
Step 7 – Perform Thermal Inspection
Use an infrared thermal camera to inspect:
- Terminals
- Busbars
- Power electronics
- Cooling system
Thermal imaging helps identify hidden overheating issues.
Step 8 – Verify Communication System
Confirm proper operation of:
- Monitoring software
- Data logger
- Communication ports
- SCADA interface
Resolve communication faults promptly.
Step 9 – Update Firmware (If Required)
Install manufacturer-approved firmware updates only after verifying compatibility and following recommended procedures.
Firmware updates may improve system stability and functionality.
Step 10 – Complete Maintenance Documentation
Record:
- Inspection date
- Electrical measurements
- Fault codes
- Cleaning activities
- Corrective actions
- Technician details
Maintain complete service records.
Preventive Maintenance Activities
Routine maintenance includes:
- Cleaning the inverter enclosure
- Inspecting electrical connections
- Verifying cooling systems
- Monitoring operating parameters
- Updating firmware
- Thermal inspection
- Grounding verification
- Communication testing
Preventive maintenance extends inverter lifespan.
Recommended Maintenance Frequency
General recommendations include:
Maintenance Activity | Typical Frequency |
Visual inspection | Monthly |
Cleaning | Every 3-6 months |
Electrical Inspection | Every 6 months |
Thermal imaging | Annually |
Firmware review | As recommended by the manufacturer |
Comprehensive preventive maintenance | Annually |
Always follow manufacturer recommendations and project maintenance plans.
Benefits of Routine Inverter Maintenance
Improved Renewable Solar System Efficiency
- Well-maintained inverters maximize energy conversion efficiency.
Increased Equipment Lifespan
- Routine maintenance reduces wear and premature failures.
Better Safety
- Regular inspections identify electrical hazards before they become serious.
Reduced Downtime
- Early fault detection minimizes operational interruptions.
Lower Maintenance Costs
- Preventive maintenance is more economical than emergency repairs.
Conclusion
Solar inverters are among the most important components of a solar PV system, making their regular inspection and maintenance essential for ensuring reliable, safe, and efficient solar electricity generation. By carrying out routine visual inspections, monitoring electrical performance, verifying communication systems, maintaining cooling components, updating firmware when required, and documenting maintenance activities accurately, technicians can significantly reduce equipment failures, improve system availability, and extend inverter service life.
Preventive maintenance of solar inverters is a critical responsibility of solar installers, EPC contractors, commissioning engineers, and operations and maintenance professionals. Furthermore, following technical recommendations and safety practices promoted by the Ministry of New and Renewable Energy, together with manufacturer guidelines, helps ensure safe, standards-compliant, and efficient operation of renewable solar systems.
By implementing scheduled maintenance programs, using calibrated testing instruments, maintaining detailed inspection records, responding promptly to fault indications, and following industry best practices, solar professionals can optimize solar panel system cost, reduce the solar installation cost per kWh, maximize solar electricity generation, improve renewable solar system reliability, and ensure the long-term success of residential, commercial, industrial, and utility-scale solar energy projects.
FAQs
Q1. Why is inverter maintenance important in a solar PV system?
Ans: Regular inverter maintenance helps ensure efficient power conversion, detects electrical or mechanical faults early, reduces downtime, extends inverter lifespan, and improves the overall performance and safety of the solar PV system.
Q2. What should be checked during a routine inverter inspection?
Ans: Routine inspections should include checking the inverter enclosure, DC and AC connections, grounding system, cooling fans, air filters, communication systems, display indicators, fault logs, and operating parameters such as voltage, current, frequency, and power output.
Q3. How often should solar inverters be inspected?
Ans: Visual inspections are generally recommended monthly, while detailed electrical inspections, thermal imaging, and comprehensive preventive maintenance should be performed according to the manufacturer’s recommendations and the project’s maintenance schedule.
Q4. What are the common signs of inverter problems?
Ans: Common signs include warning alarms, fault codes, overheating, unusual noises, reduced power output, communication failures, frequent shutdowns, burnt smells, and abnormal voltage or current readings.
Q5. Can inverter maintenance improve solar system efficiency?
Ans: Yes. Regular cleaning, tightening electrical connections, maintaining proper ventilation, monitoring operating parameters, updating firmware, and addressing faults promptly help maximize energy conversion efficiency and improve the overall performance of the renewable solar system.
How to Test PV Module Electrical Output: Step-by-Step Guide
A step-by-step guide to PV module electrical output testing, covering voltage, current measurement, and best practices for accurate performance evaluation.
Solar Installation on Sloped Roofs: Design, Mounting Systems & Best Practices
A practical guide to flat roof solar installation covering key design considerations, mounting system types, and best practices for efficient and reliable performance.
Capex vs Opex Solar Model: Which is Better for Your Energy Needs?
Solar energy systems are becoming increasingly popular in homes and businesses around the world. With rising electricity costs, solar energy provides an attractive alternative to traditional energy sources.
Environmental Hazards in Solar PV Installations Guide
A complete guide to identifying and mitigating safety hazards in solar PV systems, including risk assessment, hazard control, preventive measures, and workplace safety practices.
India Raises Solar Purchase Obligation (SPO) to 8%: A Complete Guide
The Solar Purchase Obligation (SPO) in India is set to increase to 8%, pushing companies to adopt more solar energy. This guide explains the implications for businesses, compliance strategies, and how organizations can align with renewable energy targets.
Solar PV Fault Diagnosis During Power Interruptions
A complete guide to identifying faults in solar PV systems during power generation interruptions, including troubleshooting techniques, root cause analysis, and corrective maintenance.

Solar Roof Hook Installation: Step-by-Step Guide
A step-by-step guide to solar roof hook installation, covering positioning, alignment, and best practices for strong and reliable rooftop systems.
PPE Checklist for Solar Installations: Safety Gear Guide
A complete PPE checklist for solar installations covering essential safety gear required for safe and efficient on-site work.