
In solar photovoltaic (PV) systems, electrical connections play a critical role in ensuring safe and efficient power transmission. Among these connections, cable termination is one of the most important processes during solar installation. Proper cable termination ensures reliable electrical contact between cables and equipment such as solar modules, combiner boxes, inverters, batteries, and distribution panels.
Incorrect cable termination can lead to loose connections, overheating, voltage drops, electrical faults, fire hazards, and increased solar installation charges. Therefore, solar installers and EPC professionals must understand the correct termination procedures, tools, and safety practices required for renewable solar projects.
Proper electrical connections and cable management are essential for safe solar electricity generation and long-term system reliability.
This blog provides a complete guide to cable termination in solar installations, including tools required, step-by-step procedures, safety precautions, testing methods, and best practices.
What is Cable Termination?
Cable termination is the process of securely connecting electrical cables to equipment terminals or connectors to ensure proper current flow.
In solar PV systems, cable termination is required at:
- Solar modules
- DC combiner boxes
- Inverters
- Battery banks
- AC distribution panels
- Earthing systems
Importance of Proper Cable Termination
Proper cable termination helps:
- Reduce electrical resistance
- Prevent overheating
- Improve electrical efficiency
- Enhance system safety
- Increase equipment lifespan
- Optimize solar panel system cost
Improper termination can increase:
- Maintenance expenses
- Energy losses
- Solar installation cost per kWh
Types of Cable Termination Used in Solar PV Systems
1. Lug Termination
Uses cable lugs and terminals for secure connections.
Common Applications:
- Inverters
- Battery banks
- Distribution panels
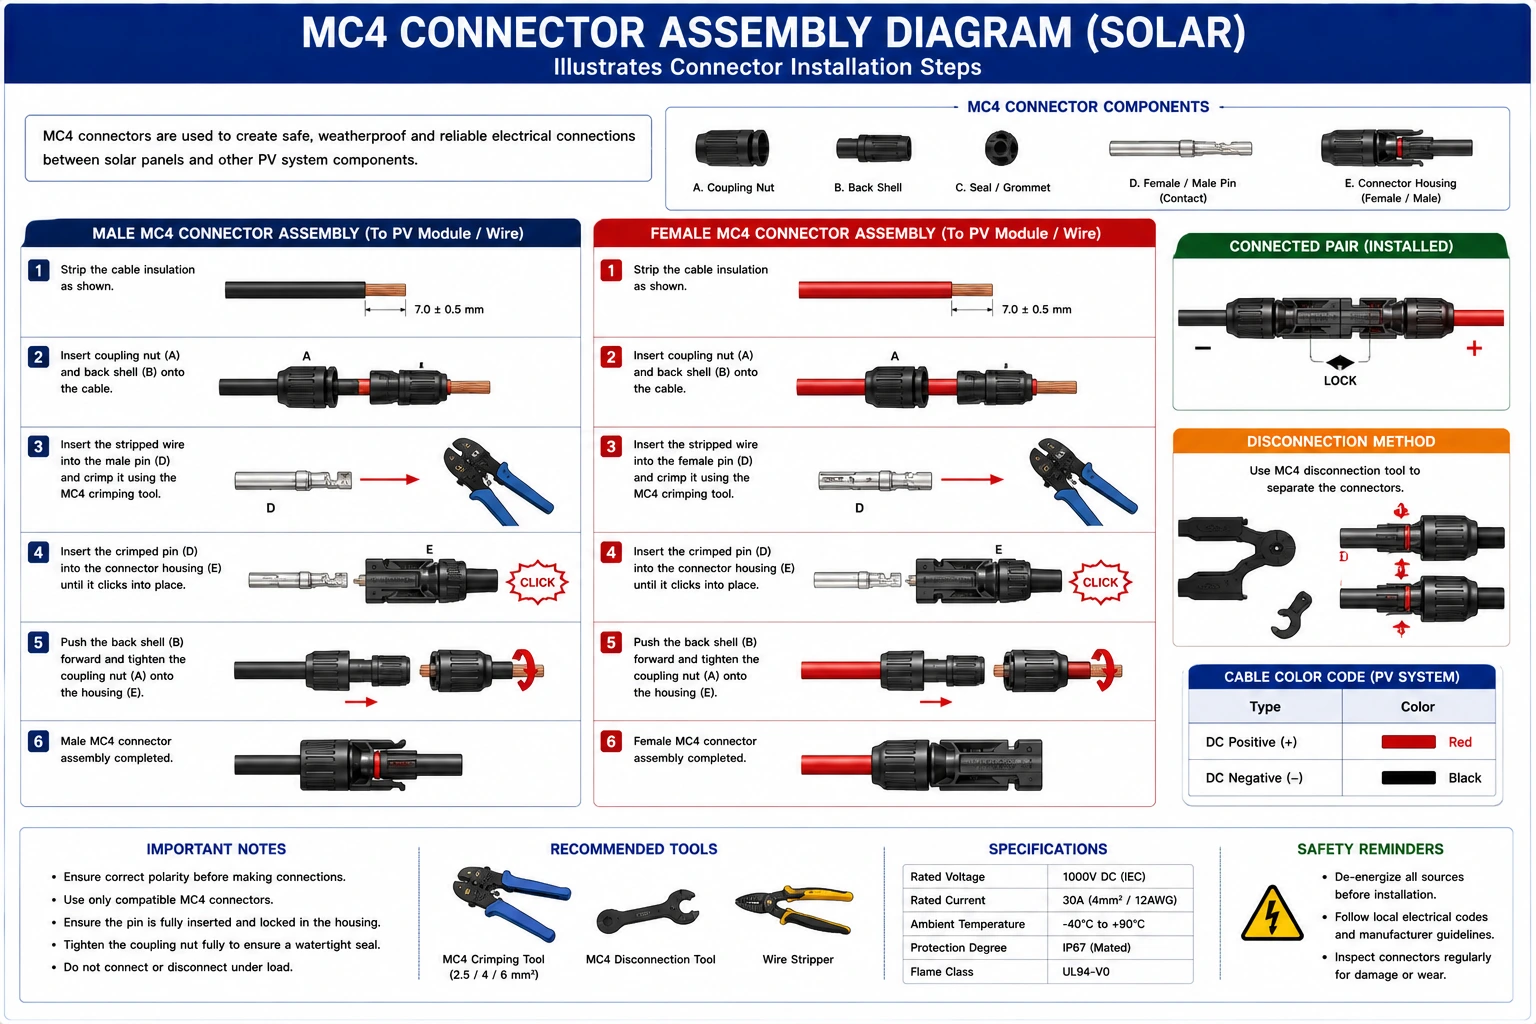
2. MC4 Connector Termination
Used for solar module interconnections.
Features:
- Weatherproof
- UV resistant
- Quick locking mechanism
3. Ferrule Termination
Uses ferrules for stranded conductors.
Benefits:
- Better conductor protection
- Improved connection reliability
4. Screw Terminal Connections
Used in combiner boxes and electrical panels.
Tools Required for Cable Termination
1. Cable Cutter
Used for clean cable cutting.
2. Wire Stripper
Removes cable insulation safely.
3. Crimping Tool
Used for crimping lugs, ferrules, and connectors.
4. Torque Wrench
Ensures proper tightening torque.
5. Multimeter
Used for continuity and voltage testing.
6. Insulation Tester
Checks insulation integrity.
Materials Required for Cable Termination
- Cable lugs
- Ferrules
- Heat shrink sleeves
- MC4 connectors
- Insulation tape
- Cable glands
Factors to Consider Before Cable Termination
1. Cable Size Compatibility
- Ensure lugs and connectors match cable size.
2. Voltage and Current Ratings
- Termination components must support system ratings.
3. Environmental Conditions
Outdoor installations require:
- UV-resistant connectors
- Waterproof protection
4. Equipment Specifications
- Follow manufacturer recommendations.
Step-by-Step Cable Termination Procedure
Step 1 – Isolate Electrical Supply
Before starting work:
- Shut down the inverter
- Disconnect the battery supply
- Isolate AC and DC circuits
Step 2 – Verify Cable Length and Size
- Ensure proper cable dimensions and conductor size.
Step 3 – Cut the Cable Properly
- Use cable cutters to achieve a clean cut.
Step 4 – Strip Cable Insulation
- Remove insulation carefully without damaging conductors.
Step 5 – Select Proper Lug or Connector
Choose connectors according to:
- Cable size
- Voltage rating
- Current capacity
Step 6 – Insert Cable into Lug or Ferrule
- Ensure full conductor insertion.
Step 7 – Crimp the Connection
- Use appropriate crimping tools for secure termination.
- Improper crimping can lead to loose connections and overheating.
Step 8 – Apply Heat Shrink Sleeve (If Required)
- Provides insulation and environmental protection.
Step 9 – Connect to Equipment Terminal
Attach terminated cable to:
- Inverter terminals
- Combiner box terminals
- Battery terminals
- Distribution panels
Step 10 – Tighten Connections Properly
- Use the torque wrench according to the manufacturer’s specifications.
Step 11 – Label the Cables
Identify:
- AC cables
- DC cables
- Earthing cables
Step 12 – Perform Electrical Testing
Verify:
- Continuity
- Voltage levels
- Polarity
- Insulation resistance
MC4 Connector Termination Procedure
Step 1 – Strip Solar Cable
- Remove insulation carefully.
Step 2 – Insert Cable into MC4 Pin
- Ensure correct conductor placement.
Step 3 – Crimp MC4 Pin
- Use the MC4 crimping tool.
Step 4 – Assemble Connector Housing
- Secure the locking mechanism properly.
Step 5 – Test Connector Continuity
- Verify electrical performance.
Quality Checks After Cable Termination
1. Pull Test
Ensures the mechanical strength of termination.
2. Continuity Testing
Verifies electrical connection integrity.
3. Insulation Resistance Testing
Checks insulation quality.
4. Thermal Inspection
Detects overheating points.
5. Torque Verification
Ensures proper tightening.
Applications in Solar Projects
1. Residential Rooftop Solar Systems
Ensures safe solar energy for home use.
2. Commercial Solar Plants
Supports reliable power distribution.
3. Utility-Scale Renewable Solar Projects
Improves long-term system reliability.
Conclusion
Proper cable termination is essential for ensuring safe, efficient, and reliable solar PV system operation. By using the correct tools, selecting suitable connectors, following proper crimping procedures, and conducting quality testing, installers can significantly improve electrical performance and long-term durability.
Secure electrical connections are fundamental to renewable solar systems and solar energy for home use. Additionally, adherence to standards established by the Ministry of New and Renewable Energy ensures safe and standardized installation practices.
With proper cable termination techniques, solar professionals can optimize solar panel system cost, improve solar electricity generation efficiency, and support sustainable renewable energy technology deployment across residential, commercial, and industrial sectors.
FAQs
Q1. Why is cable termination important in solar PV systems?
Ans: It ensures safe and reliable electrical connections.
Q2. What tools are commonly used for cable termination?
Ans: Crimping tools, wire strippers, torque wrenches, and multimeters.
Q3. Why are MC4 connectors used in solar installations?
Ans: They provide secure, weatherproof solar cable connections.
Q4. Does cable termination affect solar panel system cost?
Ans: Yes, proper termination reduces maintenance and equipment failure costs.
Q5. What safety precautions should installers follow?
Ans: Use PPE, insulated tools, and isolate power sources before work.
Inspection Reporting and Corrective Actions in Solar PV Projects Duplicated
A complete guide to preparing solar PV inspection reports and implementing corrective actions to ensure quality, compliance, and project performance.

Sir! Solar Mein Itna Chalta Hai!” When to Reject a Site: The Truth About Shadow Analysis
Discover the importance of solar site assessment and shadow analysis to optimize rooftop solar performance, prevent shading losses, and maximize energy generation.
Different Technical Parameters and Performance of a Solar PV Module
Earthing and lightning protection are critical safety components in solar PV installations. This guide explains their importance, types, components, and best practices for solar installers.
Solar Energy Gadgets in India: 9 Cool Devices to Explore
Explore 9 innovative solar-powered gadgets in India that make daily life more sustainable, energy-efficient, and eco-friendly.
Haryana’s GEOA 2025: A Boost for Captive Solar Plants and Wind Energy Developers
Haryana’s GEOA 2025 paves the way for growth in captive wind and solar energy projects with investor-friendly reforms.

Steps for Conducting a Load Assessment Before Solar Installation and Its Requirements
Load assessment is an essential step before installing a solar PV system. It helps determine electricity consumption and ensures accurate system sizing for optimal solar performance.
How Solar Energy Is Converted into Electricity Using Solar Panels – Complete Guide
Solar panels convert sunlight into usable electricity through the photovoltaic effect. From photon absorption to inverter conversion and grid connection, each component plays a critical role in solar power generation. This complete guide explains the step-by-step process of how solar energy becomes electricity for homes, businesses, and industries, helping you understand the technology behind India’s growing renewable energy movement.

Sanctioned Load & Rooftop Solar: Everything You Need to Know
Learn why sanctioned load is crucial before rooftop solar installation. Understand its role, process, and impact on solar panel efficiency and subsidy eligibility.