
Solar photovoltaic (PV) systems are typically designed by connecting multiple solar modules into strings, which are then connected to combiner boxes and inverters. Each string should generate nearly identical electrical output when installed under similar environmental conditions. However, over time, certain strings may begin producing lower current or power than expected due to equipment faults, shading, module degradation, loose electrical connections, cable damage, or environmental factors. Identifying these underperforming strings is one of the most important preventive maintenance activities in solar PV systems.
Routine string current testing enables technicians to compare the performance of individual strings, detect abnormalities, isolate faulty components, and restore optimal energy generation. Since the output of an entire solar PV system depends on the performance of each string, even one underperforming string can significantly reduce the efficiency of the complete installation.
Modern solar power plants use monitoring systems that provide real-time string-level performance data. However, field testing with calibrated instruments remains essential for confirming faults, identifying root causes, and verifying corrective actions. Regular current measurements also help detect gradual performance degradation before it develops into major equipment failures.
Checking current output for each string and identifying strings with low or undesired power output is a fundamental skill for solar installers, commissioning engineers, EPC contractors, and operations and maintenance (O&M) professionals.
This comprehensive guide explains why string current testing is important, common causes of low string output, testing procedures, required tools, safety precautions, documentation practices, and industry best practices.
What Is a Solar PV String?
A solar PV string consists of multiple solar modules connected in series to increase DC voltage before supplying power to the inverter through a DC combiner box.
A solar installation may contain:
- One string
- Multiple strings connected to one inverter
- Multiple strings connected to several inverters
Each string should produce a similar current under identical operating conditions.
Why Check Current Output for Each String?
Routine current measurement helps technicians:
- Detect underperforming strings
- Identify faulty PV modules
- Locate cable or connector faults
- Detect shading effects
- Improve the renewable solar system efficiency
- Prevent major equipment failures
- Maximize solar electricity generation
Early fault detection minimizes downtime and maintenance costs.
Importance of String Performance Monitoring
Routine string testing provides:
- Early fault identification
- Performance verification
- Preventive maintenance
- Improved system reliability
- Better warranty support
- Reduced operating costs
String-level monitoring is particularly important in large commercial and utility-scale solar projects.
Common Causes of Low String Output
1. Partial Shading
Shading from:
- Trees
- Buildings
- Bird droppings
- Dust
- Leaves
Can reduce string current significantly.
2. Dirty PV Modules
Dust accumulation reduces sunlight reaching the solar cells. Lower irradiance results in reduced current generation.
3. Faulty Solar Modules
Possible defects include:
- Cracked cells
- Delamination
- Hotspots
- Burn marks
- Water ingress
Damaged modules affect the entire string’s performance.
4. Loose Electrical Connections
Poor connections increase resistance and reduce current flow.
Inspect:
- MC4 connectors
- Junction boxes
- Combiner boxes
- Terminal blocks
5. Cable Damage
Inspect cables for:
- Rodent damage
- UV degradation
- Broken conductors
- Insulation failure
Damaged cables reduce electrical performance.
6. Bypass Diode Failure
Faulty bypass diodes reduce module output and lower string current.
7. Module Degradation
Natural aging reduces the current generation over time. Routine testing identifies gradual degradation.
8. Inverter MPPT Issues
Maximum Power Point Tracking (MPPT) faults may reduce current utilization. Verify inverter operation during troubleshooting.
9. Combiner Box Faults
Inspect:
- DC fuses
- Busbars
- Terminal blocks
- Surge Protection Devices (SPDs)
Combiner box faults may isolate individual strings.
10. Environmental Conditions
Performance varies with:
- Solar irradiance
- Temperature
- Cloud cover
- Seasonal changes
Environmental conditions should always be considered during testing.
Tools Required for String Current Testing
Technicians commonly use:
- DC clamp meter
- Digital multimeter
- PV analyzer
- Irradiance meter (Pyranometer)
- Infrared thermal camera
- IV curve tracer
- Personal Protective Equipment (PPE)
Only calibrated instruments should be used.
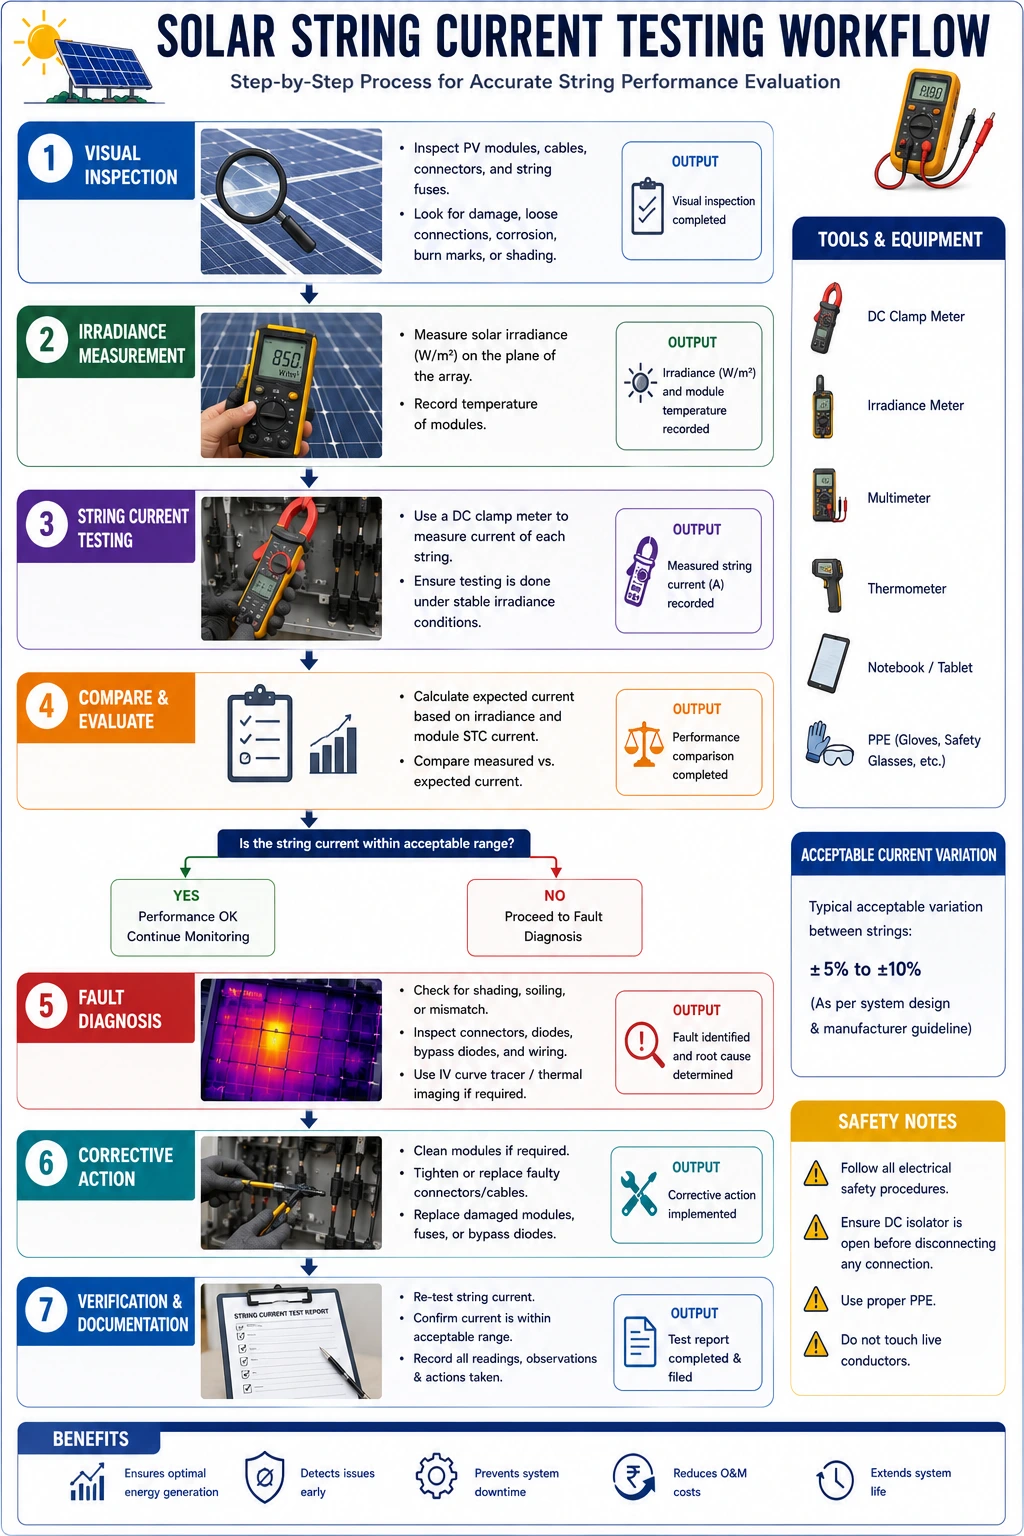
Step-by-Step Procedure for Checking String Current
Step 1 – Review System Documentation
Before testing:
Review:
- Electrical drawings
- String layout
- Module datasheets
- Previous maintenance records
Understand the expected current values.
Step 2 – Verify Environmental Conditions
Measure:
- Solar irradiance
- Ambient temperature
- Module temperature
Testing should ideally be performed under stable sunlight.
Step 3 – Perform Visual Inspection
Inspect:
- PV modules
- Connectors
- Cables
- Combiner boxes
- Mounting structures
Look for:
- Dust
- Shading
- Loose connections
- Physical damage
Correct visible issues before electrical testing.
Step 4 – Verify Inverter Operation
Ensure:
- Normal inverter operation
- No active fault codes
- Proper MPPT function
Inverter faults may affect current measurements.
Step 5 – Measure Current for Each String
Using a DC clamp meter:
- Measure operating current for each string individually.
Record:
- String identification
- Current value
- Irradiance
- Module temperature
Maintain consistent testing conditions.
Step 6 – Compare String Outputs
Compare measured current values between strings. Normally, strings operating under identical conditions should produce similar current.
Significant differences require further investigation.
Step 7 – Identify Underperforming Strings
A string producing substantially lower current than similar strings may indicate:
- Module failure
- Shading
- Loose connectors
- Cable faults
- Fuse failure
- Bypass diode problems
Further testing is required to locate the exact fault.
Step 8 – Perform Additional Diagnostics
If an abnormal current is detected:
Inspect:
- Module voltage
- Open Circuit Voltage (Voc)
- Short Circuit Current (Isc)
- Insulation resistance
- Thermal images
These tests help identify the root cause.
Step 9 – Perform Corrective Actions
Depending on the identified fault:
- Clean PV modules
- Tighten electrical connections
- Replace damaged cables
- Repair connectors
- Replace faulty modules
- Replace defective fuses
- Correct shading issues
Verify performance after repairs.
Step 10 – Record Test Results
Document:
- String current
- Irradiance
- Temperature
- Observed faults
- Corrective actions
- Technician details
Maintain accurate maintenance records.
Interpretation of Test Results
Examples:
Observation | Possible Cause |
One string has a significantly lower current | Shading or faulty module |
Multiple strings have low current | Low irradiance or inverter issue |
Current fluctuates frequently | Loose connection or intermittent fault |
Zero current | Open circuit, blown fuse, disconnected cable, or severe equipment failure |
Proper analysis should always consider environmental conditions.
Conclusion
Routine measurement of current output for each solar PV string is an essential maintenance practice for ensuring optimal system performance and reliable solar electricity generation. Comparing the currents of individual strings under similar operating conditions allows technicians to quickly identify underperforming strings caused by shading, dust, damaged modules, loose electrical connections, cable faults, or equipment failures. Prompt diagnosis and corrective action help restore balanced system operation, reduce downtime, and improve long-term energy production.
String current testing is a fundamental skill for solar installers, commissioning engineers, EPC contractors, and operations and maintenance professionals. Furthermore, following technical recommendations and safety practices promoted by the Ministry of New and Renewable Energy, together with manufacturer guidelines, helps ensure safe, standards-compliant, and accurate performance evaluation of solar PV systems.
By implementing scheduled string current inspections, using calibrated testing instruments, documenting environmental conditions, maintaining detailed maintenance records, and resolving abnormalities without delay, solar professionals can optimize solar panel system cost, maximize renewable solar system reliability, improve solar electricity generation, reduce the cost of solar per kWh installed, and ensure the long-term success of residential, commercial, industrial, and utility-scale solar energy projects.
FAQs
Q1. Why should the current output of each solar PV string be measured?
Ans: Measuring the current of each string helps identify underperforming strings, detect faulty modules or electrical connections, improve system efficiency, and prevent unexpected power losses.
Q2. What causes one solar string to produce less current than others?
Ans: Common causes include partial shading, dust accumulation, damaged PV modules, loose connectors, faulty bypass diodes, cable damage, blown fuses, combiner box faults, or inverter MPPT issues.
Q3. Which instrument is commonly used to measure string current?
Ans: A calibrated DC clamp meter is the most commonly used instrument for measuring the operating current of individual solar PV strings without disconnecting the circuit.
Q4. Should environmental conditions be considered during string current testing?
Ans: Yes. Solar irradiance, module temperature, cloud cover, and shading significantly affect current generation. These conditions should always be recorded when comparing string performance.
Q5. What should be done if one string produces significantly lower current?
Ans: Technicians should perform a detailed inspection of the affected string, including checking PV modules, connectors, cables, combiner box components, bypass diodes, inverter inputs, and electrical measurements such as voltage and insulation resistance to identify and correct the root cause.
PPE Checklist for Solar Installations: Safety Gear Guide
A complete PPE checklist for solar installations covering essential safety gear required for safe and efficient on-site work.

Corporate Safety Policies for Solar PV Workplaces
A complete guide to establishing and following safe work procedures in solar PV systems, ensuring worker safety during installation, testing, commissioning, operation, and maintenance.
Solar Power System Efficiency: How to Calculate for Residential, Industrial & Commercial Use
Understand and measure your solar system’s performance. Maximize energy output at home, industrial units, and commercial buildings
Delhi Jal Board Solar Project: A Step Towards Sustainable Energy
Delhi Jal Board has embraced solar power, becoming a leader in renewable energy adoption. This initiative highlights the benefits of solar energy, including cost savings, sustainability, and promoting clean energy practices in institutional operations.
Top Industrial Solar EPC: How to Choose the Right Solar EPC Company for Industries in India
Choosing the right industrial solar EPC is critical for plant performance and ROI. This guide explains how Indian industries can select the best solar EPC partner.
Solar PV Conduit & Cable Routing Plan Guide
A complete guide to preparing solar PV conduit and cable routing plans, including layout design, routing methods, and installation best practices.
Solar Rooftop Projects: Benefits of Intentional Islanding for Power Backup
Discover the role of intentional islanding in solar rooftop projects. Ensure continuous power supply, system safety, and reliable energy even during grid failures.
How Solar Energy Generation Is Calculated: A Simple Step-by-Step Guide
Understanding how solar energy generation is calculated helps estimate system output, savings, and ROI. This step-by-step guide explains the formula, key factors, and real-world examples to make solar energy calculation simple and practical.