
The start-up and shutdown of a solar photovoltaic (PV) system are important operational activities that should be performed in a controlled and systematic manner. Incorrect switching, premature energization, or failure to follow the manufacturer’s instructions can result in equipment damage, electrical faults, unexpected power generation, or safety risks to personnel.
A PV system may include solar modules, DC cables, combiner boxes, DC isolators, inverters, AC distribution equipment, batteries, charge controllers, protection devices, and energy meters. The exact sequence for starting or shutting down the system depends on the system architecture and equipment manufacturer’s instructions.
For this reason, a PV installer or technician should understand the approved operating sequence before attempting to energize or de-energize the system. Proper procedures support safe operation, reliable solar electricity generation, and effective maintenance of the installation.
Why Are Correct Start-Up and Shutdown Procedures Important?
A solar PV system contains multiple sources of electrical energy. Even when the inverter is switched off, PV modules can continue producing DC voltage when exposed to sunlight. Grid-connected systems may also have an AC supply, while hybrid and standalone systems can include batteries or other energy-storage equipment.
Following a defined sequence helps to:
- Protect workers from electrical hazards.
- Prevent equipment damage.
- Avoid unnecessary inverter faults.
- Confirm that protection devices are functional.
- Establish correct system operation.
- Make troubleshooting easier.
- Maintain reliable solar electricity generation.
The manufacturer’s instructions and the project’s approved operating procedure should always take priority over a generic sequence.
Start-Up Procedure for a Solar PV System
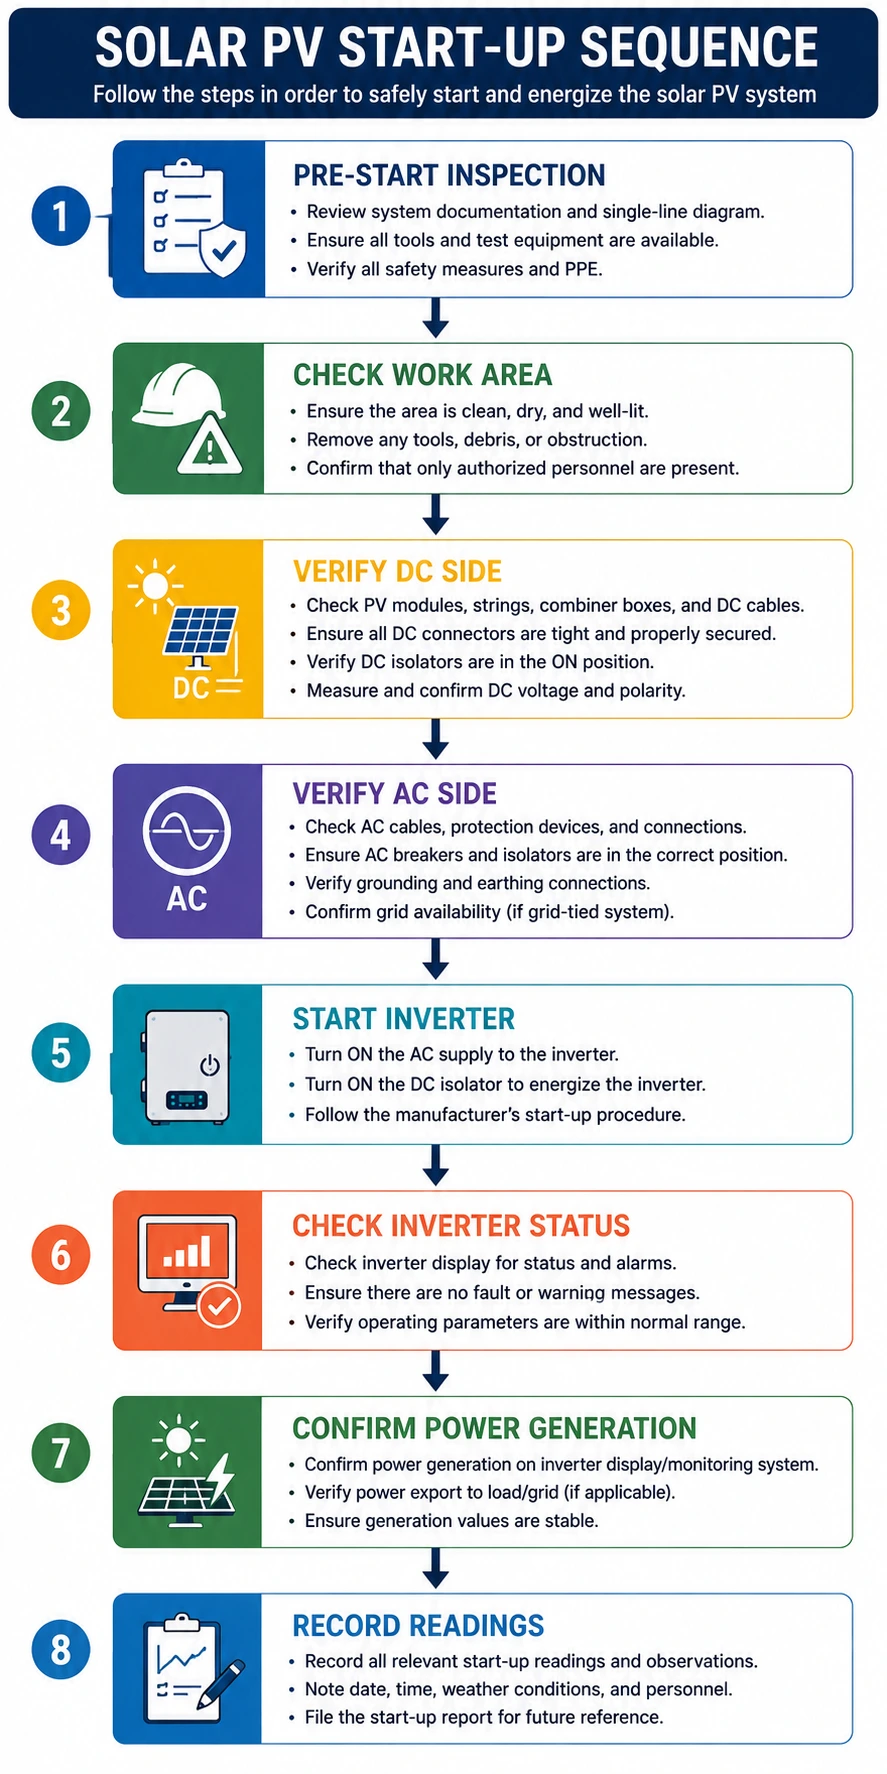
1. Conduct a Pre-Start Inspection
Before energizing the system, inspect the installation visually.
Check:
- PV modules for visible damage.
- DC and AC cables for damage.
- Connectors for correct engagement.
- Inverter and enclosure condition.
- Earthing and bonding.
- Combiner boxes and protection devices.
- Battery connections where applicable.
- Signs of water ingress or overheating.
Any abnormal condition should be addressed before startup.
2. Confirm the Work Area Is Safe
Ensure that personnel, tools, packaging, and other materials have been removed from areas where they could create a hazard.
Check that:
- Electrical panels can be safely accessed.
- Covers and enclosures are properly secured.
- No unauthorized person is working on the system.
- Warning labels are visible.
- Emergency access routes remain clear.
The system should not be energized while maintenance or repair work is still in progress.
3. Verify the DC Side
Before operating the inverter, the PV DC side should be checked according to the applicable procedure.
Depending on the system, this may involve verifying:
- Polarity
- DC voltage
- String connections
- DC isolators
- Combiner-box condition
- Fuse condition
- Surge protection devices
Measurements should only be performed by appropriately trained personnel using suitable instruments.
4. Check the AC Side
For a grid-connected PV system, the AC side should be checked before connecting the inverter to the grid.
The technician may verify:
- AC supply availability
- Voltage
- Frequency
- Circuit-breaker status
- AC isolator position
- Distribution-board condition
The measured values should fall within the equipment’s permitted operating range.
5. Start the Inverter
The inverter should be started according to the manufacturer’s specified sequence.
After startup, observe:
- Display or indicator lights
- Inverter status
- DC input
- AC output
- Grid status
- Fault or warning messages
The inverter may take some time to complete internal checks and synchronize with the grid.
Do not repeatedly restart an inverter without understanding the cause of a fault or alarm.
6. Confirm Power Generation
Once the inverter is operating normally, check whether the PV system is generating power.
Where available, verify:
- DC voltage
- DC current
- AC voltage
- AC current
- Instantaneous power
- Energy meter reading
- Inverter operating status
The readings should be recorded according to the project’s commissioning or operational documentation.
Shutdown Procedure for a Solar PV System
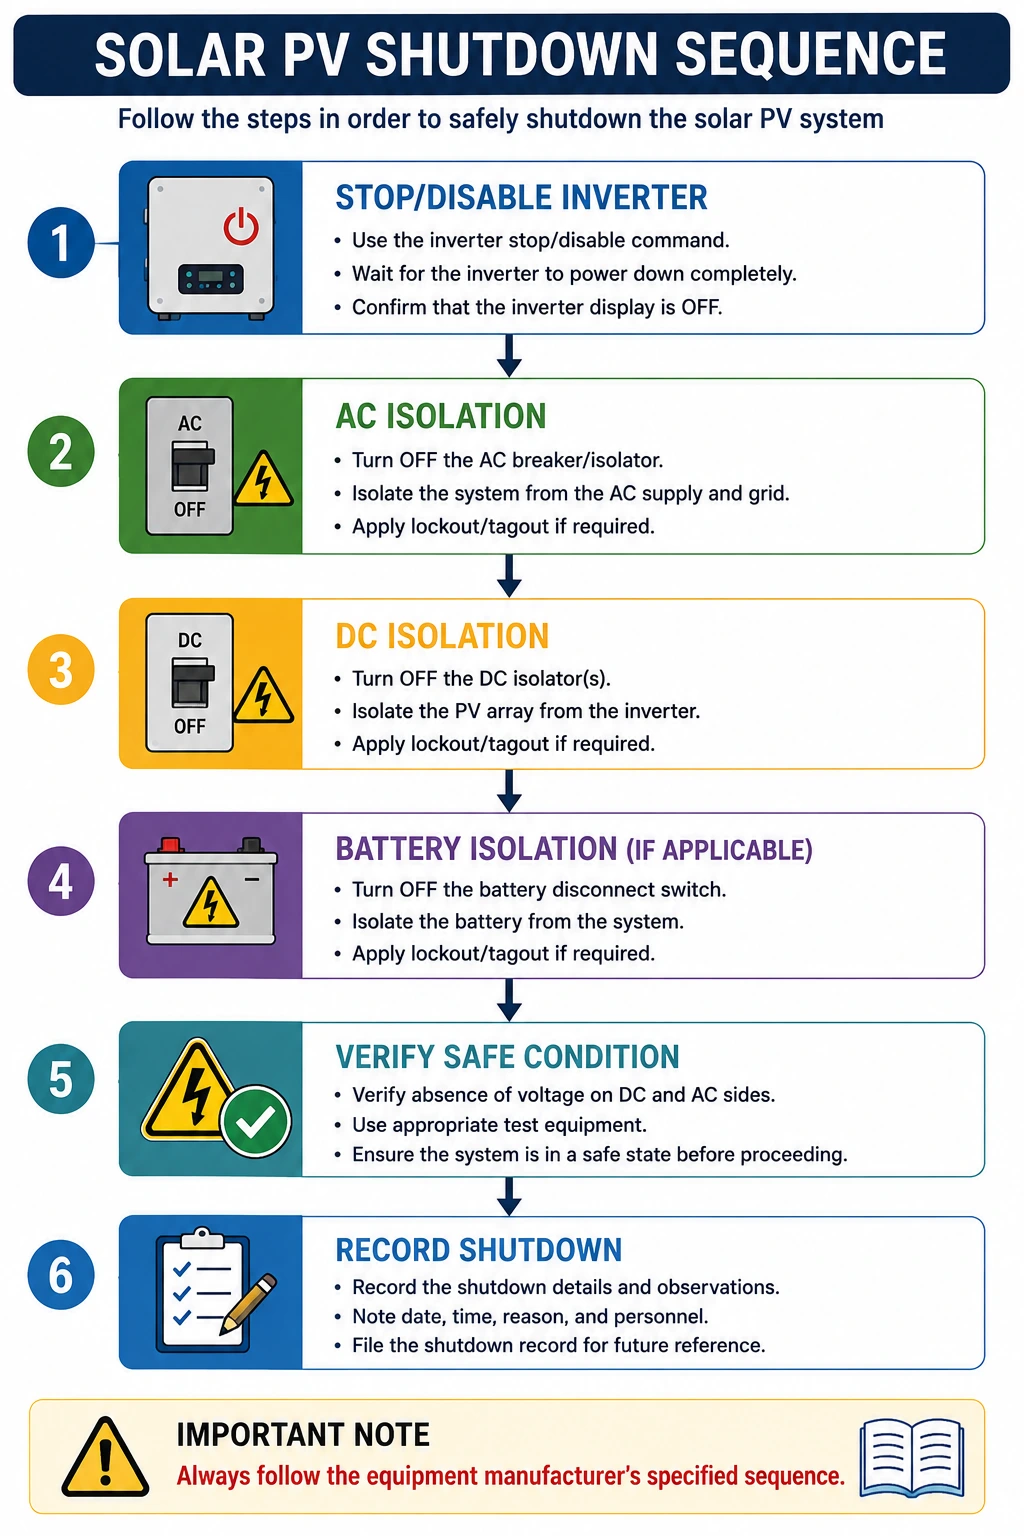
1. Follow the Approved Shutdown Sequence
Shutdown should be carried out according to the manufacturer’s instructions.
A controlled shutdown may involve:
Stop/Disable Inverter → Isolate AC Side → Isolate DC Side → Isolate Other Energy Sources
However, the exact sequence varies between equipment and system types. The manufacturer’s specified procedure should always be followed.
2. Disconnect the AC Supply as Required
For maintenance or complete system shutdown, the appropriate AC isolation device may be operated according to the approved procedure.
The technician should confirm that the intended circuit has been isolated and prevent accidental re-energization where required.
3. Isolate the DC Side
The PV array can continue producing electricity in sunlight. Therefore, simply switching off the inverter does not necessarily eliminate DC voltage.
Where the system procedure requires it, the relevant DC isolators should be operated and the safe condition verified using appropriate methods.
4. Consider Batteries and Energy Storage
Standalone and hybrid systems may contain batteries that remain energized even after the PV array or inverter has been switched off.
Battery isolation should therefore be performed according to the manufacturer’s instructions and the system’s approved shutdown procedure.
Do not assume that switching off one component has isolated the entire system.
5. Verify Shutdown and Record the Condition
After shutdown, confirm that the system has reached the intended state.
Check:
- Inverter status
- AC isolation
- DC isolation
- Battery status where applicable
- Energy meter reading
- Alarm or fault indications
Record relevant readings and observations in the system logbook.
Important Safety Precautions
During start-up and shutdown:
- Never bypass safety devices.
- Never operate damaged equipment.
- Use appropriate PPE.
- Follow electrical isolation procedures.
- Use correctly rated test instruments.
- Keep unauthorized personnel away.
- Follow manufacturer instructions.
- Do not work on energized equipment unless specifically authorized and controlled under applicable procedures.
PV modules can generate voltage whenever sufficient light is available, so workers must always consider the possibility of energized DC circuits.
Start-Up and Shutdown Checklist
Start-Up
- Inspect modules and equipment.
- Check cables and connectors.
- Confirm safe work area.
- Verify DC conditions.
- Check AC supply.
- Follow inverter startup instructions.
- Observe inverter status.
- Confirm power generation.
- Record readings.
Shutdown
- Follow the approved shutdown procedure.
- Stop/disable the inverter as instructed.
- Isolate AC supply where required.
- Isolate DC circuits where required.
- Address battery isolation where applicable.
- Verify the intended safe state.
- Record meter readings and observations.
Conclusion
Demonstrating correct start-up and shutdown procedures is an essential skill for anyone involved in the operation and maintenance of a solar PV system. A systematic procedure ensures that the system is inspected, energized, operated, isolated, and de-energized in a controlled manner.
Before startup, the installer should inspect the PV modules, cables, connectors, protection equipment, inverter, earthing, and other relevant components. DC and AC conditions should be verified before the inverter is started. Once operational, the technician should confirm normal inverter operation and record important electrical and energy-meter readings.
During shutdown, the approved sequence should be followed carefully. The inverter, AC circuits, DC circuits, and batteries should be addressed according to the equipment manufacturer’s instructions. Because PV modules can remain electrically active in sunlight and batteries can retain stored energy, workers should never assume that switching off one component has completely isolated the system.
These procedures are important for solar energy for home use, commercial and industrial installations, and large-scale solar plants. Correct operation improves safety, protects equipment, supports effective maintenance, and helps maintain reliable solar electricity generation.
Ultimately, proper startup and shutdown are more than simple switching operations. They are controlled processes involving inspection, verification, energization, monitoring, isolation, testing, and documentation. Following these practices helps create safer PV installations while supporting the efficient and dependable growth of renewable energy and solar energy.
FAQs
Q1. Why is the correct startup sequence important?
Ans: A controlled startup allows the PV system and its protection equipment to be checked before normal operation, reducing the risk of faults and equipment damage.
Q2. Can PV modules produce electricity when the inverter is switched off?
Ans: Yes. PV modules can continue producing DC voltage when exposed to sufficient sunlight. Therefore, switching off the inverter does not automatically eliminate all DC electrical hazards.
Q3. Should the manufacturer’s instructions be followed during startup?
Ans: Yes. The manufacturer’s instructions should take priority because startup and shutdown sequences can differ between inverter, battery, and other equipment models.
Q4. What should be checked before starting an inverter?
Ans: The technician should check the physical condition of the system, DC and AC connections, protection equipment, electrical parameters, and work-area safety according to the applicable procedure.
Q5. Why should inverter readings be recorded after startup?
Ans: Recording voltage, current, power, energy, and status information provides a baseline for monitoring system performance and identifying future abnormalities.
UPNEDA Solar Subsidy 2025: How to Maximize Savings on Rooftop Solar
Discover how the UPNEDA Solar Subsidy 2025 can help you cut electricity costs and make rooftop solar more affordable. Learn about eligibility, subsidy rates, and the step-by-step application process.
Solar Panel Specifications Explained: How to Read Datasheets & Choose the Right PV Module
Choosing the right solar panel requires a clear understanding of technical specifications. This guide explains how to read solar panel datasheets, interpret key parameters, and select the best PV module for your project.
Solar Mounting Structure Installation: Complete Project Guide
A complete guide to solar mounting structures types in PV systems, covering fixed tilt, tracking, and rooftop installations for installers.

SmartRoof Solar Associate Program – Easy Way to Earn with Solar Referrals
Join the SmartRoof Solar Associate Program. Refer solar leads, earn rewards, and support clean energy growth in your community.
Why Solar Energy Makes Sense for the Healthcare Industry
Explore how the healthcare industry can leverage solar energy to reduce electricity bills, enhance reliability, and support green initiatives.
Solar ROI for Commercial & Industrial Projects in India: Cost, Payback & Profits
Learn how commercial and industrial solar projects deliver strong ROI for businesses in India through lower energy costs, faster payback, and long-term profit generation.
Solar Module Support & Racking Frame Installation
A practical guide to solar racking frame installation, covering module support structures, alignment, and best practices for reliable PV systems.
What Is Solar Performance Ratio (PR)? Meaning, Formula & Importance
Solar Performance Ratio (PR) is a key indicator of how efficiently a solar power system converts available sunlight into usable electricity. This guide explains what PR is, how it is calculated, why it matters, and how it directly impacts your solar system’s actual energy output.