
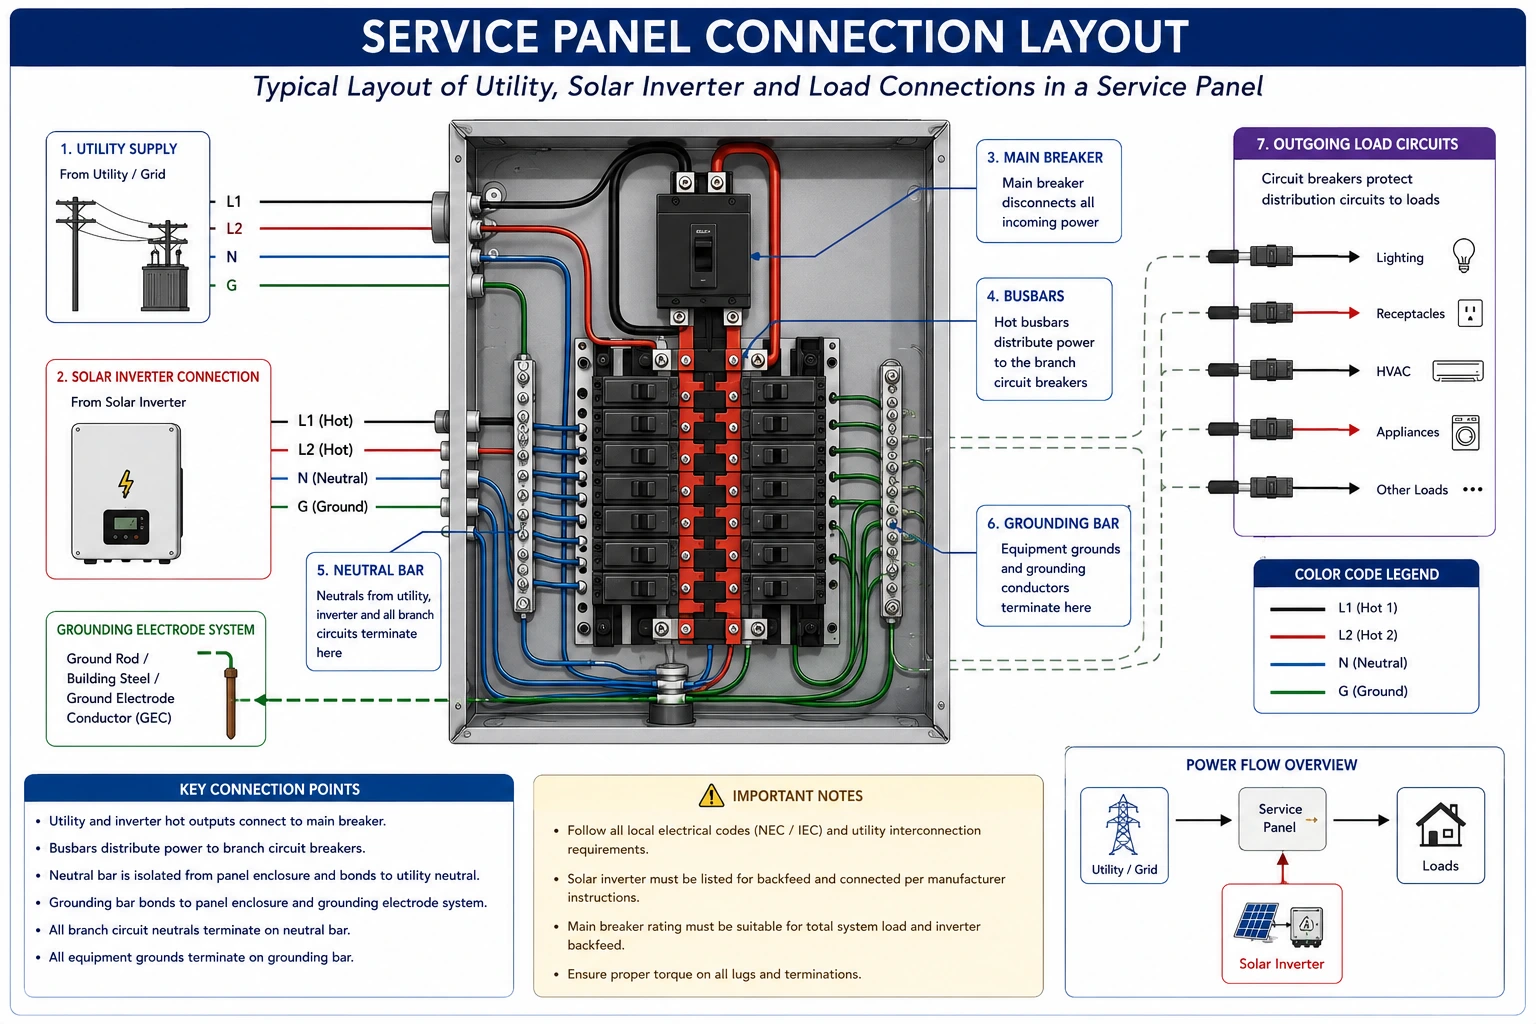
The service panel, also known as the main electrical distribution panel, is one of the most critical components in a grid-connected solar photovoltaic (PV) system. It serves as the central point where electricity from the utility grid, solar inverter, energy meter, and electrical loads is distributed throughout the building or facility. Proper service panel connections ensure the safe transfer of electrical power, efficient system performance, and compliance with electrical codes and utility regulations.
Loose terminals, corroded connections, improper cable sizing, overloaded breakers, damaged busbars, incorrect grounding, or poor workmanship inside the service panel can lead to voltage drops, overheating, equipment failure, nuisance breaker trips, reduced solar electricity generation, and even electrical fires. Therefore, routine inspection and maintenance of service panel connections are essential for maintaining the safety, reliability, and efficiency of residential, commercial, industrial, and utility-scale solar installations.
During commissioning, preventive maintenance, and troubleshooting, technicians must verify that all electrical connections within the service panel are mechanically secure, electrically sound, properly labeled, and installed according to manufacturer specifications and applicable standards. A systematic inspection helps identify potential issues before they affect system performance or create safety hazards.
Checking service panel connections is a fundamental maintenance activity for solar installers, commissioning engineers, EPC contractors, and operations and maintenance (O&M) professionals.
This comprehensive guide explains the importance of service panel inspections, common faults, testing procedures, required tools, documentation practices, safety precautions, and industry best practices.
What Is a Service Panel?
A service panel is the main electrical distribution point where electrical power is received from the utility grid and distributed to various circuits within a building.
In a grid-connected solar PV installation, the service panel typically connects:
- Solar inverter AC output
- Utility supply
- Main circuit breaker
- Distribution breakers
- Energy meter
- Grounding system
- Building electrical loads
It acts as the interface between the solar PV system and the building’s electrical network.
Why Is Checking Service Panel Connections Important?
Routine inspections help to:
- Prevent loose electrical connections
- Reduce overheating
- Minimize voltage drops
- Improve the renewable solar system efficiency
- Increase solar electricity generation
- Prevent equipment damage
- Reduce fire hazards
- Improve electrical safety
Proper service panel maintenance ensures reliable long-term system operation.
Common Problems Found in Service Panels
Technicians frequently encounter:
- Loose terminals
- Corroded connections
- Burnt insulation
- Damaged busbars
- Overheated breakers
- Incorrect cable sizes
- Improper grounding
- Moisture ingress
- Dust accumulation
- Poor labeling
Early detection prevents costly repairs.
Causes of Service Panel Connection Failures
Common causes include:
- Improper installation
- Insufficient tightening torque
- Thermal expansion and contraction
- Vibration
- Corrosion
- Moisture exposure
- Overloading
- Aging electrical components
- Poor workmanship
- Environmental contamination
Routine inspections help reduce these risks.
Tools Required
Technicians commonly use:
- Digital multimeter
- Clamp meter
- Insulation resistance tester
- Infrared thermal camera
- Torque wrench
- Screwdriver set
- Voltage tester
- Inspection flashlight
- Personal Protective Equipment (PPE)
Only calibrated instruments should be used for testing.
Step-by-Step Inspection Procedure
Step 1 – Ensure Safety
Before beginning work:
- Follow Lockout/Tagout (LOTO) procedures where applicable.
- Isolate equipment if required.
- Wear appropriate PPE.
- Verify the work area is safe.
Safety should always be the highest priority.
Step 2 – Review Electrical Drawings
Verify:
- Single-line diagram (SLD)
- Service panel layout
- Circuit identification
- Breaker ratings
- Cable schedule
Understanding the panel configuration improves inspection accuracy.
Step 3 – Perform Visual Inspection
Inspect the service panel for:
- Dust
- Moisture
- Corrosion
- Burn marks
- Loose components
- Damaged insulation
- Missing labels
- Foreign objects
Clean and repair as necessary.
Step 4 – Inspect Cable Connections
Check:
- Incoming utility cables
- Inverter AC output cables
- Load cables
- Neutral conductors
- Grounding conductors
Verify that cables are securely terminated and free from damage.
Step 5 – Verify Tightness of Connections
Using a calibrated torque wrench:
- Check all accessible terminals according to the manufacturer’s torque specifications.
Loose connections are one of the leading causes of overheating.
Step 6 – Inspect Circuit Breakers
Verify:
- Proper installation
- Secure mounting
- Correct ratings
- Smooth mechanical operation
- No signs of overheating
Replace defective breakers when necessary.
Step 7 – Inspect Busbars
Examine busbars for:
- Corrosion
- Burn marks
- Discoloration
- Cracks
- Loose mounting
Busbars should remain clean and mechanically secure.
Step 8 – Check Grounding Connections
Verify:
- Ground busbar
- Equipment grounding conductor
- Neutral-ground bonding (where applicable)
- Earthing conductor continuity
Proper grounding improves electrical safety.
Step 9 – Measure Electrical Parameters
Using appropriate instruments:
Measure:
- Voltage
- Current
- Phase balance
- Neutral voltage
Verify readings are within design limits.
Step 10 – Perform Thermal Inspection
Use an infrared thermal camera to identify:
- Hot terminals
- Loose connections
- Overheated breakers
- Busbar heating
- Uneven temperature distribution
Abnormal heating indicates excessive resistance or poor electrical contact.
Step 11 – Verify Panel Labeling
Ensure that:
- Circuit breakers are clearly labeled.
- Warning labels are present.
- Solar disconnects are identified.
- Emergency shutdown information is available where required.
Proper labeling improves maintenance safety.
Step 12 – Perform Functional Verification
After inspection:
Verify:
- Stable inverter operation
- Proper AC voltage
- Correct breaker status
- Normal energy flow
- Reliable power generation
Ensure the system operates normally after maintenance.
Step 13 – Prepare the Inspection Report
Document:
- Inspection date
- Panel identification
- Voltage measurements
- Thermal inspection findings
- Loose connections found
- Corrective actions
- Technician details
Proper documentation supports preventive maintenance.
Common Faults and Corrective Actions
Fault | Corrective Action |
Loose terminal | Tighten to the manufacturer’s torque specifications |
Corroded connection | Clean or replace affected components |
Overheated breaker | Replace after identifying the root cause |
Burnt insulation | Replace damaged conductors |
Improper grounding | Repair the grounding system |
Missing labels | Install permanent identification labels |
Conclusion
Routine inspection of service panel connections is essential for maintaining the safety, reliability, and efficiency of solar PV systems. As the central point for power distribution between the utility grid, solar inverter, and electrical loads, the service panel must have secure electrical connections, properly functioning protective devices, effective grounding, and correctly labeled circuits. By performing systematic visual inspections, verifying terminal tightness, measuring electrical parameters, conducting thermal inspections, and correcting identified issues promptly, technicians can prevent equipment failures, reduce downtime, and ensure uninterrupted solar electricity generation.
Checking service panel connections is a core maintenance responsibility for solar installers, EPC contractors, commissioning engineers, and operations and maintenance professionals. Furthermore, following technical recommendations and safety practices promoted by the Ministry of New and Renewable Energy, together with manufacturer guidelines and local electrical standards, ensures that service panels operate safely, efficiently, and in compliance with industry requirements.
By implementing regular inspection schedules, using calibrated testing instruments, maintaining detailed maintenance records, correcting loose or damaged connections without delay, and following preventive maintenance best practices, solar professionals can optimize solar panel system cost, enhance renewable solar system reliability, maximize solar electricity generation, reduce the cost of solar per kWh installed, and ensure the long-term success of residential, commercial, industrial, and utility-scale solar energy projects.
FAQs
Q1. Why are service panel connections important in a solar PV system?
Ans: Service panel connections distribute electricity between the utility grid, solar inverter, and building loads. Secure and properly maintained connections ensure safe operation, minimize energy losses, and reduce the risk of electrical faults.
Q2. What are the most common faults found in service panels?
Ans: Common faults include loose terminals, overheated breakers, corroded connections, damaged insulation, improper grounding, overloaded circuits, and missing or incorrect labels.
Q3. Why should a thermal inspection be performed on a service panel?
Ans: An infrared thermal inspection helps identify loose or high-resistance connections, overloaded breakers, and overheating components that may not be visible during a standard visual inspection.
Q4. How often should service panel connections be inspected?
Ans: Service panels should be inspected during commissioning, scheduled preventive maintenance, annual inspections, after major electrical faults, or whenever abnormal system behavior is observed, in accordance with manufacturer recommendations.
Q5. What should be done if a loose connection is found inside the service panel?
Ans: The connection should be tightened using the manufacturer’s recommended torque specifications after ensuring the circuit is safe to work on. The surrounding components should also be inspected for signs of overheating or damage before returning the system to service.
Photovoltaic Power Output Explained: A Practical Guide for Homes & Businesses
Photovoltaic power output determines how much electricity a solar system can generate. This simple guide explains PV output, how it is calculated, and what it means for homes and businesses planning to go solar.
Solar Charge Controller Explained: Purpose, Need & Advantages
A charge controller is a vital component of any solar system. Learn what it does, how it works, and why a solar system cannot function safely without it.
Different Technical Parameters and Performance of a Solar PV Module
Earthing and lightning protection are critical safety components in solar PV installations. This guide explains their importance, types, components, and best practices for solar installers.
How Are Solar PV Modules Made? Complete Guide to the Manufacturing Process
Choosing the right solar panels can be confusing with so many options in the market. This guide simplifies solar panel selection by comparing types, efficiency ratings, and cost factors. Whether for your home, business, or industry, learn how to make an informed decision and maximize the return on your solar investment.
Electrical Hazards in Solar PV Systems Guide
A complete guide to identifying electrical hazards in solar PV systems, covering shock, arc flash, DC voltage, wiring, grounding, and electrical fire risks.
Solar Panel Installation on Tiled Roofs: Complete Homeowner Guide
When you’re ready to install solar panels on your home, there are many factors that will determine the unique design and cost of your solar system. Various roof types require different processes for installation. For example, lightweight tile roofs can present unique challenges and considerations for a solar installer. Here are a few things you need to know before adding solar energy to your tile roof.
How to Identify the Type of Footing Required for Solar PV Installations: Complete Guide
Learn how to identify the right footing for solar PV installations based on soil conditions, load requirements, and site factors. This complete guide covers different foundation types, selection criteria, and practical insights for safe and efficient solar system design.
Solar PV Module Damage Inspection & Quality Checks in Solar EPC
A practical solar panel unpacking guide covering safe handling, on-site precautions, and key do’s and don’ts to avoid module damage.