
Accurate measurement of DC voltages and currents is one of the most important activities during the installation, commissioning, troubleshooting, and maintenance of solar photovoltaic (PV) systems. Solar modules generate direct current (DC) electricity, and the performance of every string and array must be verified to ensure that the system is operating according to design specifications.
By measuring DC voltage and current values at different points within the solar PV system, installers can identify wiring issues, faulty modules, damaged connectors, shading problems, string mismatches, and performance losses before they affect overall energy production. These measurements also help verify that the system is safe to energize and ready for commissioning.
Whether the project is a residential rooftop installation, a commercial solar plant, an industrial renewable solar project, or a utility-scale solar power station, DC electrical testing is an essential quality assurance procedure. Proper testing supports efficient solar electricity generation, improves system reliability, and helps optimize solar panel system cost.
Measurement and verification of DC electrical parameters are critical steps in ensuring the safe and effective operation of solar PV systems.
This comprehensive guide explains how to measure DC voltages and currents for each string and array, the tools required, testing procedures, safety precautions, interpretation of results, and best practices.
Understanding DC Electrical Parameters in Solar PV Systems
Solar modules produce direct current electricity when exposed to sunlight.
Two of the most important electrical parameters are:
DC Voltage (V)
- Voltage represents the electrical potential generated by solar modules.
DC Current (A)
- Current represents the flow of electrical charge produced by the solar modules.
Together, voltage and current determine the power output of a solar PV system.
Why Measure DC Voltages and Currents?
DC measurements help verify that:
- Solar strings are correctly wired
- Modules are functioning properly
- Electrical connections are secure
- System performance matches design expectations
- Equipment can be safely commissioned
Testing also helps identify:
- Open circuits
- Short circuits
- Faulty modules
- Connector failures
- Shading effects
- String mismatches
Understanding Solar Strings and Arrays
Before testing, installers should understand the difference between strings and arrays.
Solar String
A string consists of multiple solar modules connected together, usually in series.
Characteristics:
- Voltage increases
- Current remains relatively constant
Solar Array
An array consists of multiple strings connected together.
Characteristics:
- Overall power increases
- Current may increase depending on configuration
Key Electrical Parameters to Measure
1. Open-Circuit Voltage (Voc)
- Open-circuit voltage is measured when the circuit is not connected to a load.
Purpose
- Verify string wiring
- Confirm module count
- Detect disconnected modules
2. Operating Voltage
Measured while the system is functioning under load.
Purpose
- Verify system performance
- Compare actual values with design expectations
3. Short-Circuit Current (Isc)
Short-circuit current is measured when the output terminals are shorted through appropriate testing equipment.
Purpose
- Verify module output
- Detect underperforming strings
4. Operating Current
Current measured during normal operation.
Purpose
- Assess real-world performance
- Compare string outputs
Why String-Level Testing is Important
Testing individual strings helps identify:
- Faulty modules
- Loose connectors
- Wiring errors
- Partial shading issues
- String imbalance
Problems can often be detected before they affect the entire renewable solar system.
Why Array-Level Testing is Important
Array-level measurements verify:
- Total system output
- Combined string performance
- Overall electrical integrity
This testing is particularly important during commissioning.
Tools Required for Measuring DC Voltages and Currents
1. Digital Multimeter (DMM)
The most commonly used solar testing instrument.
Functions
- Measure DC voltage
- Measure resistance
- Verify continuity
Applications
- String testing
- Module verification
- Troubleshooting
2. DC Clamp Meter
Used to measure current without disconnecting conductors.
Benefits
- Fast measurements
- Improved safety
- Minimal disruption
3. Solar PV Analyzer
A specialized instrument for solar system testing.
Measures
- Voltage
- Current
- Power
- Performance metrics
4. I-V Curve Tracer
Used for advanced performance analysis.
Functions
- Measure voltage-current characteristics
- Identify module degradation
- Detect mismatch losses
5. Test Leads and MC4 Adapters
Provide safe electrical connections during testing.
Pre-Test Inspection Requirements
Before performing measurements:
Verify Weather Conditions
- Testing should be conducted during adequate sunlight conditions.
Inspect Modules
Check for:
- Damage
- Cracks
- Soiling
- Hot spots
Verify Electrical Connections
Inspect:
- Connectors
- Junction boxes
- Combiner boxes
Confirm Safety Measures
- Use appropriate PPE and follow lockout/tagout procedures when required.
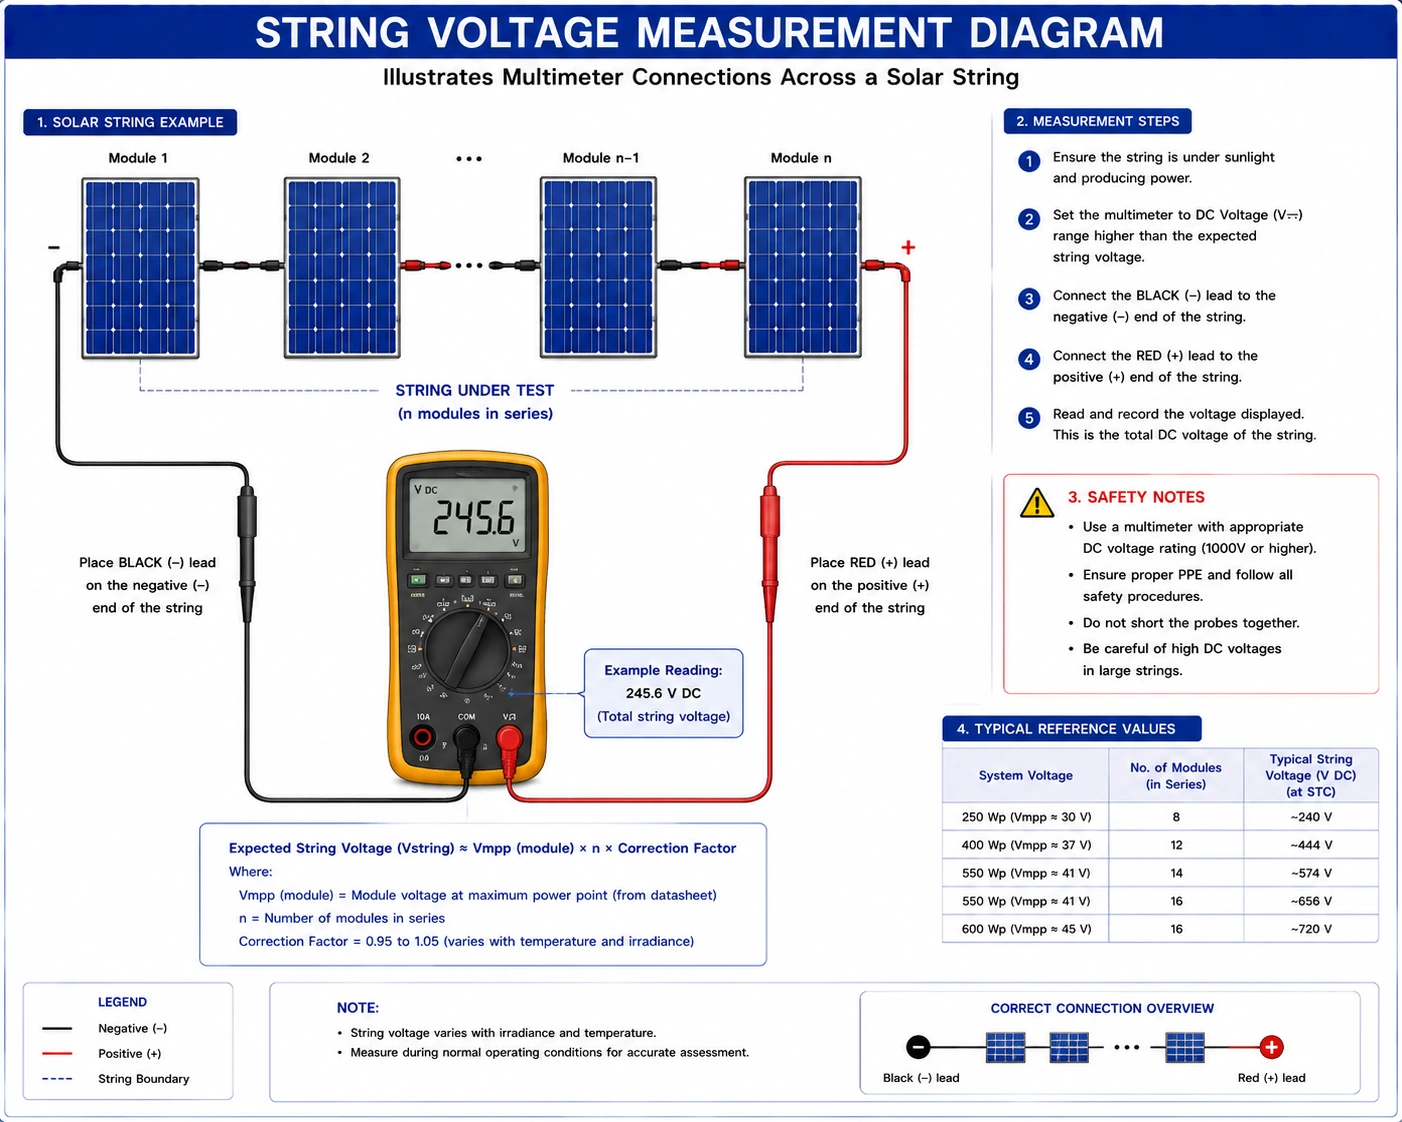
Step-by-Step Procedure for Measuring String Voltage
Step 1 – Review System Design Documents
Examine:
- Single Line Diagram (SLD)
- String layout drawings
- Module specifications
Step 2 – Isolate the String
- Follow approved testing procedures. Ensure safe access to testing points.
Step 3 – Set Multimeter to DC Voltage Mode
- Verify meter settings before connecting.
Step 4 – Connect Test Leads
Measure voltage across:
- Positive conductor
- Negative conductor
Step 5 – Record Voltage Reading
- Compare measured values with expected string voltage.
Step 6 – Analyze Results
Abnormal readings may indicate:
- Wiring errors
- Module failures
- Connector issues
Step-by-Step Procedure for Measuring String Current
Step 1 – Use a DC Clamp Meter
- Select an appropriate current range.
Step 2 – Clamp Around the String Conductor
- Ensure only one conductor is inside the clamp.
Step 3 – Record Current Reading
- Measure each string individually.
Step 4 – Compare String Currents
Significant differences between strings may indicate:
- Shading
- Faulty modules
- Dirty panels
- Loose connections
Step-by-Step Procedure for Measuring Array Voltage
Step 1 – Access Array Output Point
Typically at:
- DC combiner box
- Inverter DC input
Step 2 – Measure DC Voltage
Record array voltage using a properly rated meter.
Step 3 – Compare with Design Values
Confirm that measured values are within acceptable limits.
Step-by-Step Procedure for Measuring Array Current
Step 1 – Use a DC Clamp Meter
Measure the current at the array output.
Step 2 – Record Measurements
Compare with expected production values.
Step 3 – Evaluate Performance
Unexpected results may indicate issues affecting the entire array.
Factors Affecting Voltage Measurements
Several factors influence voltage readings.
Solar Irradiance
- Higher sunlight intensity generally increases power production.
Temperature
- Higher module temperatures typically reduce voltage output.
Module Condition
- Damaged modules may produce lower voltage.
Wiring Quality
- Poor connections can affect electrical performance.
Factors Affecting Current Measurements
Irradiance Levels
Current is strongly influenced by sunlight intensity.
Shading
Even minor shading can significantly reduce current output.
Dirt and Soiling
Accumulated dirt lowers energy production.
Module Degradation
Aging modules may produce lower current.
Typical Reasons for Abnormal Readings
Low Voltage
Possible causes:
- Faulty modules
- Incorrect wiring
- Damaged connectors
High Voltage
Possible causes:
- Incorrect string configuration
- Design errors
Low Current
Possible causes:
- Shading
- Soiling
- Module degradation
Unequal String Currents
Possible causes:
- Module mismatch
- Wiring issues
- Faulty connectors
Conclusion
Measuring DC voltages and currents for each string and array is an essential part of solar PV installation, commissioning, and maintenance. Accurate testing ensures that solar modules, strings, and arrays are functioning correctly, helps identify faults early, improves system reliability, and enhances overall energy production.
Verification of DC electrical parameters is a key quality assurance activity in renewable solar systems. Furthermore, following guidelines and best practices promoted by the Ministry of New and Renewable Energy helps ensure safe and compliant solar electricity generation.
By using calibrated instruments, following approved testing procedures, documenting results thoroughly, and investigating abnormal readings promptly, solar installers and EPC professionals can optimize solar panel system cost, improve renewable energy technology performance, and ensure the successful operation of residential, commercial, industrial, and utility-scale solar PV projects.
FAQs
Q1. Why is string voltage measurement important in solar PV systems?
Ans: String voltage measurement helps verify correct wiring, module performance, and compliance with system design specifications.
Q2. Which tool is commonly used to measure DC current in solar strings?
Ans: A DC clamp meter is commonly used because it allows current measurement without disconnecting conductors.
Q3. What causes low string current readings?
Ans: Common causes include shading, dirty modules, faulty connections, module degradation, or damaged components.
Q4. Why should all strings be tested individually?
Ans: Individual testing helps identify underperforming strings and locate faults that may not be visible at the array level.
Q5. When should DC voltage and current measurements be performed?
Ans: Measurements are typically performed during installation, commissioning, maintenance inspections, and troubleshooting activities.
Battery Troubleshooting in Solar PV Systems Guide
A complete guide to battery troubleshooting in solar PV systems, including fault diagnosis, performance testing, common battery issues, and effective corrective measures.
Grounding Conductor Sizing for Solar PV Systems
A complete guide to determining grounding conductor size for solar PV systems, ensuring safe, compliant, and reliable installations.
Agrivoltaics: Merging Solar Power with Farming
Discover how solar batteries store excess energy, maximize your solar system’s efficiency, and provide reliable power during outages. Learn about the types, benefits, lifespan, and maintenance tips to make the most of your solar investment.
Preventive Measures for PV Installers
A complete solar PV safety guide covering essential preventive measures for installers, from PPE and electrical safety to fall protection and emergency preparedness.
Cable and Conduit Labeling in Solar PV Systems
A complete guide to cable termination in solar installations, including tools, step-by-step methods, and best practices for safe connections.
Best Solar Panels for Rooftop Projects: How to Choose the Right One
Selecting the right solar panel is crucial for rooftop project success. This guide explains how to evaluate panel types, efficiency, warranties, and performance to ensure maximum power output and long-term savings for your home or business.
Solar Inverter Stand Installation: Step-by-Step Guide
A step-by-step guide to solar inverter stand installation as per drawings and manuals, ensuring proper alignment, stability, and safety.
Single Line Diagram (SLD) in Solar PV Systems: Complete Guide to Design, Symbols & Reading
Learn how to fetch a Bill of Material (BOM) for a solar PV system directly from design documents like SLD, layout, and GA drawings. This step-by-step guide helps installers and EPCs ensure accurate material estimation and efficient project execution.