
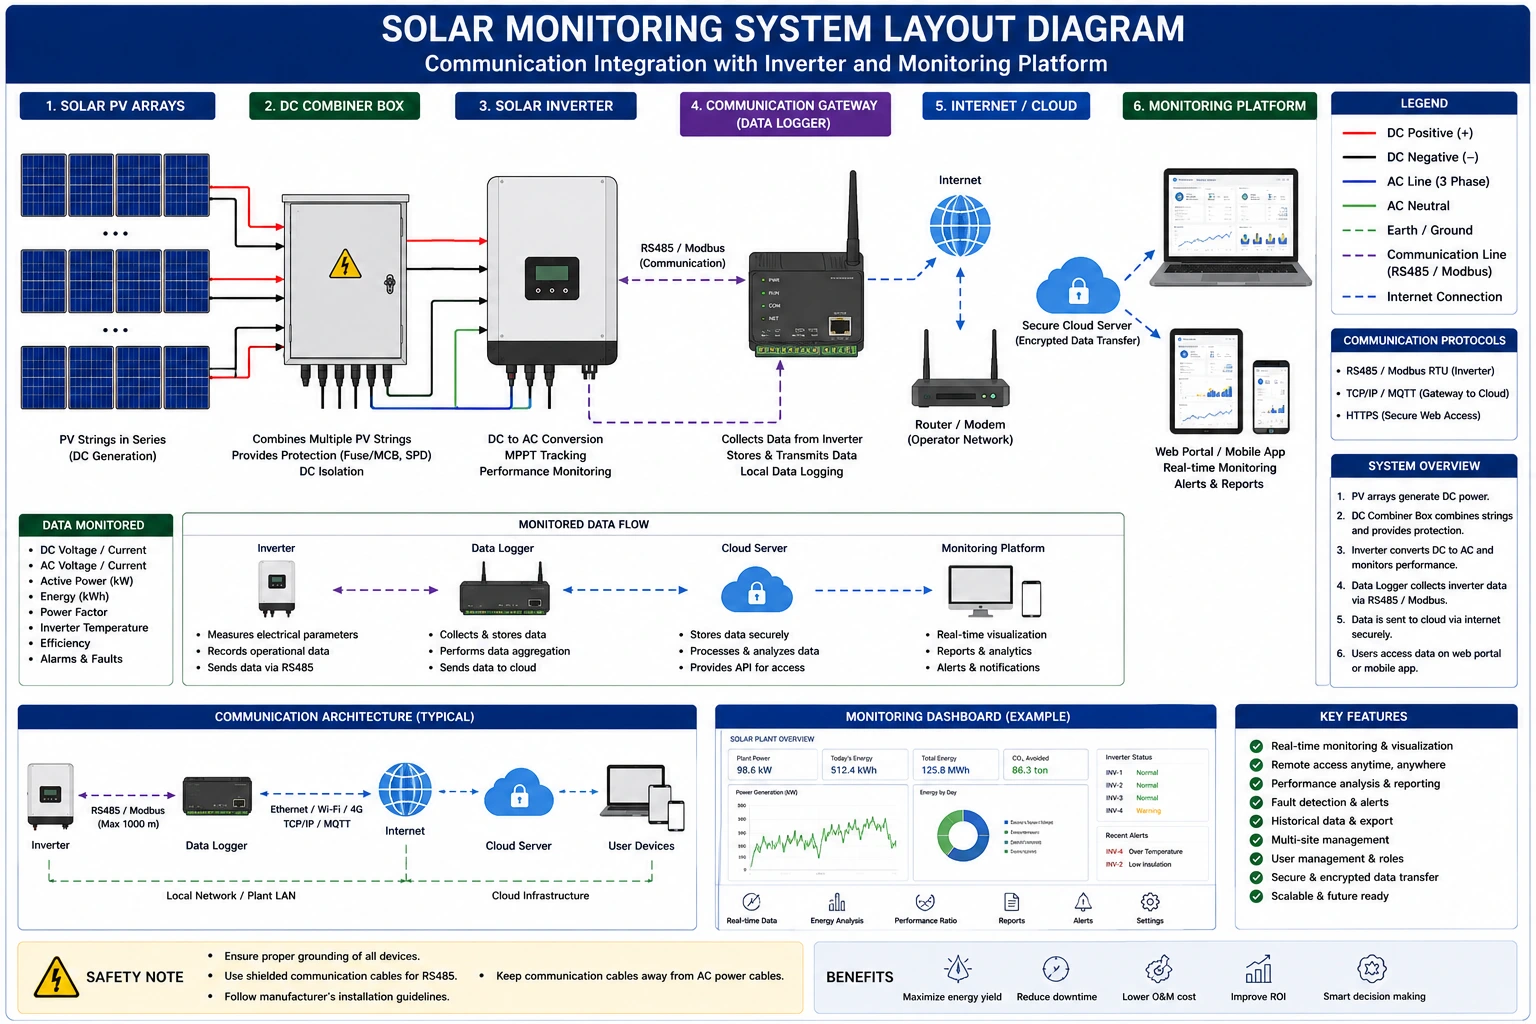
In solar photovoltaic (PV) systems, accurate monitoring of energy generation is essential for evaluating system performance, detecting faults, and ensuring efficient solar electricity generation. One of the key devices used for this purpose is the DC Energy Meter.
A DC energy meter measures the DC electrical energy generated by solar panels before it is converted into AC power by the inverter. Proper installation of DC energy meters helps installers, EPC companies, and system owners monitor performance, reduce losses, and optimize solar panel system cost.
Incorrect installation or improper meter selection can lead to inaccurate readings, operational issues, and increased solar installation charges. Proper metering and monitoring are important aspects of renewable solar installations.
This blog provides a complete step-by-step guide for installing DC energy meters in solar PV systems, including components, installation practices, safety precautions, and maintenance tips.
What is a DC Energy Meter?
A DC energy meter is a device used to measure:
- DC voltage
- DC current
- Power generation
- Total energy output (kWh)
It is commonly installed between:
- Solar PV array and inverter
- DC combiner box and inverter
Importance of DC Energy Meters in Solar PV Systems
1. Performance Monitoring
Tracks energy generated by solar panels.
2. Fault Detection
Helps identify underperforming strings or equipment.
3. Energy Analysis
Provides data for efficiency evaluation.
4. Billing and Reporting
Useful for commercial and industrial systems.
5. Optimized Solar Electricity Generation
Supports performance improvement.
Components Required for Installation
1. DC Energy Meter
Select meter compatible with system voltage and current.
2. Current Sensor / Shunt
Measures DC current flow.
3. Voltage Input Connections
Measures system voltage.
4. DC Cables and Connectors
Ensure proper electrical connections.
5. Mounting Accessories
DIN rail or panel mounting hardware.
Tools Required for Installation
- Insulated screwdrivers
- Wire stripper
- Crimping tool
- Multimeter
- Torque wrench
- Insulation tester
Pre-Installation Preparation
1. Review System Drawings
Understand:
- Wiring configuration
- Meter location
- Current and voltage ratings
2. Verify Meter Specifications
Check compatibility with:
Maximum working voltage
- Current rating
- Communication protocols
3. Inspect Installation Area
Ensure:
- Accessibility
- Proper ventilation
- Safe mounting surface
Step-by-Step Installation Procedure
Step 1 – Isolate the DC Circuit
- Turn off inverter and DC disconnects
- Ensure safe working condition
Step 2 – Select Mounting Location
Install the meter:
- Near combiner box or inverter
- In accessible and protected location
Step 3 – Mount the DC Energy Meter
- Secure meter on panel or DIN rail
- Ensure stable installation
Step 4 – Install Current Sensor or Shunt
- Connect according to wiring diagram
- Ensure correct polarity
Step 5 – Connect Voltage Input Wires
- Connect DC voltage terminals
- Verify polarity and tightness
Step 6 – Connect Communication Cables (If Applicable)
- Connect RS485 or monitoring cables
- Ensure proper termination
Step 7 – Tighten All Connections
- Use torque wrench as per specifications
- Prevent loose connections
Step 8 – Verify Grounding and Safety
- Ensure proper earthing
- Check insulation integrity
Step 9 – Energize the System
- Restore DC supply carefully
- Turn on inverter
Step 10 – Test Meter Operation
Verify:
- Voltage readings
- Current readings
- Energy data accuracy
Quality Checks After Installation
1. Connection Tightness
Ensure secure terminals.
2. Reading Accuracy
Compare with inverter data if available.
3. Proper Labeling
Identify circuits clearly.
4. Communication Functionality
Verify monitoring connectivity.
Applications of DC Energy Meters
1. Residential Solar Systems
Used for monitoring rooftop generation.
2. Commercial Solar Plants
Tracks energy production and efficiency.
3. Utility-Scale Projects
Provides detailed performance data.
Conclusion
The installation of DC energy meters is a critical step in ensuring accurate monitoring and efficient operation of solar PV systems. By following proper installation procedures, maintaining electrical safety, and verifying meter performance, installers can improve system reliability and energy tracking.
Monitoring and measurement are important aspects of renewable solar system management. Additionally, compliance with guidelines from the Ministry of New and Renewable Energy ensures safe and standardized installations.
With correct metering practices, solar professionals can optimize solar panel system cost, improve solar electricity generation monitoring, and support sustainable solar energy for home use and advanced renewable energy technology solutions.
FAQs
Q1. What is a DC energy meter used for?
Ans: It measures DC power and energy generated by solar panels.
Q2. Where is a DC energy meter installed?
Ans: Usually between the solar array and inverter.
Q3. Why is polarity important during installation?
Ans: Incorrect polarity can damage the meter and provide inaccurate readings.
Q4. Does installing a DC energy meter improve solar panel system cost efficiency?
Ans: Yes, it helps monitor performance and reduce operational losses.
Q5. What safety measures are necessary during installation?
Ans: Use PPE, isolate circuits, and use insulated tools.
How the RESCO Model Works in Solar: A Complete Guide for Industries
The RESCO model allows businesses to adopt solar with zero upfront investment. Under this model, a developer installs, owns, and operates the solar plant while you simply pay for the power you consume—making clean energy both affordable and hassle-free.
Solar String Sizing Check: Did Your Installer Get It Right?
Worried your rooftop solar strings might be sized incorrectly? Check these tips to ensure your Solar PV system is installed for maximum efficiency and safety
100 kW Solar Plant Cost in Rajasthan: Latest Cost, Maintenance & Payback Time
Installing a 100 kW solar plant in Rajasthan costs around ₹40–60 lakh in, with annual savings up to ₹10–12 lakh. Discover maintenance needs, ROI, and payback period of 4–6 years.
Service Panel Inspection Guide for Solar PV Systems
A complete guide to inspecting service panel connections in solar PV systems, including connection verification, electrical safety checks, preventive maintenance, and troubleshooting techniques.
How to Connect a Solar Panel to an MPPT Charge Controller: Step-by-Step Guide
This guide explains how to connect a solar panel to an MPPT charge controller step by step. Learn correct wiring, safety tips, and best practices to ensure efficient and reliable solar power performance.

How MPPT Works in an Inverter: A Simple Guide for Solar Users
This simple guide explains how MPPT works in a solar inverter, helping users understand how it maximizes power output and improves system efficiency.
Commercial Solar Power Plant Subsidy in India: What Businesses Need to Know
Businesses in India can reduce their solar installation costs through various MNRE-backed subsidies and state incentives. Learn eligibility, benefits, and the application process for commercial solar plants.
Solar Charge Controller Explained: Purpose, Need & Advantages
A charge controller is a vital component of any solar system. Learn what it does, how it works, and why a solar system cannot function safely without it.