
Charge controllers are one of the most important components of solar photovoltaic (PV) systems, particularly in off-grid and hybrid installations that incorporate battery storage. Their primary function is to regulate the flow of electricity from the solar PV array to the battery bank, ensuring that batteries are charged safely, efficiently, and according to their specified charging profile. By preventing overcharging, excessive discharging, reverse current flow, and battery damage, charge controllers significantly improve the reliability, safety, and lifespan of the entire renewable solar system.
Modern solar charge controllers are available in two primary types: Pulse Width Modulation (PWM) and Maximum Power Point Tracking (MPPT). While PWM controllers offer a simple and cost-effective solution for smaller systems, MPPT controllers maximize energy harvest by continuously tracking the maximum power point of the solar array, improving charging efficiency and increasing solar electricity generation. Regardless of the technology used, charge controllers can develop faults due to improper installation, loose wiring, incorrect battery settings, environmental conditions, firmware issues, overheating, damaged sensors, or component aging.
A faulty charge controller can lead to undercharged batteries, battery overcharging, reduced charging efficiency, inverter shutdowns, shortened battery life, and interruptions in power supply. Therefore, routine inspection and systematic troubleshooting of charge controllers are essential maintenance activities for solar installers, commissioning engineers, EPC contractors, and Operations & Maintenance (O&M) professionals.
Effective troubleshooting involves inspecting wiring connections, reviewing controller settings, verifying electrical parameters, checking battery charging performance, monitoring controller status indicators, reviewing error logs, testing communication systems, and implementing corrective actions based on manufacturer recommendations. Rather than replacing the controller immediately, technicians should identify the root cause of the problem using structured diagnostic procedures and calibrated testing instruments.
Understanding the operation and troubleshooting of solar charge controllers is an essential competency for professionals involved in the installation, commissioning, testing, and maintenance of solar PV systems.
This comprehensive guide explains common charge controller faults, troubleshooting procedures, testing methods, required tools, documentation practices, safety precautions, and industry best practices.
What Is a Solar Charge Controller?
A charge controller regulates the flow of electrical energy between the solar PV array and the battery bank. It ensures batteries receive the correct charging voltage and current while protecting them from conditions that may reduce performance or lifespan.
Primary functions include:
- Regulating battery charging
- Preventing battery overcharging
- Preventing deep battery discharge
- Blocking reverse current during nighttime
- Optimizing battery charging efficiency
- Monitoring battery health
- Protecting connected electrical equipment
Types of Charge Controllers
1. PWM (Pulse Width Modulation)
PWM controllers:
- Suitable for smaller systems
- Less expensive
- Simpler operation
- Lower conversion efficiency compared to MPPT
2. MPPT (Maximum Power Point Tracking)
MPPT controllers:
- Improve charging efficiency
- Maximize energy harvest
- Operate efficiently over varying irradiance conditions
- Ideal for larger solar panel system cost investments
Why Is Charge Controller Troubleshooting Important?
Routine troubleshooting helps to:
- Maintain battery health
- Improve charging efficiency
- Prevent unexpected system shutdowns
- Extend battery life
- Increase solar electricity generation
- Improve overall renewable solar system reliability
- Reduce maintenance costs
Common Charge Controller Problems
Technicians frequently encounter:
- Battery not charging
- Battery overcharging
- Battery undercharging
- Controller not powering ON
- Display failure
- Incorrect charging voltage
- Communication errors
- Temperature sensor faults
- Reverse polarity alarms
- Overcurrent protection trips
- Overtemperature shutdown
- Firmware errors
- Load output failure
Each fault requires systematic diagnosis.
Common Causes of Charge Controller Faults
Charge controller problems may result from:
- Loose electrical connections
- Incorrect battery configuration
- Incorrect charging profile
- Damaged temperature sensors
- Poor ventilation
- Dust accumulation
- Moisture ingress
- Controller overheating
- Reverse polarity
- Incorrect PV array sizing
- Battery aging
- Firmware issues
- Component degradation
Tools Required
Technicians commonly use:
- Digital multimeter
- Clamp meter
- Battery analyzer
- Insulation resistance tester
- Infrared thermal camera
- Solar irradiance meter
- Temperature meter
- Laptop with controller monitoring software
- Manufacturer diagnostic software
- Personal Protective Equipment (PPE)
All measuring instruments should be calibrated.
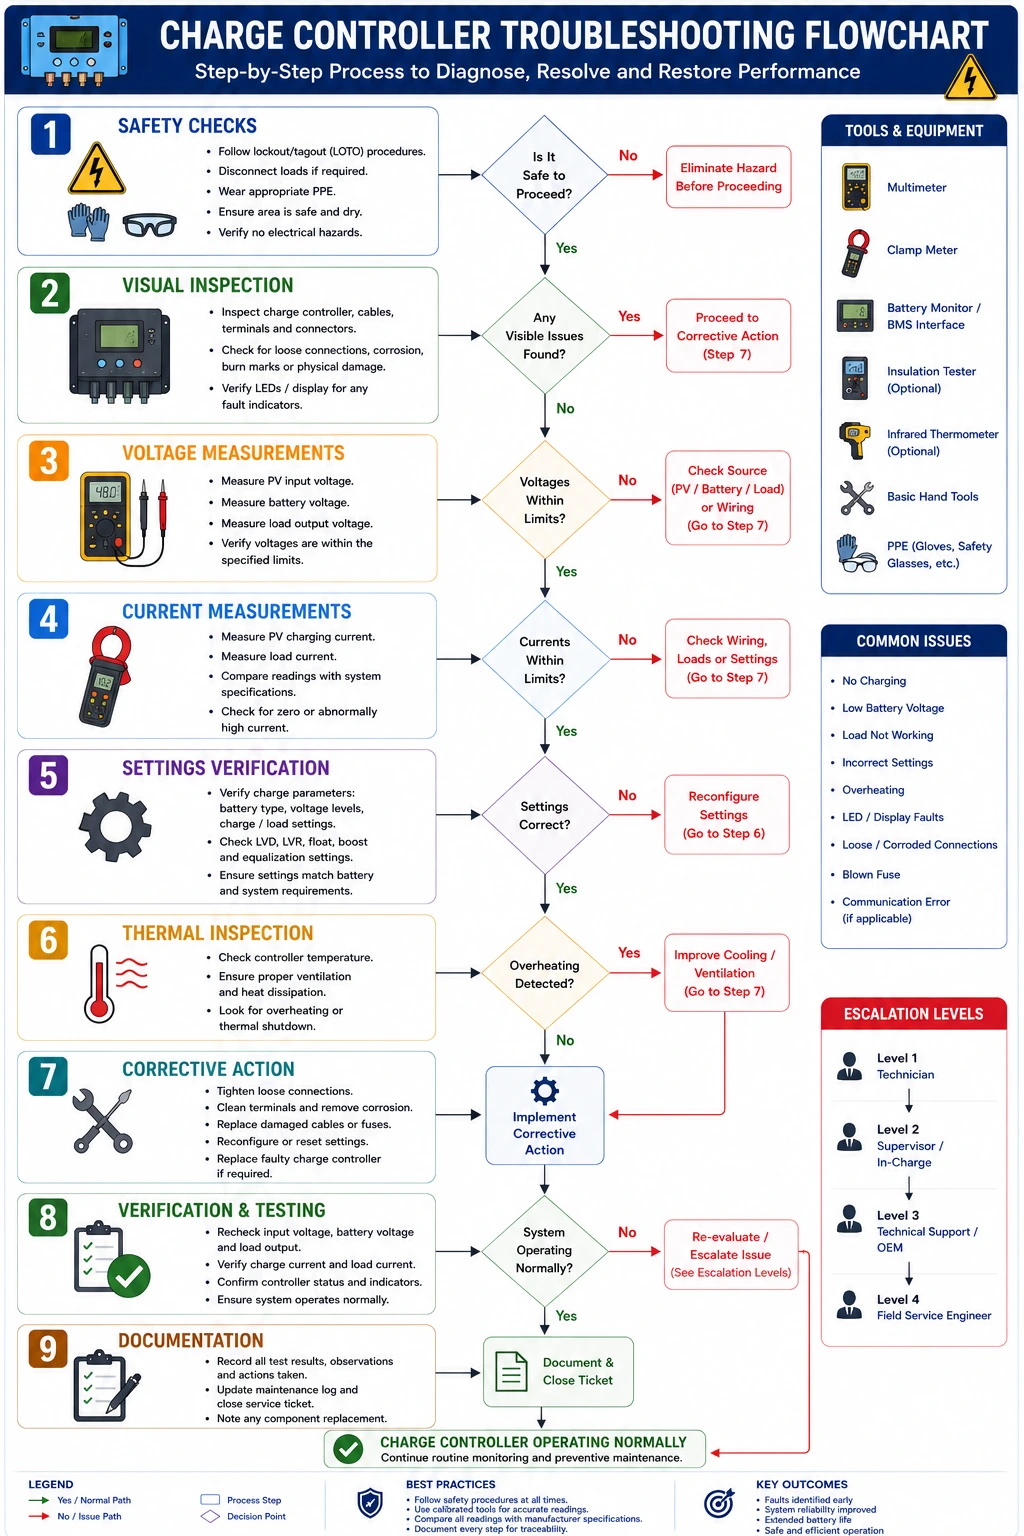
Step-by-Step Charge Controller Troubleshooting Procedure
Step 1 – Ensure Safety
Before inspection:
- Follow Lockout/Tagout (LOTO) procedures where applicable.
- Isolate equipment if necessary.
- Wear appropriate PPE.
- Ensure adequate ventilation.
Safety should always be the highest priority.
Step 2 – Review System Documentation
Check:
- Wiring diagrams
- Controller manual
- Battery specifications
- PV module specifications
- Previous maintenance records
Understanding the system configuration improves troubleshooting accuracy.
Step 3 – Perform a Visual Inspection
Inspect for:
- Burn marks
- Loose wiring
- Corroded terminals
- Damaged insulation
- Dust accumulation
- Moisture ingress
- Cracked enclosure
- Damaged connectors
Visible defects should be corrected immediately.
Step 4 – Verify Controller Status
Review:
- Display screen
- LED indicators
- Error messages
- Alarm notifications
- Event logs
Controller diagnostics provide valuable troubleshooting information.
Step 5 – Measure PV Input Voltage
Using a digital multimeter:
Measure:
- Open circuit voltage (Voc)
- Operating voltage
- Input current
Verify values against system design and manufacturer specifications.
Step 6 – Measure Battery Voltage
Measure:
- Battery resting voltage
- Charging voltage
- Float voltage
- Equalization voltage (where applicable)
Abnormal values may indicate controller configuration or battery faults.
Step 7 – Verify Charging Current
Measure battery charging current.
Compare measured values with:
- Solar irradiance
- Battery State of Charge
- Controller specifications
Unexpected readings may indicate controller malfunction.
Step 8 – Inspect Controller Settings
Verify:
- Battery type selection
- Charging profile
- Voltage limits
- Temperature compensation
- Load settings
Incorrect settings commonly cause charging problems.
Step 9 – Check Temperature Sensors
Inspect:
- Sensor wiring
- Sensor mounting
- Sensor readings
Faulty temperature sensors may cause improper charging.
Step 10 – Perform Thermal Inspection
Using an infrared thermal camera:
Inspect:
- Internal hot spots
- Power terminals
- Heat sinks
- Wiring connections
Excessive heating indicates possible electrical faults.
Step 11 – Verify Communication Systems
Inspect:
- RS485 communication
- CAN communication
- Bluetooth/Wi-Fi modules
- Monitoring software
- Remote monitoring platform
Communication failures may affect system monitoring but not necessarily charging performance.
Step 12 – Implement Corrective Actions
Depending on diagnosis:
- Tighten loose terminals
- Clean electrical connections
- Correct controller settings
- Update firmware
- Replace damaged sensors
- Improve ventilation
- Replace defective controller (if necessary)
Only manufacturer-approved corrective actions should be performed.
Step 13 – Verify System Performance
After repairs:
Confirm:
- Stable charging
- Proper battery voltage
- Correct charging current
- Normal controller operation
- Alarm clearance
- Reliable system performance
Step 14 – Document Findings
Record:
- PV voltage
- Battery voltage
- Charging current
- Controller settings
- Error codes
- Corrective actions
- Final operating status
- Technician details
Proper documentation supports preventive maintenance.
Common Charge Controller Faults and Corrective Actions
Fault | Corrective Action |
Battery not charging | Verify PV input, controller settings, and battery wiring |
Battery overcharging | Check charging profile and voltage settings |
Controller overheating | Improve ventilation and inspect electrical loading |
Reverse polarity alarm | Correct wiring polarity immediately |
Communication failure | Inspect communication cables and configuration |
Display not working | Check power supply and controller electronics |
Benefits of Proper Charge Controller Troubleshooting
Improved Renewable Solar System Efficiency
- Efficient charging improves overall system performance.
Increased Solar Electricity Generation
- Maximum energy harvesting improves battery charging and power availability.
Extended Battery Life
- Correct charging prevents battery damage.
Enhanced System Safety
- Routine inspections reduce electrical hazards.
Lower Maintenance Costs
- Early diagnosis minimizes expensive component replacement.
Conclusion
Charge controllers play a vital role in ensuring the safe and efficient operation of solar PV systems by regulating battery charging, preventing electrical faults, and optimizing energy storage performance. When charging problems occur, a structured troubleshooting approach that includes visual inspections, voltage and current measurements, controller settings verification, communication checks, thermal inspections, and proper documentation enables technicians to identify the root cause accurately and implement effective corrective actions. This systematic process improves battery health, enhances solar electricity generation, and minimizes unnecessary equipment replacement.
Troubleshooting charge controllers is a fundamental competency for solar installers, EPC contractors, commissioning engineers, and operations and maintenance professionals. Furthermore, following technical recommendations and safety practices promoted by the Ministry of New and Renewable Energy, together with manufacturer guidelines and local electrical standards, ensures that charge controller inspections and repairs are carried out safely, accurately, and in compliance with industry requirements.
By conducting regular inspections, maintaining secure electrical connections, verifying charging parameters, using calibrated testing instruments, updating controller settings when required, and maintaining comprehensive maintenance records, solar professionals can optimize solar panel system cost, improve renewable solar system reliability, maximize solar electricity generation, reduce the cost of solar per kWh installed, lower the solar installation cost per kWh, and ensure the long-term success of residential, commercial, industrial, and utility-scale solar energy projects.
FAQs
Q1. What is the primary purpose of a solar charge controller?
Ans: A solar charge controller regulates the flow of electricity from the PV array to the battery bank, preventing overcharging, deep discharge, reverse current flow, and battery damage while ensuring efficient charging.
Q2. What are the most common signs of a faulty charge controller?
Ans: Common signs include batteries not charging properly, overcharging, undercharging, controller overheating, display errors, communication failures, unexpected shutdowns, and alarm messages.
Q3. How can technicians verify that a charge controller is operating correctly?
Ans: Technicians should measure PV input voltage, battery voltage, charging current, verify controller settings, inspect alarm messages, review monitoring data, and compare readings with manufacturer specifications.
Q4. What causes the charge controller overheating?
Ans: Overheating may result from inadequate ventilation, excessive electrical loading, high ambient temperatures, loose electrical connections, blocked cooling vents, or internal electronic faults.
Q5. Why is regular charge controller maintenance important?
Ans: Routine maintenance improves battery charging efficiency, increases solar electricity availability, extends battery service life, enhances renewable solar system reliability, reduces maintenance costs, and helps maximize the return on investment of the solar installation.
Solar System for FMCG Industry: Cost, Benefits, Installation & ROI in India
A complete guide on solar systems for the FMCG industry in India covering installation cost, benefits, ROI, system sizing, and the installation process.

Role of PV Solar Installer in India – Responsibilities, Skills, and Industry Importance
PV solar installers play a critical role in India’s rapidly expanding solar energy sector. From rooftop systems to large-scale industrial projects, skilled installers ensure safe, efficient, and compliant solar plant deployment. This guide explains the responsibilities, technical skills, certifications, and career opportunities for PV solar installers in India, along with their growing importance in supporting the nation’s renewable energy transition.

1 MW Solar Power Plant Cost in Rajasthan: A Complete Guide
A detailed guide on the cost of setting up a 1 MW solar power plant in Rajasthan. Learn about pricing, EPC components, land needs, subsidies, and expected payback for commercial and industrial users.
Poor vs Good Solar Installation: Key Differences Explained
A solar system’s performance depends heavily on installation quality. This blog explains the clear differences between a poor and good solar installation — from wiring practices and panel alignment to mounting structures and system safety — helping you make an informed choice and ensure long-term efficiency.

Solar Energy Myths vs. Facts: What You Should Know
Solar power myths often mislead homeowners. Learn the facts about cost, efficiency, and reliability of solar energy.
Delhi Jal Board Solar Project: A Step Towards Sustainable Energy
Delhi Jal Board has embraced solar power, becoming a leader in renewable energy adoption. This initiative highlights the benefits of solar energy, including cost savings, sustainability, and promoting clean energy practices in institutional operations.

How MPPT Works in an Inverter: A Simple Guide for Solar Users
This simple guide explains how MPPT works in a solar inverter, helping users understand how it maximizes power output and improves system efficiency.
Is Your Solar PV Rooftop System Safe & Protected?
Worried about the safety of your solar rooftop system? Explore key tips, maintenance practices, and protection strategies to keep your Solar PV system secure and efficient